СТБ EN 13480-8-2009
Трубопроводы промышленные металлические. Часть 8. Дополнительные требования к трубам из алюминия и алюминиевого сплава
Купить СТБ EN 13480-8-2009 — бумажный документ с голограммой и синими печатями. подробнее
Цена на этот документ пока неизвестна. Нажмите кнопку "Купить" и сделайте заказ, и мы пришлем вам цену.
Распространяем нормативную документацию с 1999 года. Пробиваем чеки, платим налоги, принимаем к оплате все законные формы платежей без дополнительных процентов. Наши клиенты защищены Законом. ООО "ЦНТИ Нормоконтроль"
Наши цены ниже, чем в других местах, потому что мы работаем напрямую с поставщиками документов.
Способы доставки
- Срочная курьерская доставка (1-3 дня)
- Курьерская доставка (7 дней)
- Самовывоз из московского офиса
- Почта РФ
Устанавливает требования для систем промышленных трубопроводов, изготовленных из алюминия и алюминиевых сплавов, в качестве дополнения к общим требованиям, согласно серии стандартов EN 13480 и CEN/TR 13480-7.
Оглавление
1 Область применения
2 Нормативные ссылки
3 Термины, определения, символы и единицы измерения
4 Общие требования
5 Материалы
6 Проектирование
7 Изготовление и установка
8 Проверки и испытания
9 Заключительная оценка и документация
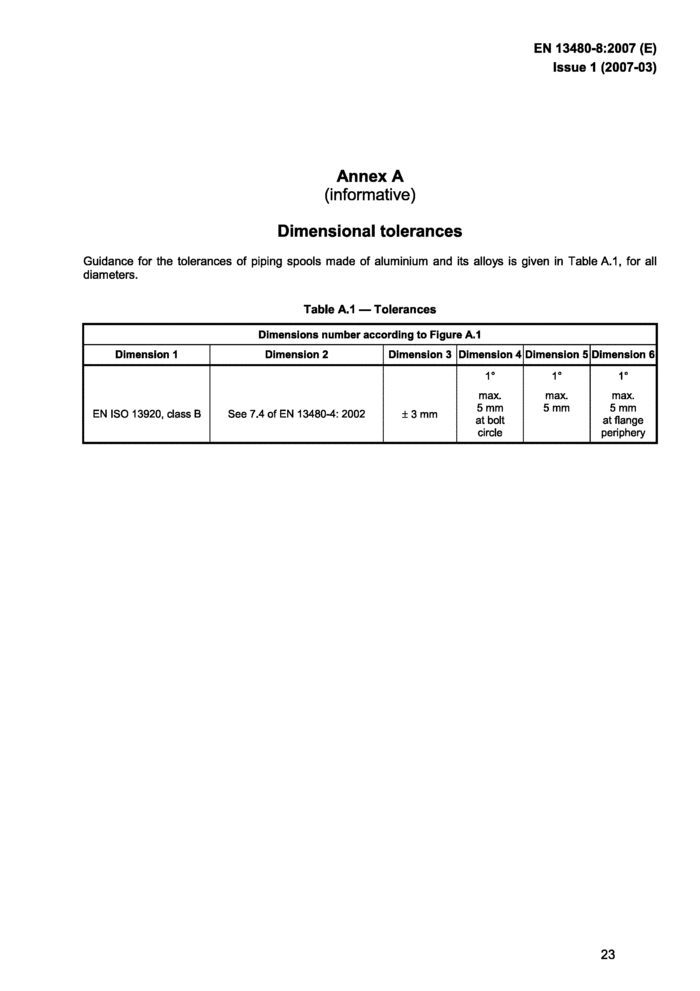
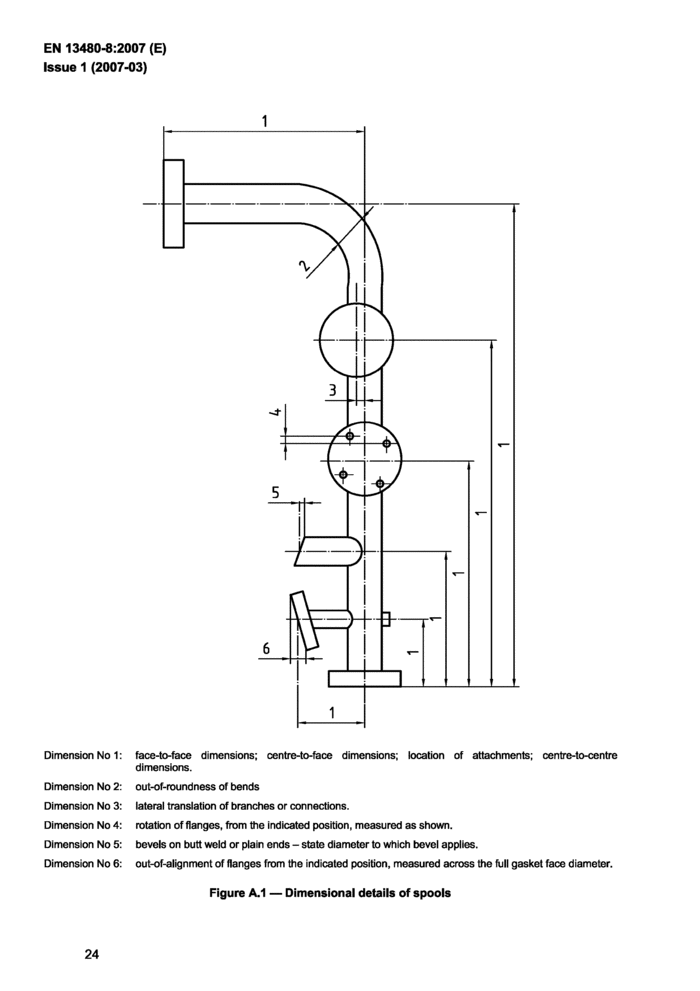
Приложение A (информационное) Допуски размеров
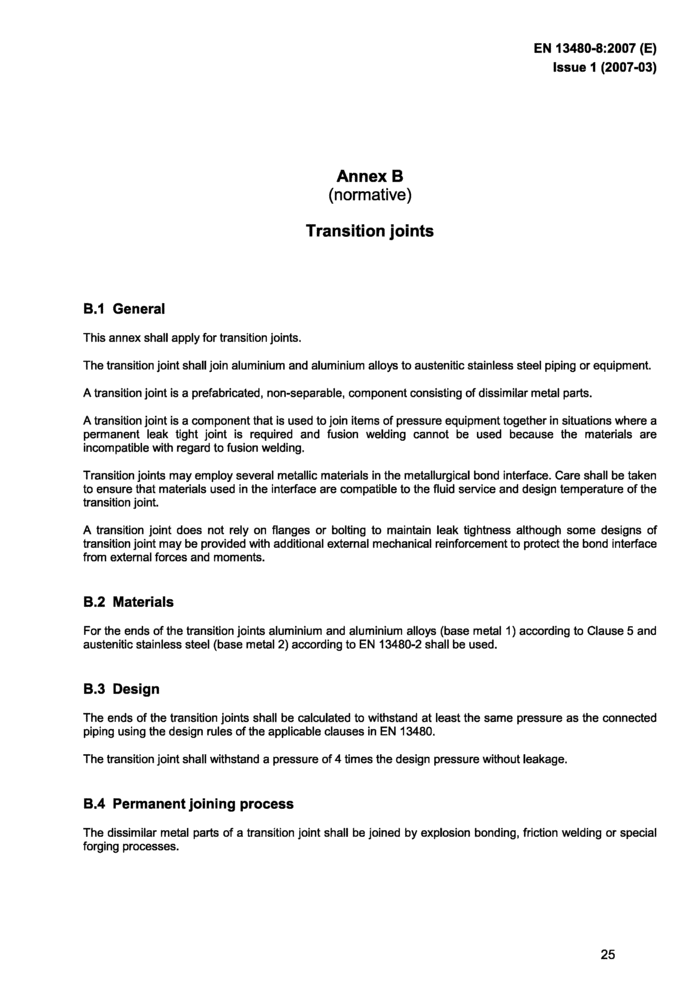
Приложение B (нормативное) Соединительные муфты
Приложение ZA (информационное) Взаимосвязь между этим европейским стандартом и Основными требованиями директивы ЕС 97/23/ЕС
Библиография
| Дата введения | 01.01.2010 |
|---|---|
| Добавлен в базу | 01.02.2020 |
| Актуализация | 01.01.2021 |
Организации:
| 10.12.2009 | Утвержден | Госстандарт Республики Беларусь | 68 |
|---|---|---|---|
| Разработан | РУП Стройтехнорм |
Metallic industrial piping - Part 8: Additional requirements for aluminium and alumimium alloy piping
Чтобы бесплатно скачать этот документ в формате PDF, поддержите наш сайт и нажмите кнопку:
стр. 1
стр. 2
стр. 3
стр. 4
стр. 5
стр. 6
стр. 7
стр. 8
стр. 9
стр. 10
стр. 11
стр. 12
стр. 13
стр. 14
стр. 15
стр. 16
стр. 17
стр. 18
стр. 19
стр. 20
стр. 21
стр. 22
стр. 23
стр. 24
стр. 25
стр. 26
стр. 27
стр. 28
стр. 29
стр. 30
СТБ EN 13480-8-2009
ГОСУДАРСТВЕННЫЙ СТАНДАРТ РЕСПУБЛИКИ БЕЛАРУСЬ
ТРУБОПРОВОДЫ ПРОМЫШЛЕННЫЕ МЕТАЛЛИЧЕСКИЕ. ЧАСТЬ 8. Дополнительные требования к трубам из алюминия и алюминиевого сплава
ТРУБАПРАВОДЫ ПРАМЫСЛОВЫЯ МЕТАЛ1ЧНЫЯ. ЧАСТКА 8. Дадатковыя патрабаванж да труб з алюмЫ1ю i алюмш1евага сплаву
(EN 13480-8:2007, ЮТ)
Госстандарт
Минск
СТБ EN 13480-8-2009
УДК 621.643.07(083.74) МКС 23.040.01 КП 03 ЮТ
Ключевые слова: трубопроводы металлические, промышленные, требования к трубам из алюминия и алюминиевого сплава
Предисловие
Цели, основные принципы, положения по государственному регулированию и управлению в области технического нормирования и стандартизации установлены Законом Республики Беларусь «О техническом нормировании и стандартизации».
1 ПОДГОТОВЛЕН ПО УСКОРЕННОЙ ПРОЦЕДУРЕ научно-проектнопроизводственным республиканским унитарным предприятием «Стройтехнорм» (РУП «Стройтехнорм»).
ВНЕСЕН Министерством архитектуры и строительства Республики Беларусь
2 УТВЕРЖДЕН И ВВЕДЕН В ДЕЙСТВИЕ постановлением Госстандарта Республики
Беларусь от 2009 г. №
В Национальном комплексе технических нормативных правовых актов в области архитектуры и строительства стандарт входит в блок 3.05 «Магистральные и промысловые трубопроводы»
3 Настоящий стандарт идентичен европейскому стандарту EN 13480-8:2007 Metallic industrial piping - Part 8: Additional requirements for aluminium and aluminium alloy piping (Трубопроводы промышленные металлические. Часть 8. Дополнительные требования к трубам из алюминия и алюминиевого сплава)
Европейский стандарт разработан техническим комитетом по стандартизации CEN/TC 267 «Промышленные системы трубопроводов и нефтепроводов» и реализует существенные требования безопасности Директивы ЕС 89/106, приведенные в приложении Z.A к стандарту (гармонизированный с Директивой стандарт).
Перевод с английского языка (еп).
Официальные экземпляры европейского стандарта, на основе которого подготовлен настоящий государственный стандарт, и европейских стандартов, на которые даны ссылки, имеются в Национальном фонде ТИПА.
Степень соответствия - идентичная (ЮТ)
4 ВВЕДЕН ВПЕРВЫЕ
Настоящий стандарт не может быть воспроизведен, тиражирован и распространен в качестве официального издания без разрешения Госстандарта Республики Беларусь
Издан на русском языке
|
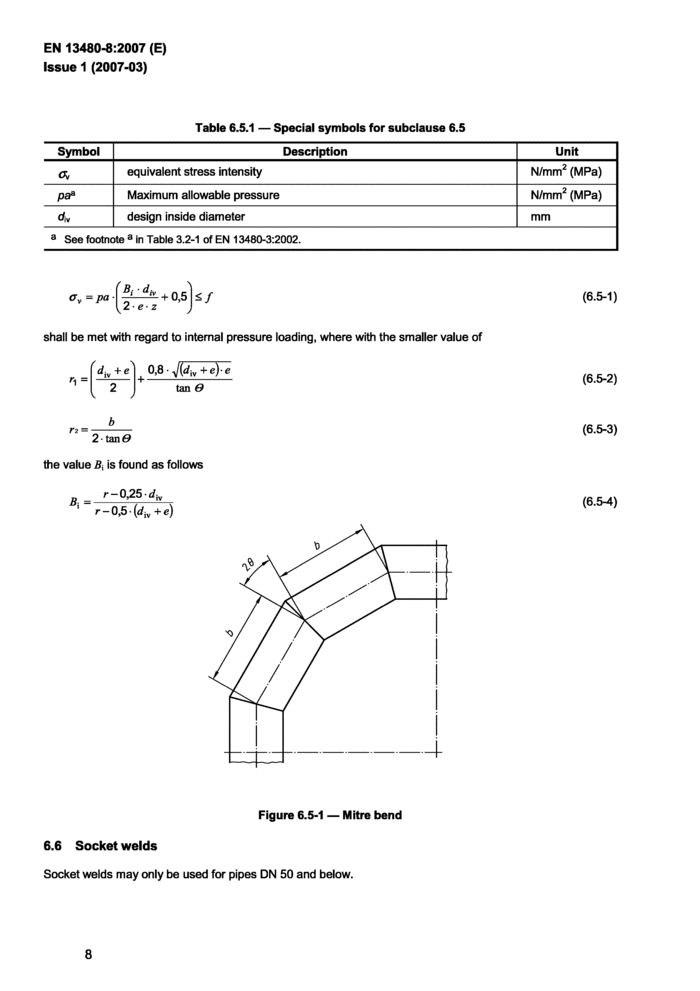
Table 6.5.1 — Special symbols for subclause 6.5 | |||||||||||||||
| |||||||||||||||
|
a^+0, y2- e-z | |||||||||||||||
0,5k/
(6.5-1)
shall be met with regard to internal pressure loading, where with the smaller value of
ri =
tan в
2- tan#
the value B, is found as follows
(6.6*2)
(6.5-3)
B r-0,25•</„
г-6,5 (</ы +e)
(6.S4)
|
Figure 6.5-1 — Mitre bend |
6.6 Socket welds
Socket welds may only be used for pipes DN 50 and below.
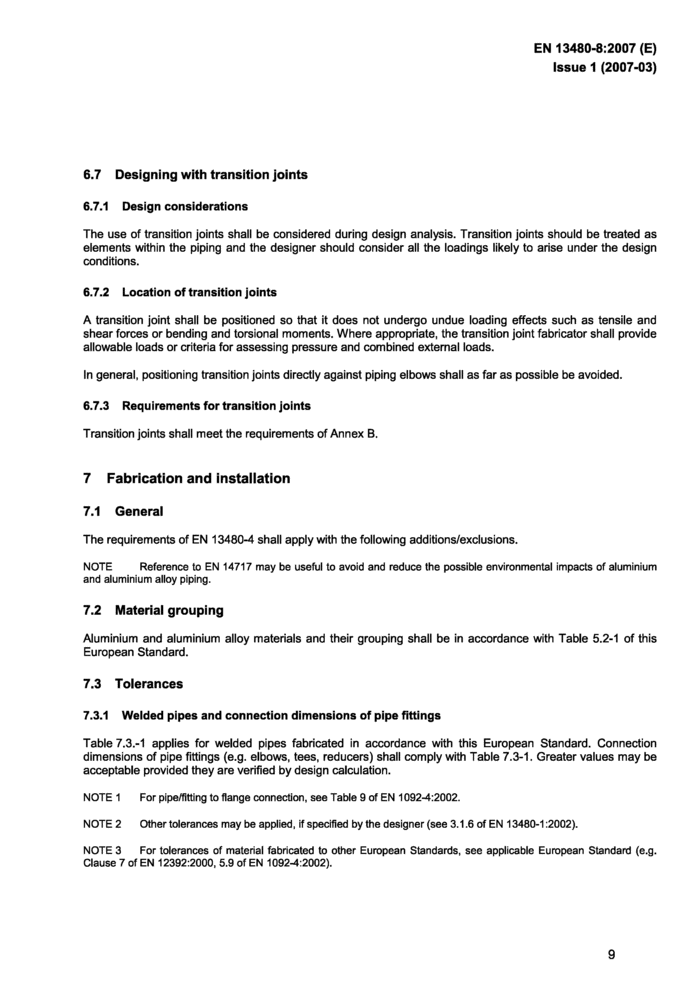
6.7 Designing with transition joints
6.7.1 Design considerations
The use of transition joints shall be considered during design analysis. Transition joints should be treated as elements within the piping and the designer should consider all the loadings likely to arise under the design conditions.
6.7.2 Location of transition joints
A transition joint shall be positioned so that it does not undergo undue loading effects such as tensile and shear forces or bending and torsional moments. Where appropriate, the transition joint fabricator shall provide allowable loads or criteria for assessing pressure and combined external loads.
In general, positioning transition joints directly against piping elbows shall as far as possible be avoided.
6.7.3 Requirements for transition joints Transition joints shall meet the requirements of Annex B.
7 Fabrication and installation
7.1 General
The requirements of EN 13480-4 shall apply with the following additions/exclusions.
NOTE Reference to EN 14717 may be useful to avoid and reduce the possible environmental impacts of aluminium and aluminium alloy piping.
7.2 Material grouping
Aluminium and aluminium alloy materials and their grouping shall be in accordance with Table 5.2-1 of this European Standard.
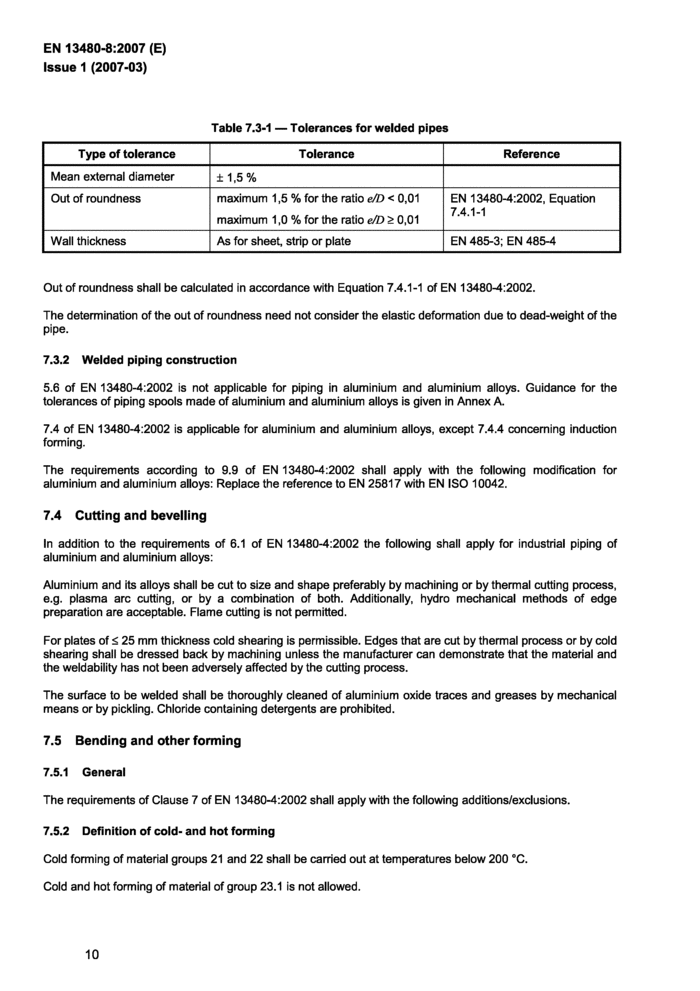
7.3 Tolerances
7.3.1 Welded pipes and connection dimensions of pipe fittings
Table 7.3.-1 applies for welded pipes fabricated in accordance with this European Standard. Connection dimensions of pipe fittings (e.g. elbows, tees, reducers) shall comply with Table 7.3-1. Greater values may be acceptable provided they are verified by design calculation.
NOTE 1 For pipe/fltting to flange connection, see Table 9 of EN 1092-4:2002.
NOTE 2 Other tolerances may be applied, if specified by the designer (see 3.1.6 of EN 13480-1:2002).
NOTE 3 For tolerances of material fabncated to other European Standards, see applicable European Standard (e.g. Clause 7 of EN 12392:2000, 5.9 of EN 1092-4:2002).
|
Table 7.3-1 — Tolerances for welded pipes | ||||||||||||||
|
Out of roundness shall be calculated in accordance with Equation 7.4.1-1 of EN 13480-4:2002.
The determination of the out of roundness need not consider the elastic deformation due to dead-weight of the pipe.
7.3.2 Welded piping construction
5.6 of EN 13480-4:2002 is not applicable for piping in aluminium and aluminium alloys. Guidance for the tolerances of piping spools made of aluminium and aluminium alloys is given in Annex A.
7.4 of EN 13480-4:2002 is applicable for aluminium and aluminium alloys, except 7.4.4 concerning induction forming.
The requirements according to 9.9 of EN 13480-4:2002 shall apply with the following modification for aluminium and aluminium alloys: Replace the reference to EN 25817 with EN ISO 10042.
7.4 Cutting and bevelling
In addition to the requirements of 6.1 of EN 13480-4:2002 the following shall apply for industrial piping of aluminium and aluminium alloys:
Aluminium and its alloys shall be cut to size and shape preferably by machining or by thermal cutting process, e.g. plasma arc cutting, or by a combination of both. Additionally, hydro mechanical methods of edge preparation are acceptable. Flame cutting is not permitted.
For plates of 5 25 mm thickness cold shearing is permissible. Edges that are cut by thermal process or by cold shearing shall be dressed back by machining unless the manufacturer can demonstrate that the material and the weldability has not been adversely affected by the cutting process.
The surface to be welded shall be thoroughly cleaned of aluminium oxide traces and greases by mechanical means or by pickling. Chloride containing detergents are prohibited.
7.5 Bending and other forming
7.5.1 General
The requirements of Clause 7 of EN 13480-4:2002 shall apply with the following additions/exdusions.
7.5.2 Definition of cold- and hot forming
Cold forming of material groups 21 and 22 shall be carried out at temperatures below 200 *C.
Cold and hot forming of material of group 23.1 is not allowed.
Hot forming of aluminium and its alloys shall be carried out in a temperature range of 320 *C to 450 eC. The last stage of the hot forming process shall be completed above 300 X, otherwise a subsequent heat treatment to achieve the О Temper is required.
7.5.3 Heat treatment after cold forming
7.5.3.1 General
For heat treatment after cold forming the requirements of 7.2 of EN 13480-4:2002 are not applicable for industrial piping of aluminium and aluminium alloys. For aluminium and aluminium alloys the heat treatment shall be carried out as follows:
The heat treatment parameters shall be in accordance with the material specification of the material manufacturer. The general heat treatment parameters shall be:
a) the heating rate shall be as rapid as possible;
b) the holding temperature shall be in the range between 320 eC and 380 eC depending on the alloy type;
c) the holding time at the holding temperature shall be between 10 min and 60 min depending on the ratio of cold forming;
d) the cooling shall be performed in still air, the cooling rate needs not to be controlled.
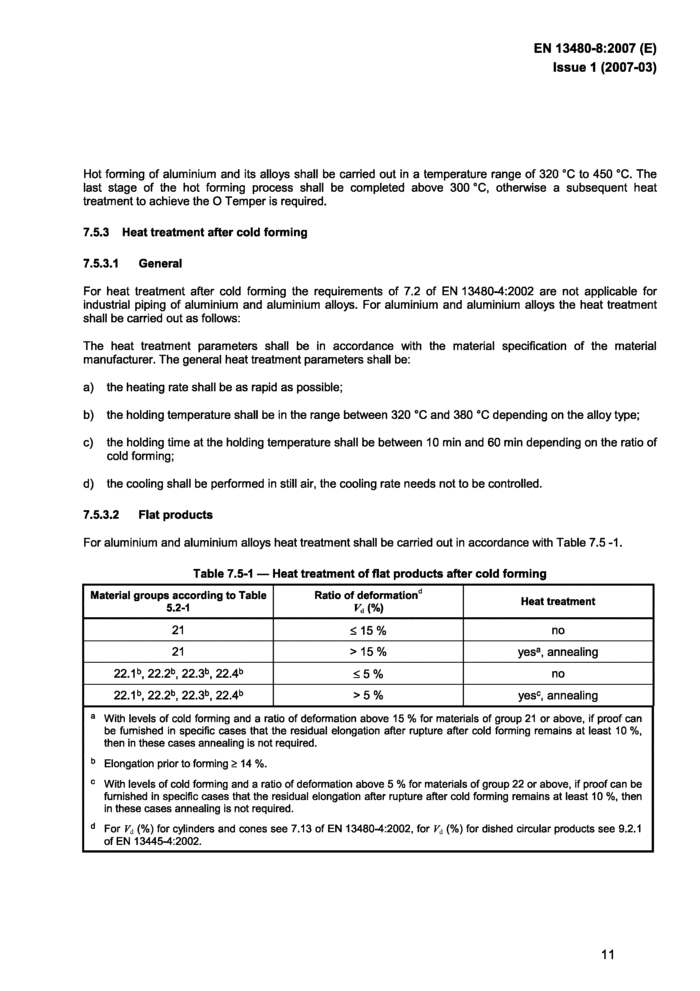
7.5.3.2 Flat products
For aluminium and aluminium alloys heat treatment shall be carried out in accordance with Table 7.5 -1.
|
Table 7.5-1 — Heat treatment of flat products after cold forming | ||||||||||||||||||
| ||||||||||||||||||
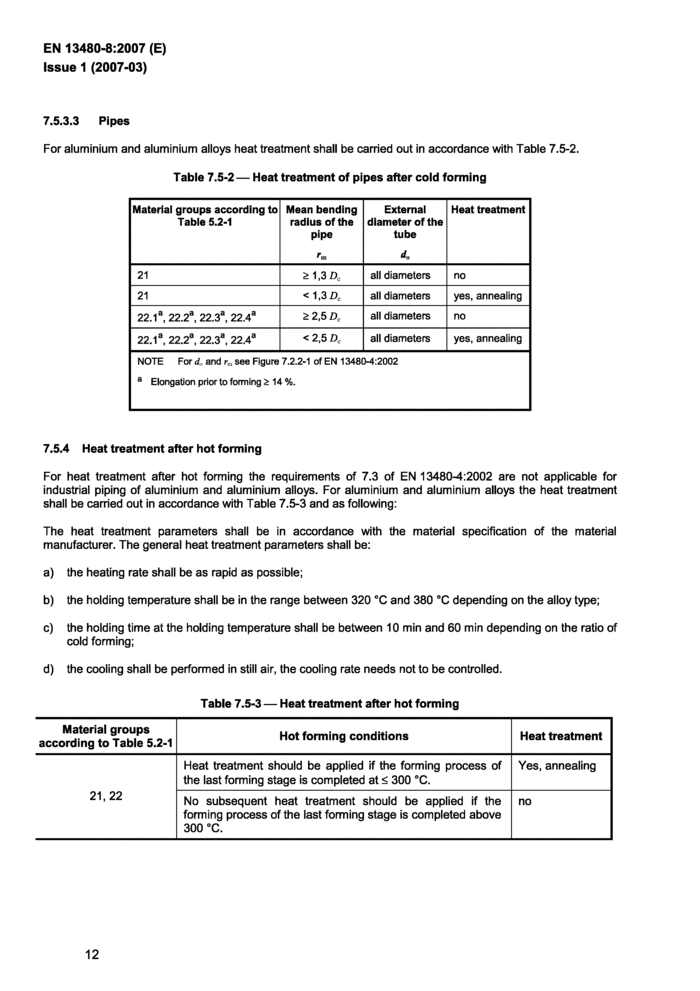
7.5.3.3 Pipes
For aluminium and aluminium alloys heat treatment shall be carried out in accordance with Table 7.5-2. Table 7.5-2— Heat treatment of pipes after cold forming
| ||||||||||||||||||||||||
|
7.5.4 Heat treatment after hot forming | ||||||||||||||||||||||||
For heat treatment after hot forming the requirements of 7.3 of EN 13480-4:2002 are not applicable for industrial piping of aluminium and aluminium alloys. For aluminium and aluminium alloys the heat treatment shall be carried out in accordance with Table 7.5-3 and as following:
The heat treatment parameters shall be in accordance with the material specification of the material manufacturer. The general heat treatment parameters shall be:
a) the heating rate shall be as rapid as possible;
b) the holding temperature shall be in the range between 320 eC and 380 *C depending on the alloy type;
c) the holding time at the holding temperature shall be between 10 min and 60 min depending on the ratio of cold forming;
d) the cooling shall be performed in still air, the cooling rate needs not to be controlled.
|
Table 7.5-3 — Heat treatment after hot forming | |||||||||
|
7.6 Welding
7.6.1 Welding personnel
The requirements according to 9.1 of EN 13480-4:2002 shall apply with the following modification for aluminium and aluminium alloys: Replace the reference to EN 287-1 by EN ISO 9606-2.
7.6.2 Welding processes
The requirements according to 9.3 of EN 13480-4:2002 shall apply with the following modification for aluminium and aluminium alloys: Qualification of welding procedure specifications (WPQR).
The requirements according to 9.3.1 of EN 13480-4:2002 shall apply with the following modifications for aluminium and aluminium alloys: Replace reference to EN 288-3 by EN ISO 15614-2.
Furthermore, impact testing is not applicable for piping of aluminium and aluminium alloys, see 5.7 of this European Standard.
Oxy fuel gas welding processes according to EN ISO 4063 are not permitted.
For qualification of welding procedures for EN AW 6061 material, the result of the tensile tests carried out in accordance with EN ISO 15614-2 shall show the following data with T = 1: minimum Rm = 165 MPa; minimum Яро.2= HO MPa.
7.6.3 Weld joint preparation
The weld joint preparation shall be in accordance with the applicable WPS.
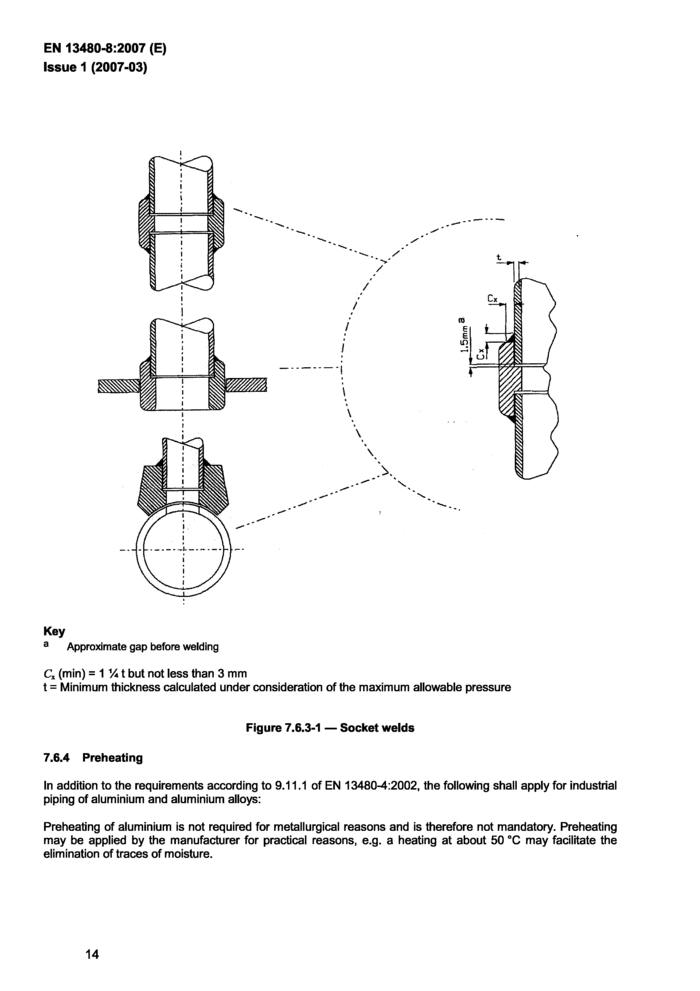
Assembly and welding of socket welds shall be in accordance with Figure 7.6.3-1. It is important that the 1.5 mm internal gap is maintained prior to welding to allow for weld shrinkage and the fillet weld leg length shall be 1,25 times the pipe minimum thickness calculated for pressure or 3 mm. whichever is the greater.
Where the size of fillet weld permits, it should be completed in two runs with the stop/start positions of the second run staggered relative to the first.
Key
3 Approximate gap before welding C, (min) ■ 1 Va t but not less than 3 mm
t = Minimum thickness calculated under consideration of the maximum allowable pressure
Figure 7.6.3-1 — Socket welds
7.6.4 Preheating
In addition to the requirements according to 9.11.1 of EN 13480-4:2002, the following shall apply for industrial piping of aluminium and aluminium alloys:
Preheating of aluminium is not required for metallurgical reasons and is therefore not mandatory. Preheating may be applied by the manufacturer for practical reasons, e.g. a heating at about 50 aC may facilitate the elimination of traces of moisture.
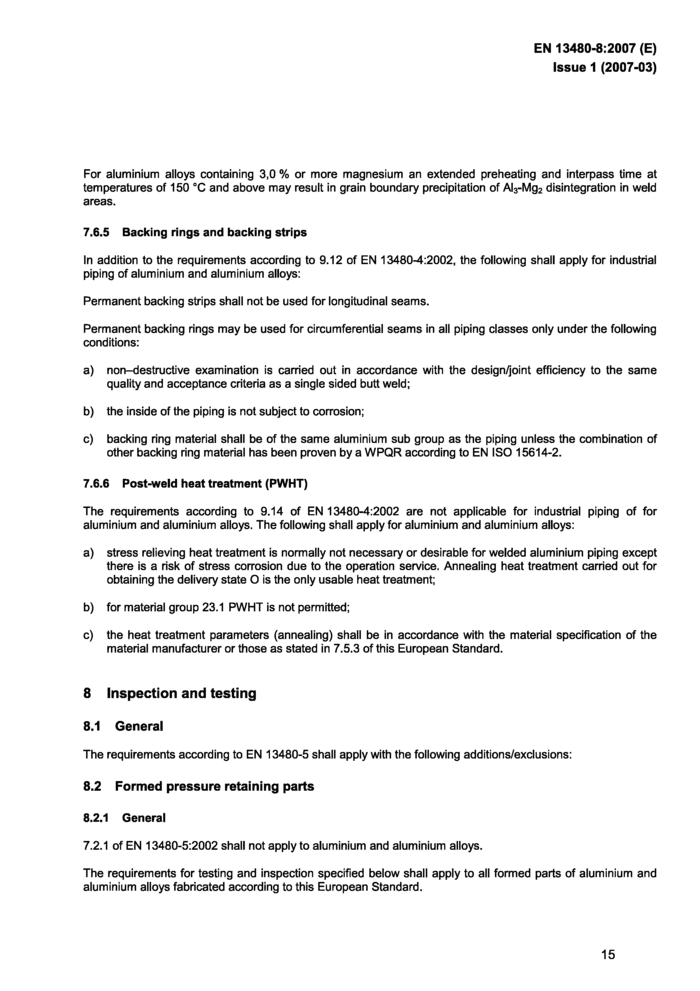
For aluminium alloys containing 3,0 % or more magnesium an extended preheating and interpass time at temperatures of 150 eC and above may result in grain boundary precipitation of AJ3-Mg2 disintegration in weld areas.
7.6.5 Backing rings and backing strips
In addition to the requirements according to 9.12 of EN 13480-4:2002, the following shall apply for industrial piping of aluminium and aluminium alloys:
Permanent backing strips shall not be used for longitudinal seams.
Permanent backing rings may be used for circumferential seams in all piping classes only under the following conditions:
a) non-destructive examination is carried out in accordance with the design/joint efficiency to the same quality and acceptance criteria as a single sided butt weld;
b) the inside of the piping is not subject to corrosion;
c) backing ring material shall be of the same aluminium sub group as the piping unless the combination of other backing ring material has been proven by a WPQR according to EN ISO 15614-2.
7.6.6 Post-weld heat treatment (PWHT)
The requirements according to 9.14 of EN 13480-4:2002 are not applicable for industrial piping of for aluminium and aluminium alloys. The following shall apply for aluminium and aluminium alloys:
a) stress relieving heat treatment is normally not necessary or desirable for welded aluminium piping except there is a risk of stress corrosion due to the operation service. Annealing heat treatment carried out for obtaining the delivery state О is the only usable heat treatment;
b) for material group 23.1 PWHT is not permitted;
c) the heat treatment parameters (annealing) shall be in accordance with the material specification of the material manufacturer or those as stated in 7.5.3 of this European Standard.
8 Inspection and testing8.1 General
The requirements according to EN 13480-5 shall apply with the following additions/exdusions:
8.2 Formed pressure retaining parts
8.2.1 General
7.2.1 of EN 13480-5:2002 shall not apply to aluminium and aluminium alloys.
The requirements for testing and inspection specified below shall apply to all formed parts of aluminium and aluminium alloys fabricated according to this European Standard.
Formed parts, fabricated, tested and inspected according to EN 13445-8 can be used without any further testing and inspection.
NOTE 1 If harmonized European Standards for formed parts (e.g. elbows, tees, reducers, welded pipes) are available and requirements for testing and inspection are specified in these harmonized European Standards, the requirements of the harmonized European Standards apply. At the time this European Standard was prepared, no such harmonized European Standard is available.
NOTE 2 Cold drawn tubes according to EN 754 and extruded tubes according to EN 755 are not considered to be formed parts manufactured under this European Standard. For these tubes, the requirements of EN 754/EN 755 apply.
The tests specified in the European Standards for the base material shall be performed for the base material.
8.2.2 Testing of formed parts
The requirements according to 7.2.4 of EN 13480-5:2002 shall not apply to aluminium and aluminium alloys. The following examinations shall be carried out on formed parts of aluminium and aluminium alloys:
a) verification of wall thickness,
b) dimensional check (ovality, angle of bend etc.),
c) examination for surface imperfection (VT).
8.2.3 Destructive testing of formed and heat treated parts
The requirements according to 7.2.5 of EN 13480-5:2002 shall not apply to aluminium and aluminium alloys.
Testing shall be performed to verify the heat treatment. If heat treatment is not required by Table 7.5-1 and 7.5-2 after cold forming, no mechanical tests are required in respect of forming.
Destructive testing shall be performed for hot formed parts, and cold formed parts with subsequent heat treatment for piping with DN > 25.
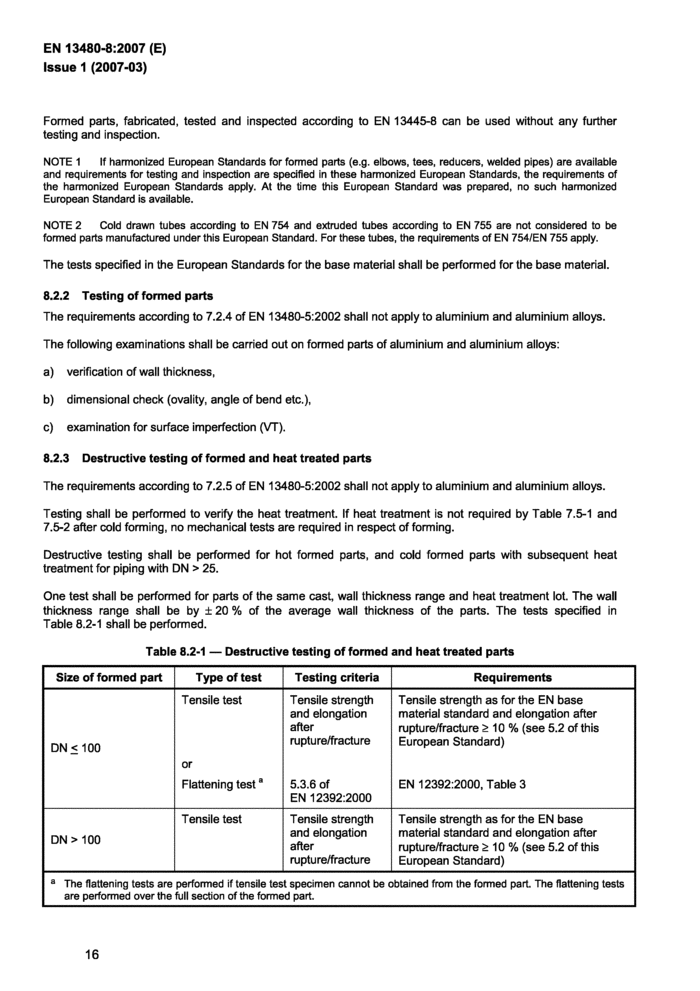
One test shall be performed for parts of the same cast, wall thickness range and heat treatment lot. The wall thickness range shall be by ± 20 % of the average wall thickness of the parts. The tests specified in Table 8.2-1 shall be performed.
|
Table 8.2-1 — Destructive testing of formed and heat treated parts | |||||||||||||||||||
| |||||||||||||||||||
8.3 Welding
The requirements according to 7.3.1 of EN 13480-5:2002 shall apply with the following modification for aluminium and aluminium alloys: Replace reference to EN 287-1 and EN 288-2 with references given in 7.6.1 and 7.6.2 in this European Standard.
8.4 Visual and non-destructive testing of welds
8.4.1 Application of NDT
The requirements according to 8.1.1.1 of EN 13480-5:2002 shall apply with the following modification for aluminium and aluminium alloys: The method for surface testing shall be PT.
8.4.2 Circumferential, branch, socket and seal welds
The requirements according to 8.2 of EN 13480*5:2002 shall apply with the following additions/exclusions for aluminium and aluminium alloys:
In 8.2.1 b) of EN 13480-5:2002 replace reference to material groups 1.1,1.2 and 8.1 with material groups 21. 22 and 23.1.
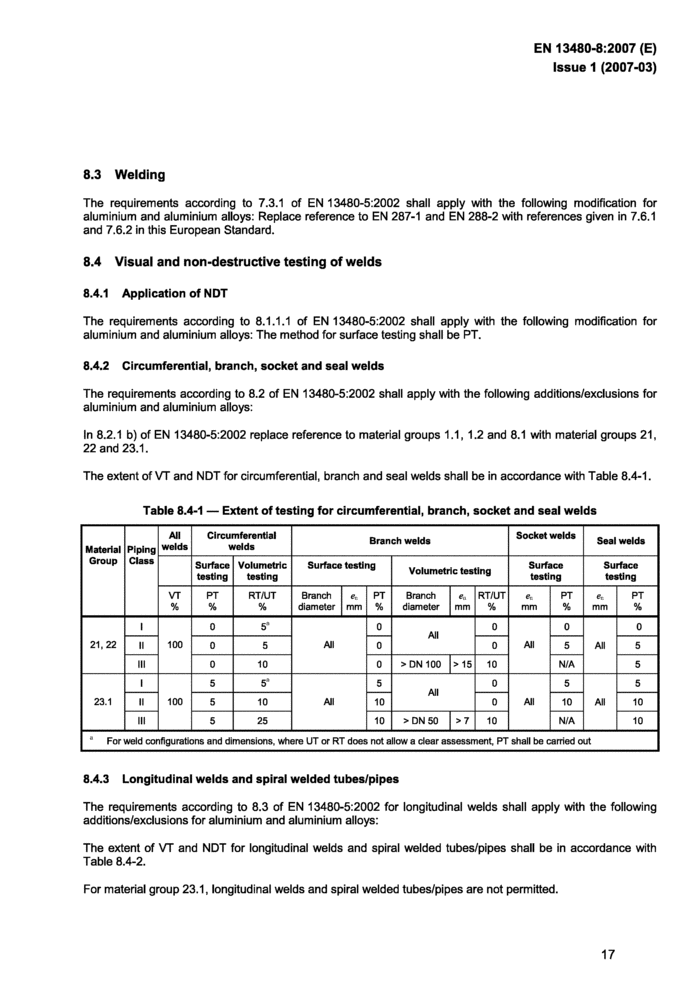
The extent of VT and NDT for circumferential, branch and seal welds shall be in accordance with Table 8.4-1.
|
Table 8.4-1 — Extent of testing for circumferential, branch, socket and seal welds | |||||||||||||||||||||||||||||||||||||||||||||||||||||||||||||||||||||||||||||||||||||||||||||||||||||||
| |||||||||||||||||||||||||||||||||||||||||||||||||||||||||||||||||||||||||||||||||||||||||||||||||||||||
|
* For weld configurations and dimensions, where UTor RT does not allow a dear assessment, PT shall be carried out | |||||||||||||||||||||||||||||||||||||||||||||||||||||||||||||||||||||||||||||||||||||||||||||||||||||||
8.4.3 Longitudinal welds and spiral welded tubes/pipes
The requirements according to 8.3 of EN 13480-5:2002 for longitudinal welds shall apply with the following additions/exdusions for aluminium and aluminium alloys:
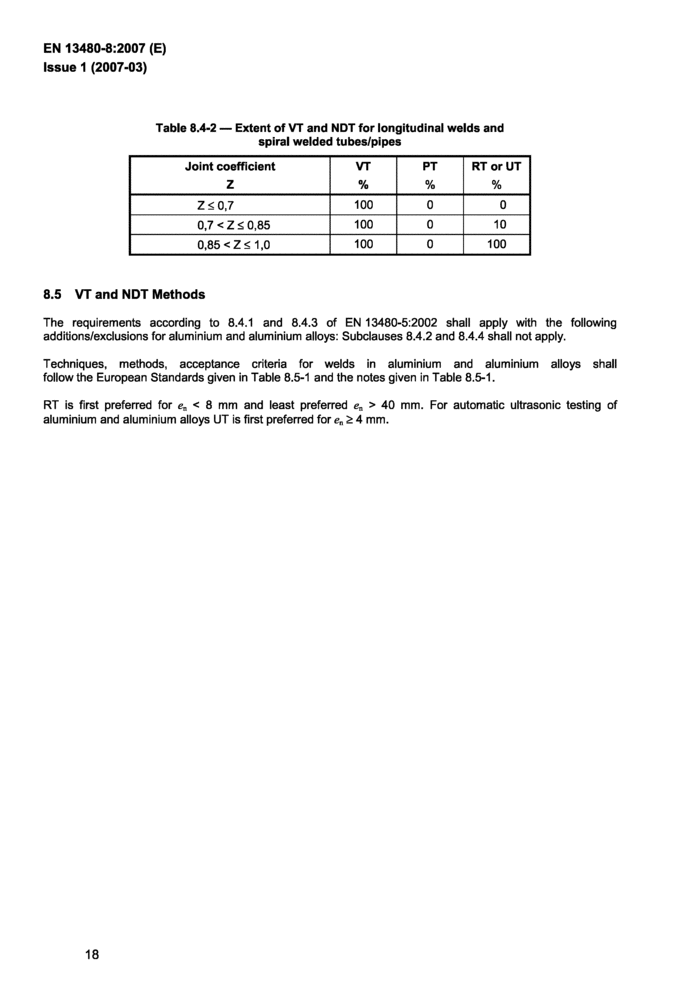
The extent of VT and NDT for longitudinal welds and spiral welded tubes/pipes shall be in accordance with Table 8.4-2.
For material group 23.1, longitudinal welds and spiral welded tubes/pipes are not permitted.
Введение
Настоящий стандарт содержит текст европейского стандарта EN 13480-8:2007 на языке оригинала и его перевод на русский язык (справочное приложение Д.А).
_ГОСУДАРСТВЕННЫЙ СТАНДАРТ РЕСПУБЛИКИ БЕЛАРУСЬ_
ТРУБОПРОВОДЫ ПРОМЫШЛЕННЫЕ МЕТАЛЛИЧЕСКИЕ. ЧАСТЬ 8. Дополнительные требования к трубам из алюминия и алюминиевого сплава
ТРУБАПРАВОДЫ ПРАМЫСЛОВЫЯ МЕТАЛ1ЧНЫЯ. ЧАСТКА 8. Дадатковыя патрабаванш да труб з алюмЫ1ю i алюмш1евага сплаву
Metallic industrial piping - Part 8:
Additional requirements for aluminium and aluminium alloy piping
Дата введения 2010-01-01
|
Table 8.4-2 — Extent of VT and NDT for longitudinal welds and spiral welded tubes/pipes | ||||||||||||||||||||
|
8.5 VT and NDT Methods
The requirements according to 8.4.1 and 8.4.3 of EN 13480-5:2002 shall apply with the following additions/exdusions for aluminium and aluminium alloys: Subclauses 8.4.2 and 8.4.4 shall not apply.
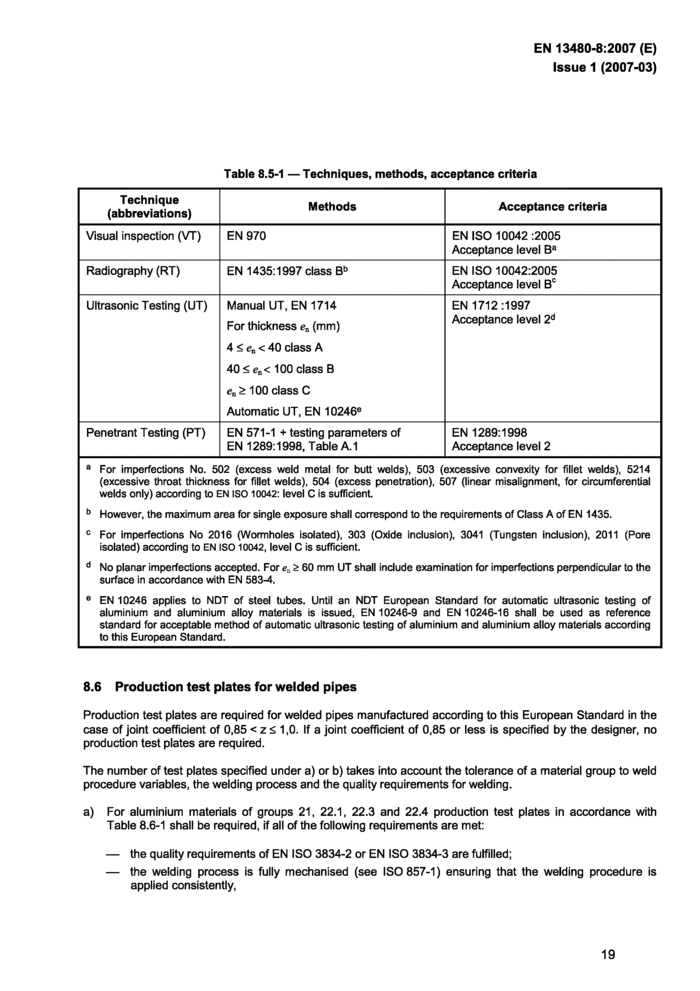
Techniques, methods, acceptance criteria for welds in aluminium and aluminium alloys shall follow the European Standards given in Table 8.5-1 and the notes given in Table 8.5-1.
RT is first preferred for e„ < 8 mm and least preferred ea > 40 mm. For automatic ultrasonic testing of aluminium and aluminium alloys UT is first preferred for e„ 2 4 mm.
1 Scope
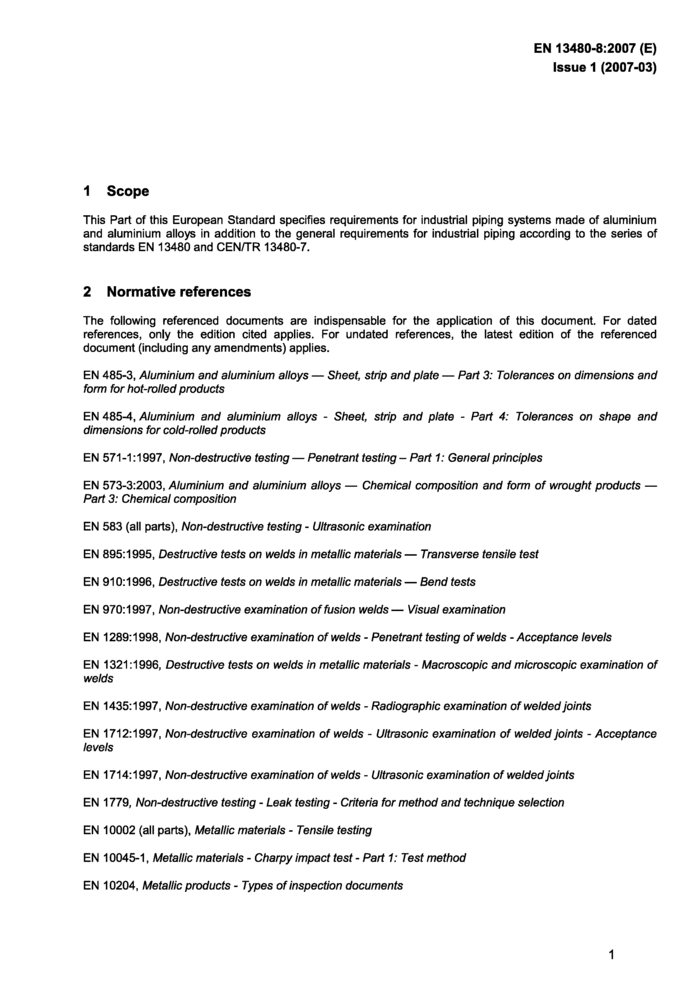
This Part of this European Standard specifies requirements for industrial piping systems made of aluminium and aluminium alloys in addition to the general requirements for industrial piping according to the series of standards EN 13480 and CEN/TR 13480-7.
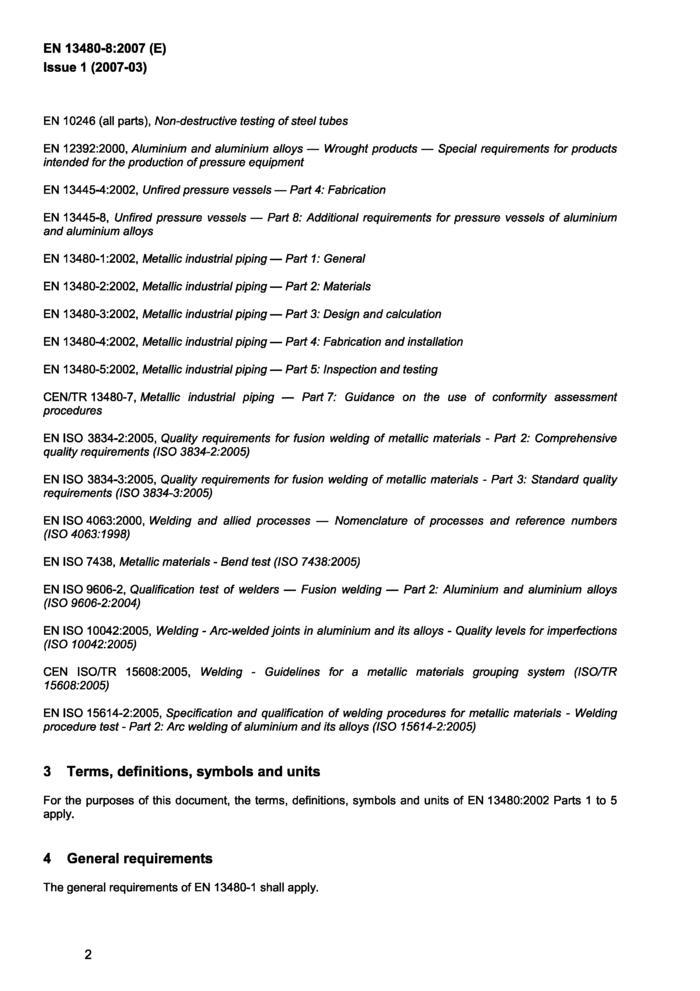
2 Normative references
The following referenced documents are indispensable for the application of this document. For dated references, only the edition cited applies. For undated references, the latest edition of the referenced document (including any amendments) applies.
EN 485-3, Aluminium and aluminium alloys — Sheet, strip and plate — Part 3: Tolerances on dimensions and form for hot-rolled products
EN 485-4, Aluminium and aluminium alloys - Sheet, strip and plate - Part 4: Tolerances on shape and dimensions for cold-rolled products
EN 571-1:1997, Non-destructive testing — Penetrant testing - Part 1: General principles
EN 573-3:2003, Aluminium and aluminium alloys — Chemical composition and form of wrought products — Part 3: Chemical composition
EN 583 (all parts), Non-destructive testing - Ultrasonic examination
EN 895:1995, Destructive tests on welds in metallic materials — Transverse tensile test
EN 910:1996, Destructive tests on welds in metallic materials — Bend tests
EN 970:1997, Non-destructive examination of fusion welds — Visual examination
EN 1289:1998, Non-destructive examination of welds - Penetrant testing of welds - Acceptance levels
EN 1321:1996, Destructive tests on welds in metallic materials - Macroscopic and microscopic examination of wolds
EN 1435:1997, Non-destructive examination of welds - Radiographic examination of welded joints
EN 1712:1997, Non-destructive examination of welds - Ultrasonic examination of welded joints - Acceptance levels
EN 1714:1997, Non-destructive examination of welds - Ultrasonic examination of welded joints EN 1779, Non-destructive testing - Leak testing - Criteria for method and technique selection EN 10002 (all parts), Metallic materials - Tensile testing EN 10045-1, Metallic materials - Charpy impact test - Part 1: Test method EN 10204, Metallic products - Types of inspection documents
EN 10246 (all parts), Non-destructive testing of steel tubes
EN 12392:2000, Aluminium and aluminium alloys — Wrought products — Special requirements for products intended for the production of pressure equipment
EN 13445-4:2002, Unfired pressure vessels — Part 4: Fabrication
EN 13445-8, Unfired pressure vessels — Part 8: Additional requirements for pressure vessels of aluminium and aluminium alloys
EN 13480-1:2002, Metallic industrial piping — Part 1: General EN 13480-2:2002, Metallic industrial piping — Part 2: Materials EN 13480-3:2002, Metallic industrial piping — Part 3: Design and calculation EN 13480-4:2002, Metallic industrial piping — Part 4: Fabrication and installation EN 13480-5:2002, Metallic industrial piping — Part 5: Inspection and testing
CENЯR 13480-7, Metallic industrial piping — Part 7: Guidance on the use of conformity assessment procedures
EN ISO 3834-2:2005, Quality requirements for fusion welding of metallic materials - Part 2: Comprehensive quality requirements (ISO 3834-2:2005)
EN ISO 3834-3:2005, Quality requirements for fusion welding of metallic materials - Part 3: Standard quality requirements (ISO 3834-3:2005)
EN ISO 4063:2000, Welding and allied processes — Nomenclature of processes and reference numbers (ISO 4063:1998)
EN ISO 7438, Metallic materials - Bend test (ISO 7438:2005)
EN ISO 9606-2, Qualification test of welders — Fusion welding — Part 2: Aluminium and aluminium alloys (ISO 9606-2:2004)
EN ISO 10042:2005, Welding - Arc-welded joints in aluminium and its alloys - Quality levels for imperfections (ISO 10042:2005)
CEN 180ЯР 15608:2005, Welding - Guidelines for a metallic materials grouping system (ISO/TR 15608:2005)
EN ISO 15614-2:2005, Specification and qualification of welding procedures for metallic materials - Welding procedure test - Part 2: Arc welding of aluminium and its alloys (ISO 15614-2:2005)
3 Terms, definitions, symbols and units
For the purposes of this document, the terms, definitions, symbols and units of EN 13480:2002 Parts 1 to 5 apply.
4 General requirements
The general requirements of EN 13480-1 shall apply.
5 Materials
5.1 General
The requirements of EN 13480-2 shall apply with the following additions/exclusions:
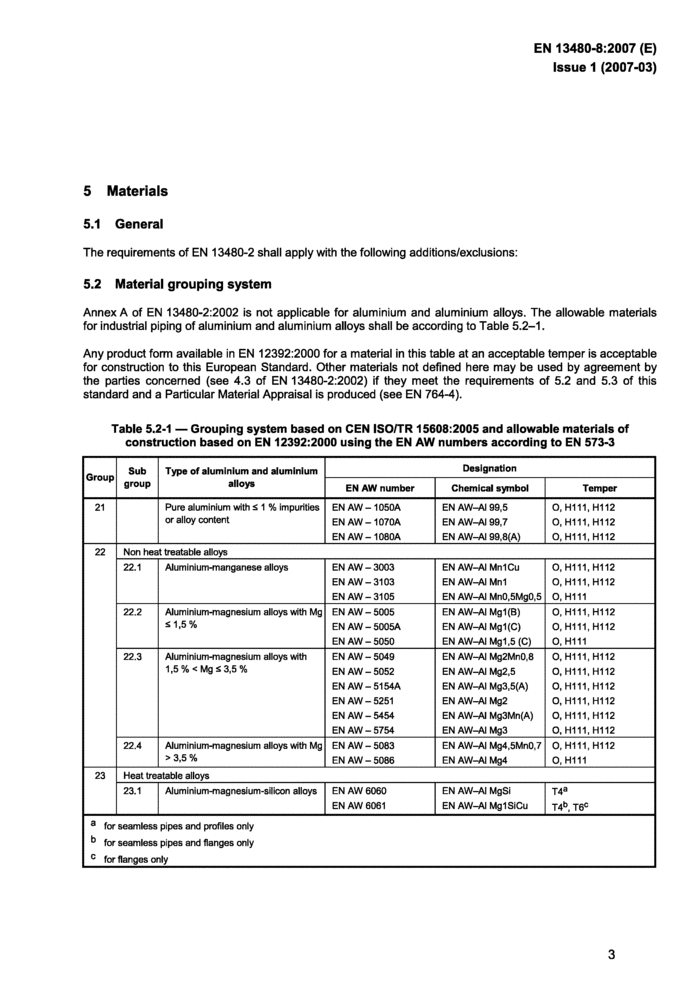
5.2 Material grouping system
Annex A of EN 13480-2:2002 is not applicable for aluminium and aluminium alloys. The allowable materials for industrial piping of aluminium and aluminium alloys shall be according to Table 5.2-1.
Any product form available in EN 12392:2000 for a material in this table at an acceptable temper is acceptable for construction to this European Standard. Other materials not defined here may be used by agreement by the parties concerned (see 4.3 of EN 13480-2:2002) if they meet the requirements of 5.2 and 5.3 of this standard and a Particular Material Appraisal is produced (see EN 764-4).
|
Table 5.2-1 — Grouping system based on CEN ISO/TR 15608:2005 and allowable materials of construction based on EN 12392:2000 using the EN AW numbers according to EN 573-3 | |||||||||||||||||||||||||||||||||||||||||||||||||||||||||||||||||||||||||||||||||||||||||||||||||||||||||||||||||||||||||||||||||||||||||||||||
| |||||||||||||||||||||||||||||||||||||||||||||||||||||||||||||||||||||||||||||||||||||||||||||||||||||||||||||||||||||||||||||||||||||||||||||||
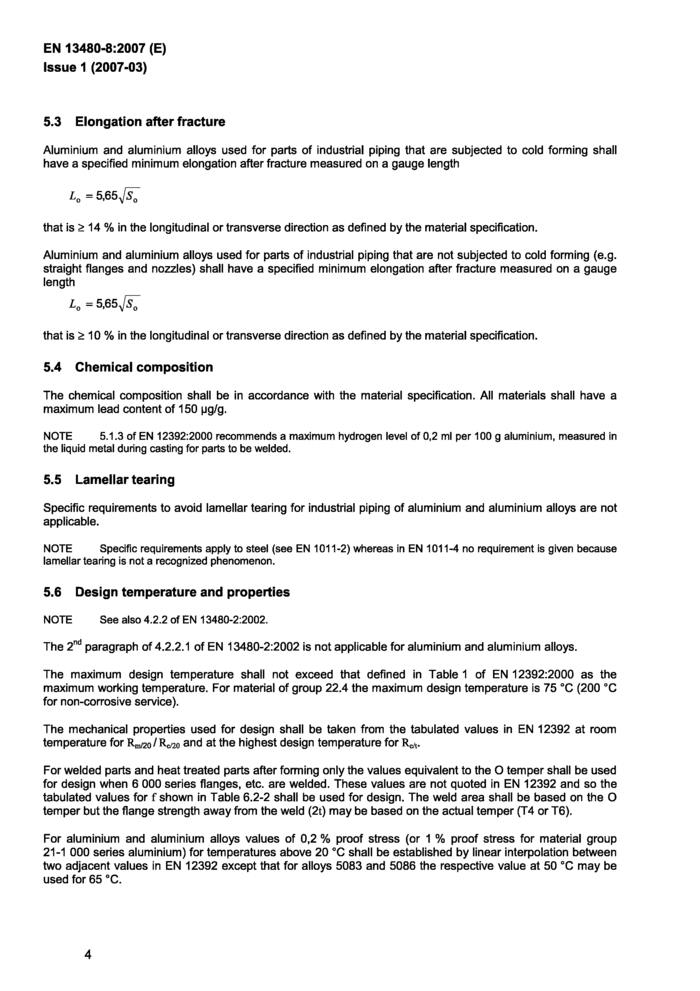
5.3 Elongation after fracture
Aluminium and aluminium alloys used for parts of industrial piping that are subjected to cold forming shall have a specified minimum elongation after fracture measured on a gauge length
L0 = 5,65 JS,
that is 2 14 % in the longitudinal or transverse direction as defined by the material specification.
Aluminium and aluminium alloys used for parts of industrial piping that are not subjected to cold forming (e.g. straight flanges and nozzles) shall have a specified minimum elongation after fracture measured on a gauge length
L0=5fi5js^
that is 2 10 % in the longitudinal or transverse direction as defined by the material specification.
5.4 Chemical composition
The chemical composition shall be in accordance with the material specification. All materials shall have a maximum lead content of 150 pg/g.
NOTE 5.1.3 of EN 12392:2000 recommends a maximum hydrogen level of 0.2 ml per 100 g aluminium, measured in the liquid metal during casting for parts to be welded.
5.5 Lamellar tearing
Specific requirements to avoid lamellar tearing for industrial piping of aluminium and aluminium alloys are not applicable.
NOTE Specific requirements apply to steel (see EN 1011-2) whereas in EN 1011-4 no requirement is given because lamellar tearing is not a recognized phenomenon.
5.6 Design temperature and properties
NOTE See also 4.2.2 of EN 13480-2:2002.
The 2nd paragraph of 4.2.2.1 of EN 13480-2:2002 is not applicable for aluminium and aluminium alloys.
The maximum design temperature shall not exceed that defined in Table 1 of EN 12392:2000 as the maximum working temperature. For material of group 22.4 the maximum design temperature is 75 eC (200 *C for non-corrosive service).
The mechanical properties used for design shall be taken from the tabulated values in EN 12392 at room temperature for Reflo/R®-» and at the highest design temperature for R«*.
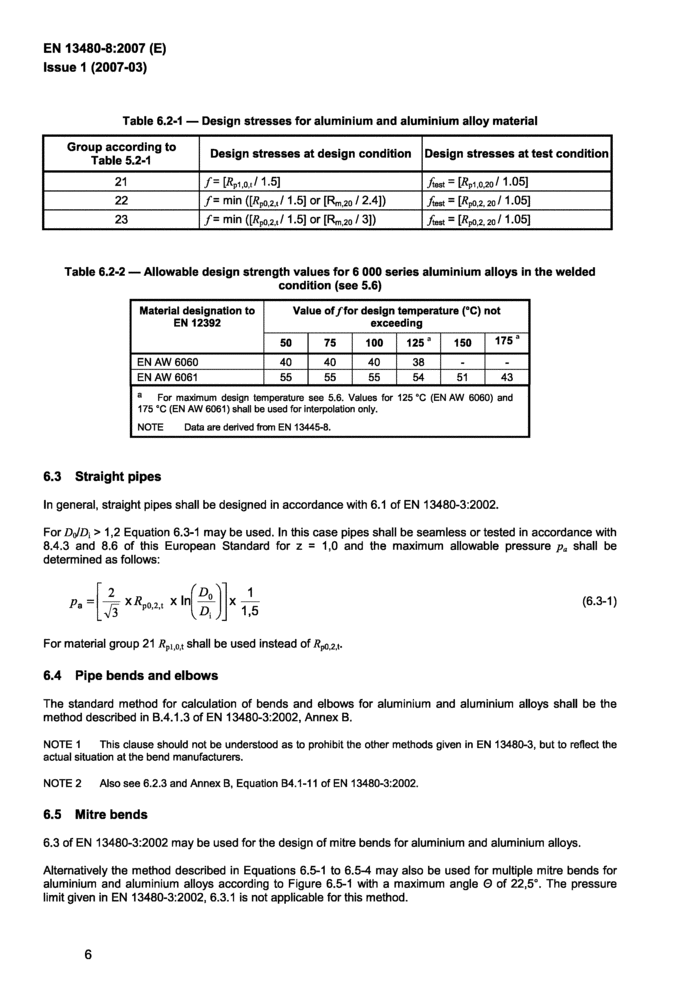
For welded parts and heat treated parts after forming only the values equivalent to the О temper shall be used for design when 6 000 series flanges, etc. are welded. These values are not quoted in EN 12392 and so the tabulated values for f shown in Table 6.2-2 shall be used for design. The weld area shall be based on the О temper but the flange strength away from the weld (2t) may be based on the actual temper (T4 or T6).
For aluminium and aluminium alloys values of 0,2 % proof stress (or 1 % proof stress for material group 21-1 000 series aluminium) for temperatures above 20 *C shall be established by linear interpolation between two adjacent values in EN 12392 except that for alloys 5083 and 5086 the respective value at 50 °C may be used for 65 eC.
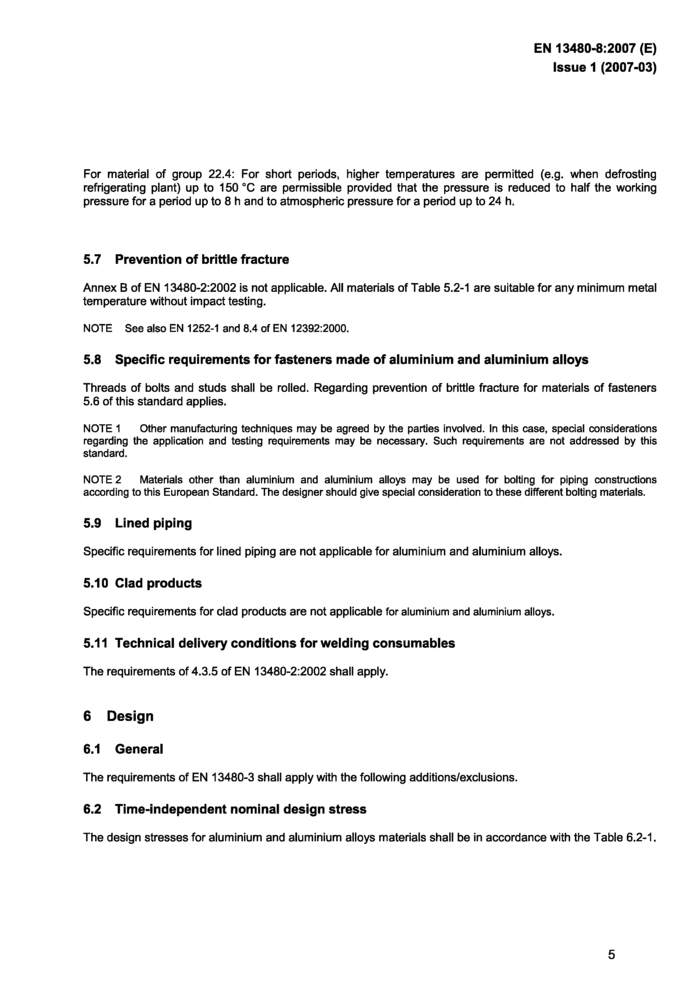
For material of group 22.4: For short periods, higher temperatures are permitted (e.g. when defrosting refrigerating plant) up to 150 eC are permissible provided that the pressure is reduced to half the working pressure for a period up to 8 h and to atmospheric pressure for a period up to 24 h.
5.7 Prevention of brittle fracture
Annex В of EN 13480-2:2002 is not applicable. All materials of Table 5.2-1 are suitable for any minimum metal temperature without impact testing.
NOTE See also EN 1252-1 and 8.4 of EN 12392:2000.
5.8 Specific requirements for fasteners made of aluminium and aluminium alloys
Threads of bolts and studs shall be rolled. Regarding prevention of brittle fracture for materials of fasteners 5.6 of this standard applies.
NOTE 1 Other manufacturing techniques may be agreed by the parties involved. In this case, special considerations regarding the application and testing requirements may be necessary. Such requirements are not addressed by this standard.
NOTE 2 Materials other than aluminium and aluminium aloys may be used for bolting for piping constructions according to this European Standard. The designer should give special consideration to these different bolting materials.
5.9 Lined piping
Specific requirements for lined piping are not applicable for aluminium and aluminium alloys.
5.10 Clad products
Specific requirements for clad products are not applicable for aluminium and aluminium alloys.
5.11 Technical delivery conditions for welding consumables
The requirements of 4.3.5 of EN 13480-2:2002 shall apply.
6 Design
6.1 General
The requirements of EN 13480-3 shall apply with the following additions/exclusions.
6.2 Time-Independent nominal design stress
The design stresses for aluminium and aluminium alloys materials shall be in accordance with the Table 6.2-1.
|
Table 6.2-1 — Design stresses for aluminium and aluminium alloy material | ||||||||||||
|
|
Table 6.2-2 — Allowable design strength values for 6 000 series aluminium alloys in the welded condition (see 5.6) | |||||||||||||||||||||||||||
| |||||||||||||||||||||||||||
|
a For maximum design temperature see 5.6. Values for 125 'C (EN AW 6060) and 175 *C (EN AW 6061) shall be used for interpolation only. NOTE Data are derived from EN 13445-8. | |||||||||||||||||||||||||||
6.3 Straight pipes
In general, straight pipes shall be designed in accordance with 6.1 of EN 13480-3:2002.
For DJD\ > 1,2 Equation 6.3-1 may be used. In this case pipes shall be seamless or tested in accordance with
8.4.3 and 8.6 of this European Standard for z = 1,0 and the maximum allowable pressure pa shall be determined as follows:
For material group 21 Rpш shall be used instead of
6.4 Pipe bends and elbows
The standard method for calculation of bends and elbows for aluminium and aluminium alloys shall be the method described in B.4.1.3 of EN 13480-3:2002, Annex B.
NOTH 1 This clause should not be understood as to prohibit the other methods given in EN 13480-3, but to reflect the actual situation at the bend manufacturers.
NOTE 2 Also see 6.2.3 and Annex B. Equation B4.1-11 of EN 13480-3:2002.
6.5 Mitre bends
6.3 of EN 13480-3:2002 may be used for the design of mitre bends for aluminium and aluminium alloys.
Alternatively the method described in Equations 6.5-1 to 6.5-4 may also be used for multiple mitre bends for aluminium and aluminium alloys according to Figure 6.5-1 with a maximum angle О of 22,5*. The pressure limit given in EN 13480-3:2002, 6.3.1 is not applicable for this method.
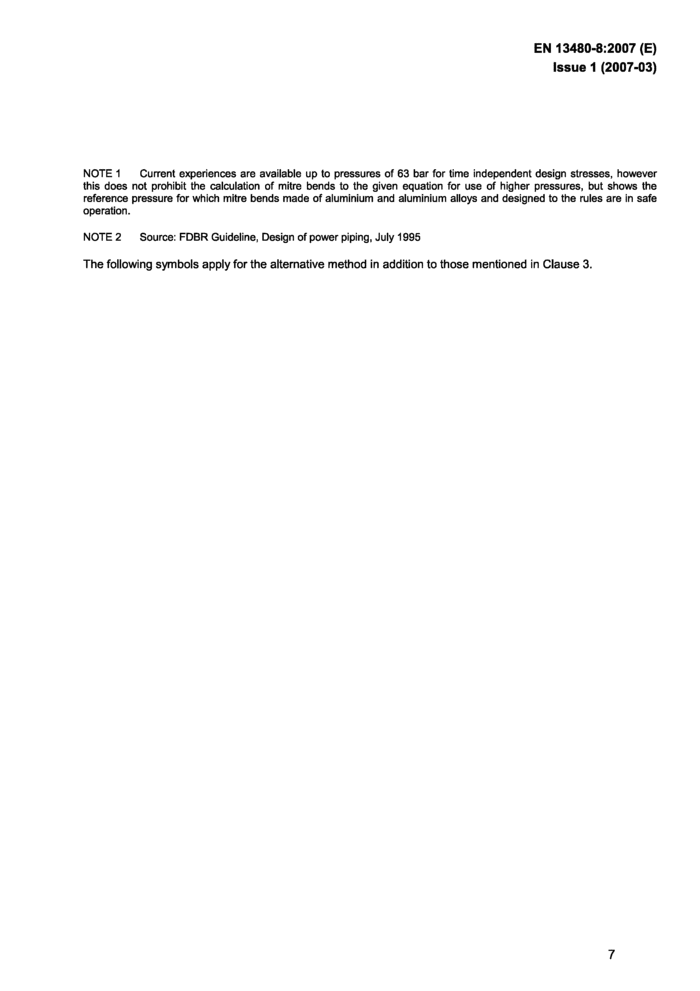
NOTE 1 Current experiences are available up to pressures of 63 bar for time independent design stresses, however this does not prohibit the calculation of mitre bends to the given equation for use of higher pressures, but shows the reference pressure for which mitre bends made of aluminium and aluminium alloys and designed to the rules are in safe operation.
NOTE 2 Source: FDBR Guideline, Design of power piping, July 1995
The following symbols apply for the alternative method in addition to those mentioned in Clause 3.