СТБ EN 13445-8-2009
Сосуды, работающие под давлением. Часть 8. Дополнительные требования к сосудам, работающим под давлением, из алюминия и алюминиевых сплавов
Купить СТБ EN 13445-8-2009 — бумажный документ с голограммой и синими печатями. подробнее
Цена на этот документ пока неизвестна. Нажмите кнопку "Купить" и сделайте заказ, и мы пришлем вам цену.
Распространяем нормативную документацию с 1999 года. Пробиваем чеки, платим налоги, принимаем к оплате все законные формы платежей без дополнительных процентов. Наши клиенты защищены Законом. ООО "ЦНТИ Нормоконтроль"
Наши цены ниже, чем в других местах, потому что мы работаем напрямую с поставщиками документов.
Способы доставки
- Срочная курьерская доставка (1-3 дня)
- Курьерская доставка (7 дней)
- Самовывоз из московского офиса
- Почта РФ
Часть европейского стандарта устанавливает требования к сосудам, работающим под давлением, без огневого подвода теплоты и их частям из алюминия и алюминиевых сплавов в дополнение к общим требованиям к сосудам, работающим под давлением, без огневого подвода теплоты по ЕМ 13445:2009 (части 1 — 5). Настоящий европейский стандарт распространяется на сосуды, работающие под давлением, без огневого подвода теплоты для нагрузок до 500 полных циклов.
Оглавление
Введение
Приложение Д.А. (справочное) Перевод европейского стандарта EN 13445-8:2009 на русский язык
1 Область применения
2 Нормативные ссылки
3 Термины, определения, символы и единицы
4 Общие требования
5 Материалы
6 Проектирование
7 Изготовление
8 Контроль и испытания
9 Контроль и испытания серийно изготавливаемых сосудов, работающих под давлением, — утверждение модели
Приложение Y (справочное) Отличия между ЕМ 13445-8:2006 и ЕМ 13445-8:2009
Приложение ZA (справочное) Взаимосвязь между настоящим европейским стандартом и существенными требованиями директивы ЕС 97/23/ЕС по оборудованию, работающему под давлением
Библиография
| Дата введения | 01.01.2010 |
|---|---|
| Добавлен в базу | 01.01.2019 |
| Актуализация | 01.01.2021 |
Организации:
| 27.11.2009 | Утвержден | Госстандарт Республики Беларусь | 61 |
|---|---|---|---|
| Разработан | БелГИСС | ||
| Издан | БелГИСС | 2010 г. |
Unfired pressure vessels. Part 8. Additional requirements for pressure vessels of aluminium and aluminium alloys
Чтобы бесплатно скачать этот документ в формате PDF, поддержите наш сайт и нажмите кнопку:
стр. 1
стр. 2
стр. 3
стр. 4
стр. 5
стр. 6
стр. 7
стр. 8
стр. 9
стр. 10
стр. 11
стр. 12
стр. 13
стр. 14
стр. 15
стр. 16
стр. 17
стр. 18
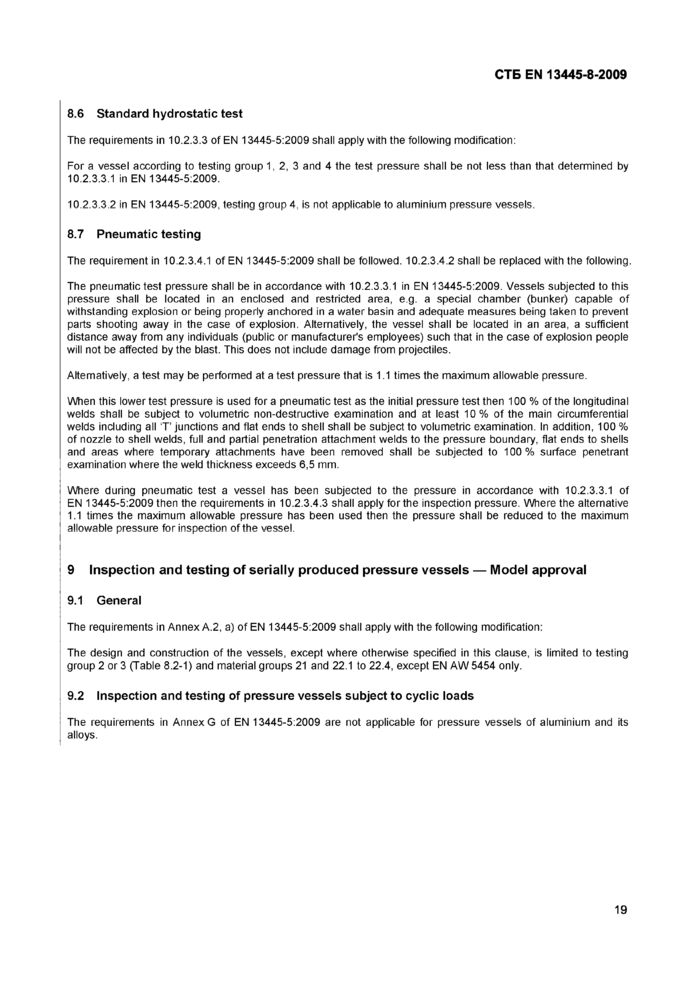
стр. 19
стр. 20
стр. 21
стр. 22
стр. 23
стр. 24
стр. 25
стр. 26
стр. 27
стр. 28
стр. 29
стр. 30
ГОСУДАРСТВЕННЫЙ СТАНДАРТ РЕСПУБЛИКИ БЕЛАРУСЬ
СОСУДЫ, РАБОТАЮЩИЕ ПОД ДАВЛЕНИЕМ
Часть 8
Дополнительные требования к сосудам, работающим под давлением, из алюминия и алюминиевых сплавов
ПАСУД31НЫ, ПРАЦУЮЧЫЯ ПАД Ц1СКАМ
Частка 8
Дадатковыя патрабаванш да пасудзш, працуючых пад щекам, з алюм1шю i алюм1шевых сплавау
(EN 13445-8:2009, ЮТ)
Издание официальное
Г осстандарт Минск
(SB
УДК 621.642-98(083.74)(476) МКС 23.020.30 КП 03 ЮТ
Ключевые слова: сосуды, работающие под давлением, из алюминия, требования
Предисловие
Цели, основные принципы, положения по государственному регулированию и управлению в области технического нормирования и стандартизации установлены Законом Республики Беларусь «О техническом нормировании и стандартизации».
1 ПОДГОТОВЛЕН ПО УСКОРЕННОЙ ПРОЦЕДУРЕ научно-производственным республиканским унитарным предприятием «Белорусский государственный институт стандартизации и сертификации» (БелГИСС)
ВНЕСЕН Госстандартом Республики Беларусь
2 УТВЕРЖДЕН И ВВЕДЕН В ДЕЙСТВИЕ постановлением Госстандарта Республики Беларусь от 27 ноября 2009 г. № 61
3 Настоящий стандарт идентичен европейскому стандарту EN 13445-8:2009 Unfired pressure vessels - Part 8: Additional requirements for pressure vessels of aluminium and aluminium alloys (Сосуды, работающие под давлением. Часть 8. Дополнительные требования к сосудам, работающим под давлением, из алюминия и алюминиевых сплавов).
Европейский стандарт разработан техническим комитетом по стандартизации CEN/TC 54 «Сосуды, работающие под давлением» Европейского комитета по стандартизации (CEN).
Перевод с английского языка (еп).
Официальные экземпляры европейского стандарта, на основе которого подготовлен настоящий государственный стандарт, и европейских стандартов, на которые даны ссылки, имеются в Национальном фонде ТИПА.
Степень соответствия - идентичная (ЮТ)
4 ВВЕДЕН ВПЕРВЫЕ
© Госстандарт, 2010
Настоящий стандарт не может быть воспроизведен, тиражирован и распространен в качестве официального издания без разрешения Госстандарта Республики Беларусь
Издан на русском языке
СТБ EN 13445-8-2009
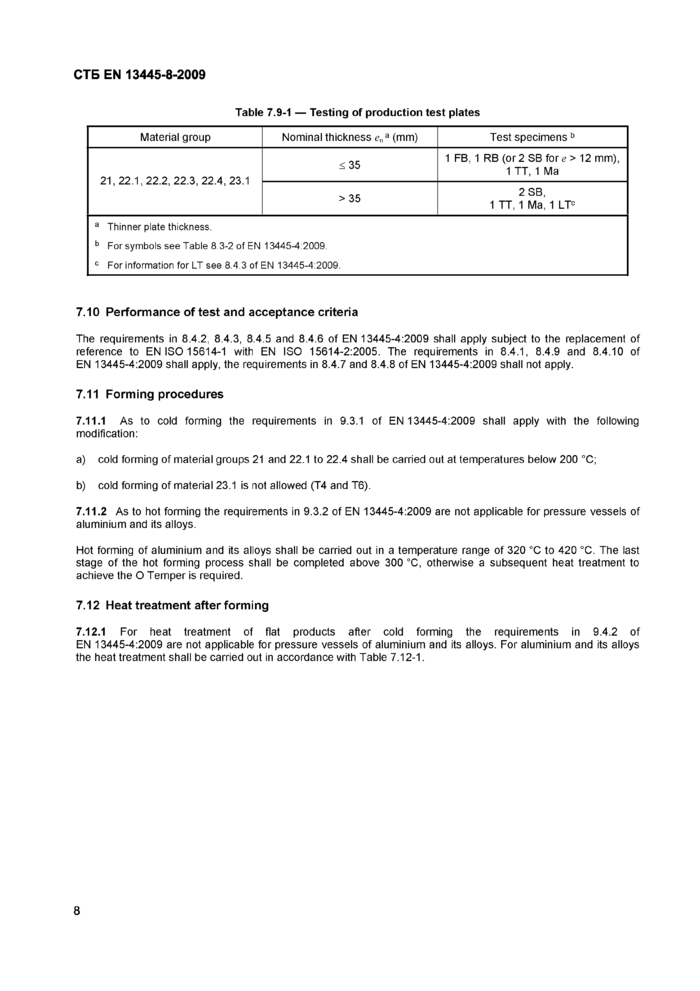
| ||||||||
|
a Thinner plate thickness. b For symbols see Table 8.3-2 of EN 13445-4:2009. c For information for LT see 8.4.3 of EN 13445-4:2009. |
7.10 Performance of test and acceptance criteria
The requirements in 8.4.2, 8.4.3, 8.4.5 and 8.4.6 of EN 13445-4:2009 shall apply subject to the replacement of reference to EN ISO 15614-1 with EN ISO 15614-2:2005. The requirements in 8.4.1, 8.4.9 and 8.4.10 of EN 13445-4:2009 shall apply, the requirements in 8.4.7 and 8.4.8 of EN 13445-4:2009 shall not apply.
7.11 Forming procedures
7.11.1 As to cold forming the requirements in 9.3.1 of EN 13445-4:2009 shall apply with the following modification:
a) cold forming of material groups 21 and 22.1 to 22.4 shall be carried out at temperatures below 200 °C;
b) cold forming of material 23.1 is not allowed (T4 and T6).
7.11.2 As to hot forming the requirements in 9.3.2 of EN 13445-4:2009 are not applicable for pressure vessels of aluminium and its alloys.
Hot forming of aluminium and its alloys shall be carried out in a temperature range of 320 °C to 420 °C. The last stage of the hot forming process shall be completed above 300 °C, otherwise a subsequent heat treatment to achieve the О Temper is required.
7.12 Heat treatment after forming
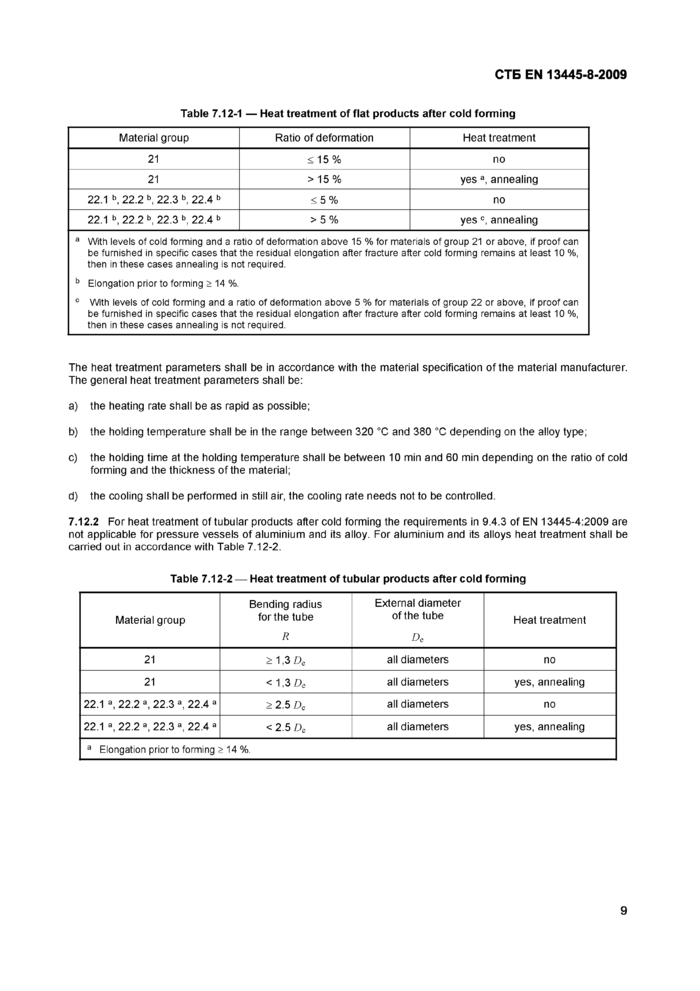
7.12.1 For heat treatment of flat products after cold forming the requirements in 9.4.2 of EN 13445-4:2009 are not applicable for pressure vessels of aluminium and its alloys. For aluminium and its alloys the heat treatment shall be carried out in accordance with Table 7.12-1.
8
|
Material group |
Ratio of deformation |
Heat treatment |
|
21 |
< 15 % |
no |
|
21 |
> 15 % |
yes a, annealing |
|
22.1 b, 22.2 b, 22.3 b, 22.4 b |
< 5 % |
no |
|
22.1 b, 22.2 b, 22.3 b, 22.4 b |
> 5 % |
yes c, annealing |
|
a With levels of cold forming and a ratio of deformation above 15 % for materials of group 21 or above, if proof can be furnished in specific cases that the residual elongation after fracture after cold forming remains at least 10 %, then in these cases annealing is not required. | ||
|
b Elongation prior to forming > 14 %. | ||
|
c With levels of cold forming and a ratio of deformation above 5 % for materials of group 22 or above, if proof can be furnished in specific cases that the residual elongation after fracture after cold forming remains at least 10 %, then in these cases annealing is not required. | ||
The heat treatment parameters shall be in accordance with the material specification of the material manufacturer. The general heat treatment parameters shall be:
a) the heating rate shall be as rapid as possible;
b) the holding temperature shall be in the range between 320 °C and 380 °C depending on the alloy type;
c) the holding time at the holding temperature shall be between 10 min and 60 min depending on the ratio of cold forming and the thickness of the material;
d) the cooling shall be performed in still air, the cooling rate needs not to be controlled.
7.12.2 For heat treatment of tubular products after cold forming the requirements in 9.4.3 of EN 13445-4:2009 are not applicable for pressure vessels of aluminium and its alloy. For aluminium and its alloys heat treatment shall be carried out in accordance with Table 7.12-2.
|
Table 7.12-2 — Heat treatment of tubular products after cold forming | ||||||||||||||||||||||||||||
| ||||||||||||||||||||||||||||
9СТБ EN 13445-8-2009
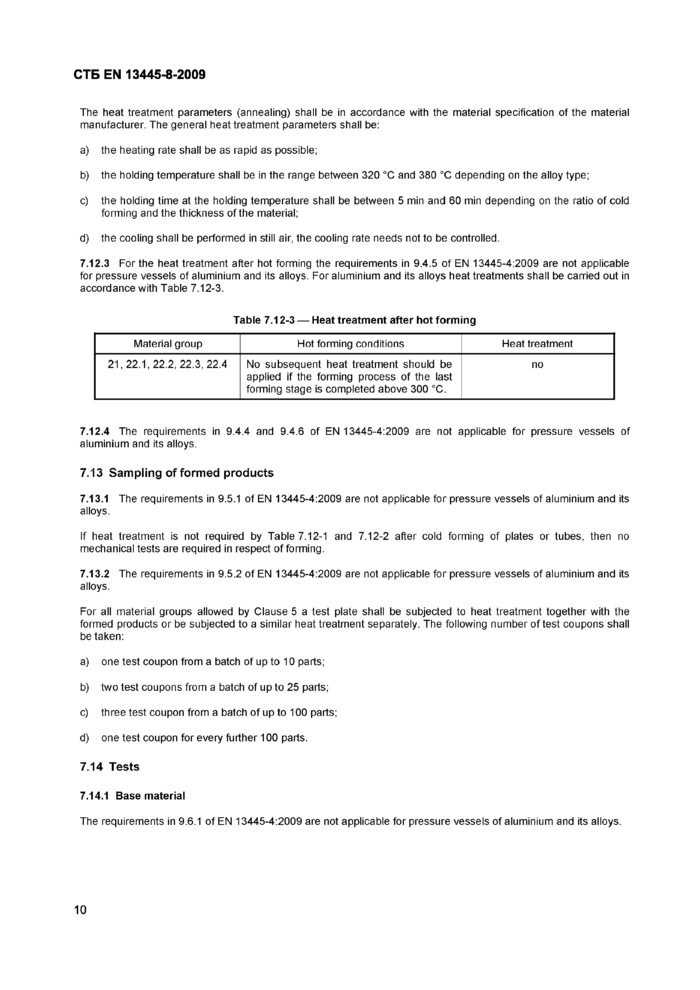
The heat treatment parameters (annealing) shall be in accordance with the material specification of the material manufacturer. The general heat treatment parameters shall be:
a) the heating rate shall be as rapid as possible;
b) the holding temperature shall be in the range between 320 °C and 380 °C depending on the alloy type;
c) the holding time at the holding temperature shall be between 5 min and 60 min depending on the ratio of cold forming and the thickness of the material;
d) the cooling shall be performed in still air, the cooling rate needs not to be controlled.
7.12.3 For the heat treatment after hot forming the requirements in 9.4.5 of EN 13445-4:2009 are not applicable for pressure vessels of aluminium and its alloys. For aluminium and its alloys heat treatments shall be carried out in accordance with Table 7.12-3.
|
Table 7.12-3 — Heat treatment after hot forming | ||||||
|
7.12.4 The requirements in 9.4.4 and 9.4.6 of EN 13445-4:2009 are not applicable for pressure vessels of aluminium and its alloys.
7.13 Sampling of formed products
7.13.1 The requirements in 9.5.1 of EN 13445-4:2009 are not applicable for pressure vessels of aluminium and its alloys.
If heat treatment is not required by Table 7.12-1 and 7.12-2 after cold forming of plates or tubes, then no mechanical tests are required in respect of forming.
7.13.2 The requirements in 9.5.2 of EN 13445-4:2009 are not applicable for pressure vessels of aluminium and its alloys.
For all material groups allowed by Clause 5 a test plate shall be subjected to heat treatment together with the formed products or be subjected to a similar heat treatment separately. The following number of test coupons shall be taken:
a) one test coupon from a batch of up to 10 parts;
b) two test coupons from a batch of up to 25 parts;
c) three test coupon from a batch of up to 100 parts;
d) one test coupon for every further 100 parts.
7.14 Tests
7.14.1 Base material
The requirements in 9.6.1 of EN 13445-4:2009 are not applicable for pressure vessels of aluminium and its alloys.
10
СТБ EN 13445-8-2009
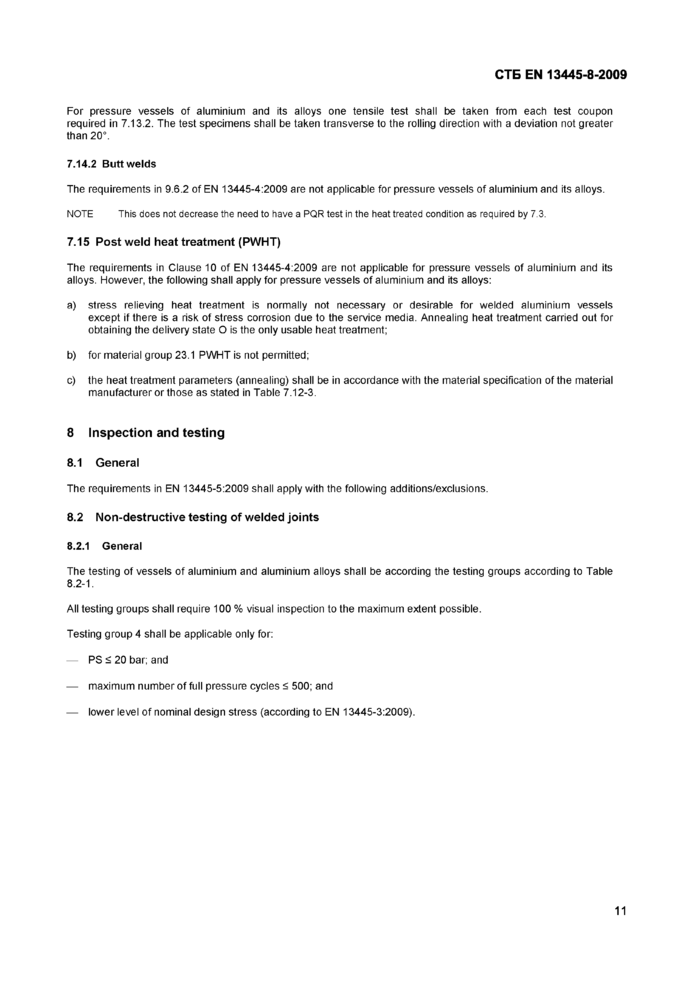
For pressure vessels of aluminium and its alloys one tensile test shall be taken from each test coupon required in 7.13.2. The test specimens shall be taken transverse to the rolling direction with a deviation not greater than 20°.
7.14.2 Buttwelds
The requirements in 9.6.2 of EN 13445-4:2009 are not applicable for pressure vessels of aluminium and its alloys. NOTE This does not decrease the need to have a PQR test in the heat treated condition as required by 7.3.
7.15 Post weld heat treatment (PWHT)
The requirements in Clause 10 of EN 13445-4:2009 are not applicable for pressure vessels of aluminium and its alloys. However, the following shall apply for pressure vessels of aluminium and its alloys:
a) stress relieving heat treatment is normally not necessary or desirable for welded aluminium vessels except if there is a risk of stress corrosion due to the service media. Annealing heat treatment carried out for obtaining the delivery state О is the only usable heat treatment;
b) for material group 23.1 PWHT is not permitted;
c) the heat treatment parameters (annealing) shall be in accordance with the material specification of the material manufacturer or those as stated in Table 7.12-3.
8 Inspection and testing
8.1 General
The requirements in EN 13445-5:2009 shall apply with the following additions/exclusions.
8.2 Non-destructive testing of welded joints
8.2.1 General
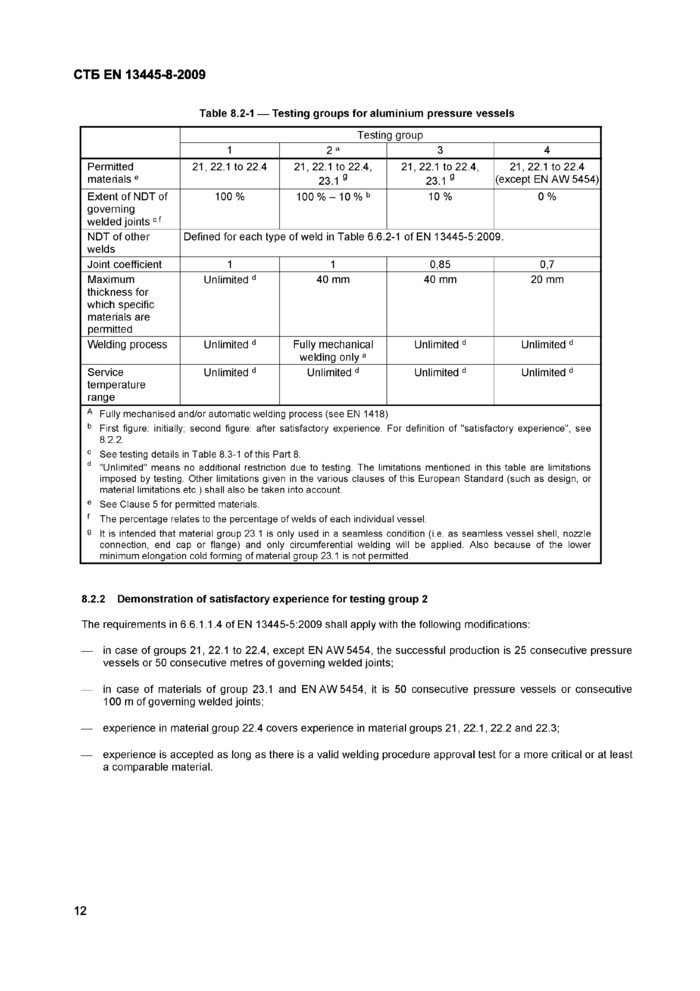
The testing of vessels of aluminium and aluminium alloys shall be according the testing groups according to Table 8.2-1.
All testing groups shall require 100 % visual inspection to the maximum extent possible.
Testing group 4 shall be applicable only for:
— PS < 20 bar; and
— maximum number of full pressure cycles < 500; and
lower level of nominal design stress (according to EN 13445-3:2009).
11
СТБ EN 13445-8-2009
| ||||||||||||||||||||||||||||||||||||||||||||
|
A Fully mechanised and/or automatic welding process (see EN 1418) b First figure: initially; second figure: after satisfactory experience. For definition of "satisfactory experience", see 8.2.2. c See testing details in Table 8.3-1 of this Part 8. d "Unlimited" means no additional restriction due to testing. The limitations mentioned in this table are limitations imposed bytesting. Other limitations given in the various clauses of this European Standard (such as design, or material limitations etc.) shall also be taken into account. | ||||||||||||||||||||||||||||||||||||||||||||
e See Clause 5 for permitted materials.
f The percentage relates to the percentage of welds of each individual vessel.
s It is intended that material group 23.1 is only used in a seamless condition (i.e. as seamless vessel shell, nozzle connection, end cap or flange) and only circumferential welding will be applied. Also because of the lower minimum elongation cold forming of material group 23.1 is not permitted.
8.2.2 Demonstration of satisfactory experience for testing group 2
The requirements in 6.6.1.1.4 of EN 13445-5:2009 shall apply with the following modifications:
— in case of groups 21,22.1 to 22.4, except EN AW 5454, the successful production is 25 consecutive pressure vessels or 50 consecutive metres of governing welded joints;
— in case of materials of group 23.1 and EN AW 5454, it is 50 consecutive pressure vessels or consecutive 100 m of governing welded joints;
— experience in material group 22.4 covers experience in material groups 21,22.1,22.2 and 22.3;
— experience is accepted as long as there is a valid welding procedure approval test for a more critical or at least a comparable material.
12
СТБ EN 13445-8-20098.2.3 Symbols
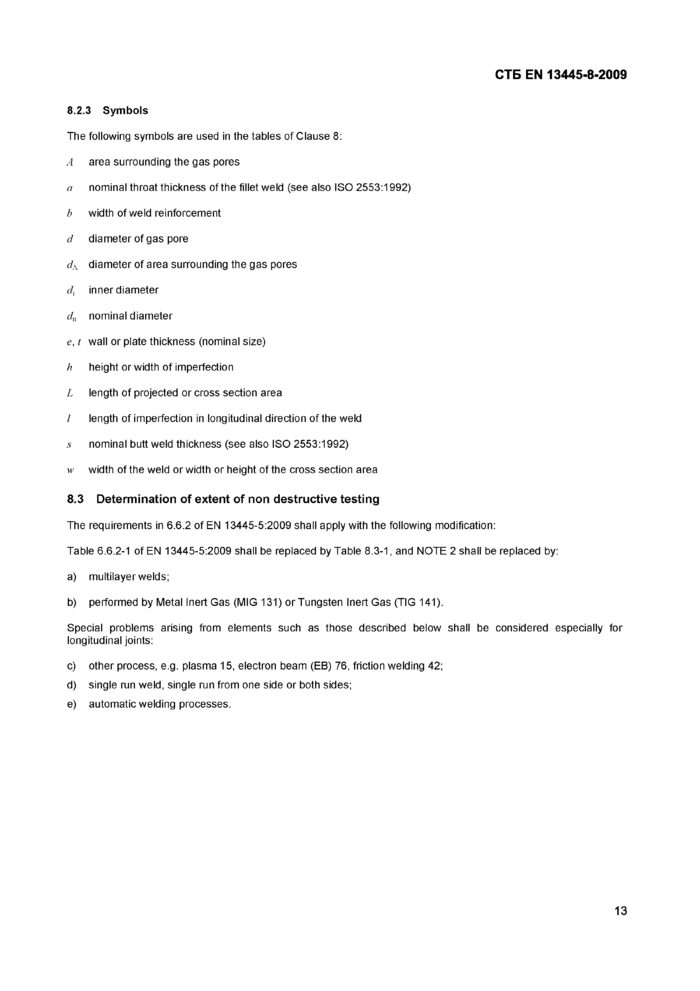
The following symbols are used in the tables of Clause 8:
A area surrounding the gas pores
a nominal throat thickness of the fillet weld (see also ISO 2553:1992)
b width of weld reinforcement
d diameter of gas pore
dA diameter of area surrounding the gas pores
d; inner diameter
dn nominal diameter
e, t wall or plate thickness (nominal size)
h height or width of imperfection
L length of projected or cross section area
/ length of imperfection in longitudinal direction of the weld
s nominal butt weld thickness (see also ISO 2553:1992)
w width of the weld or width or height of the cross section area
8.3 Determination of extent of non destructive testing
The requirements in 6.6.2 of EN 13445-5:2009 shall apply with the following modification:
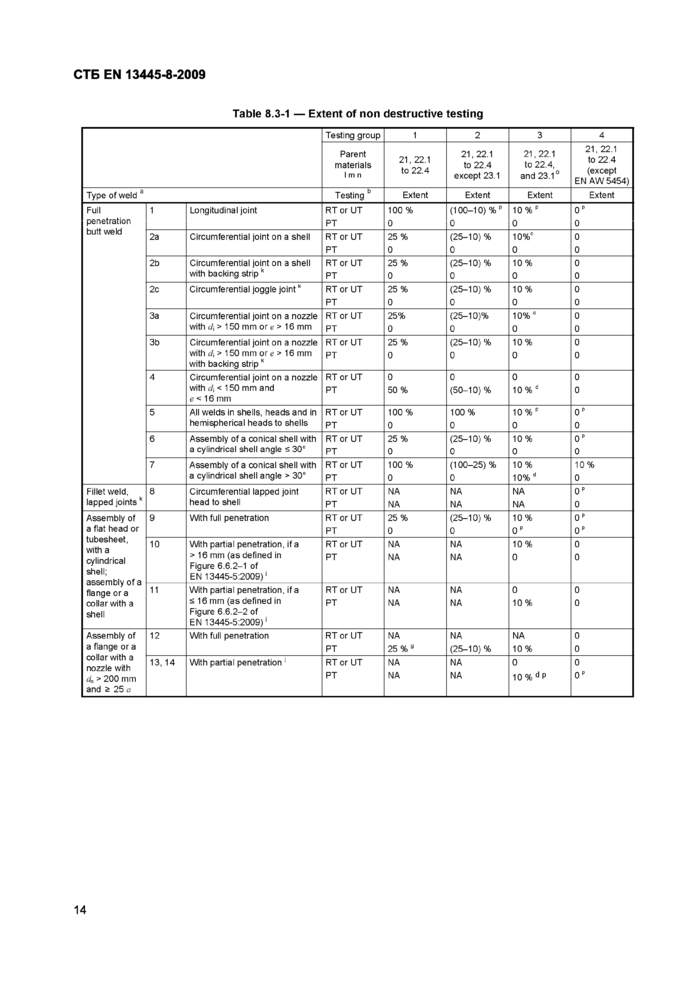
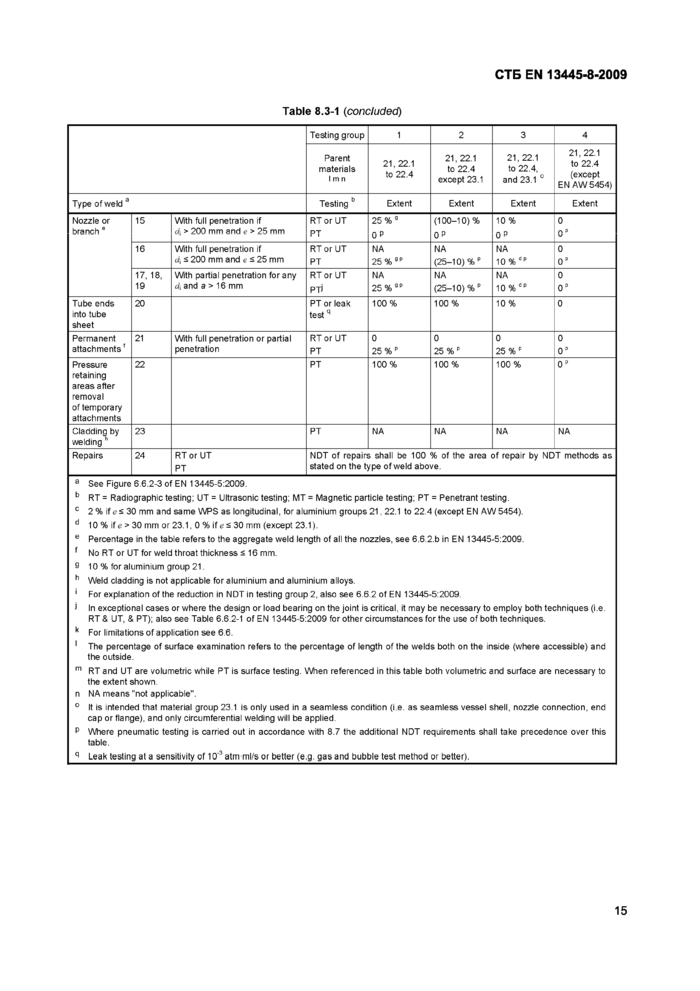
Table 6.6.2-1 of EN 13445-5:2009 shall be replaced by Table 8.3-1, and NOTE 2 shall be replaced by:
a) multilayer welds;
b) performed by Metal Inert Gas (MIG 131) or Tungsten Inert Gas (TIG 141).
Special problems arising from elements such as those described below shall be considered especially for longitudinal joints:
c) other process, e.g. plasma 15, electron beam (EB) 76, friction welding 42;
d) single run weld, single run from one side or both sides;
e) automatic welding processes.
13
СТБ EN 13445-8-2009
|
Table 8.3-1 — Extent of non destructive testing | |||||||||||||||||||||||||||||||||||||||||||||||||||||||||||||||||||||||||||||||||||||||||||||||||||||||||||||||||||||||||||||||||||||||||||||||||||||||||||||||||||||||||||||||||||||||||||||||||||||||||||||||||||||||||||||||||||||||||||||||||||||||||||||||||||||||||||||
| |||||||||||||||||||||||||||||||||||||||||||||||||||||||||||||||||||||||||||||||||||||||||||||||||||||||||||||||||||||||||||||||||||||||||||||||||||||||||||||||||||||||||||||||||||||||||||||||||||||||||||||||||||||||||||||||||||||||||||||||||||||||||||||||||||||||||||||
14
СТБ EN 13445-8-2009
|
Table 8.3-1 (concluded) | |||||||||||||||||||||||||||||||||||||||||||||||||||||||||||||||||||||||||||||||||||
| |||||||||||||||||||||||||||||||||||||||||||||||||||||||||||||||||||||||||||||||||||
|
a See Figure 6.6.2-3 of EN 13445-5:2009. | |||||||||||||||||||||||||||||||||||||||||||||||||||||||||||||||||||||||||||||||||||
b RT = Radiographic testing; UT = Ultrasonic testing; MT = Magnetic particle testing; PT = Penetrant testing.
c 2 % if e £ 30 mm and same WPS as longitudinal, for aluminium groups 21,22.1 to 22.4 (except EN AW 5454).
d 10 % if e > 30 mm or 23.1,0 % if e < 30 mm (except 23.1).
e Percentage in the table refers to the aggregate weld length of all the nozzles, see 6.6.2.b in EN 13445-5:2009.
f No RT or UT for weld throat thickness < 16 mm.
9 10 % for aluminium group 21.
h Weld cladding is not applicable for aluminium and aluminium alloys.
' For explanation of the reduction in NDT in testing group 2, also see 6.6.2 of EN 13445-5:2009.
i In exceptional cases or where the design or load bearing on the joint is critical, it may be necessary to employ both techniques (i.e. RT & UT, & PT); also see Table 6.6.2-1 of EN 13445-5:2009 for other circumstances for the use of both techniques.
k For limitations of application see 6.6.
1 The percentage of surface examination refers to the percentage of length of the welds both on the inside (where accessible) and the outside.
m RT and UT are volumetric while PT is surface testing. When referenced in this table both volumetric and surface are necessary to the extent shown.
n NA means "not applicable".
0 It is intended that material group 23.1 is only used in a seamless condition (i.e. as seamless vessel shell, nozzle connection, end cap or flange), and only circumferential welding will be applied.
P Where pneumatic testing is carried out in accordance with 8.7 the additional NDT requirements shall take precedence over this table.
q Leak testing at a sensitivity of 10'3 atnrml/s or better (e.g, gas and bubble test method or better).
15
СТБ EN 13445-8-2009
8.4 Applicable non destructive testing techniques
8.4.1 NDT methods
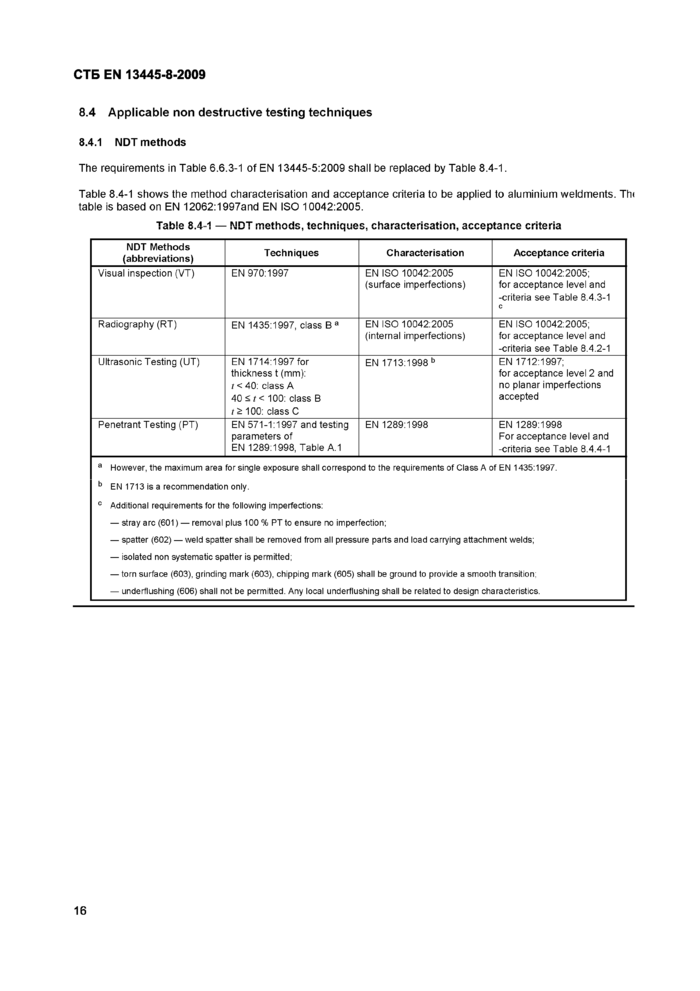
The requirements in Table 6.6.3-1 of EN 13445-5:2009 shall be replaced by Table 8.4-1.
|
Table 8.4-1 shows the method characterisation and acceptance criteria to be applied to aluminium weldments. Th< table is based on EN 12062:1997and EN ISO 10042:2005. Tahtla Й Л.Л | ||||||||||||||||||||||||
| ||||||||||||||||||||||||
16
СТБ EN 13445-8-20098.4.2 Acceptance criteria for radiographic testing (RT)
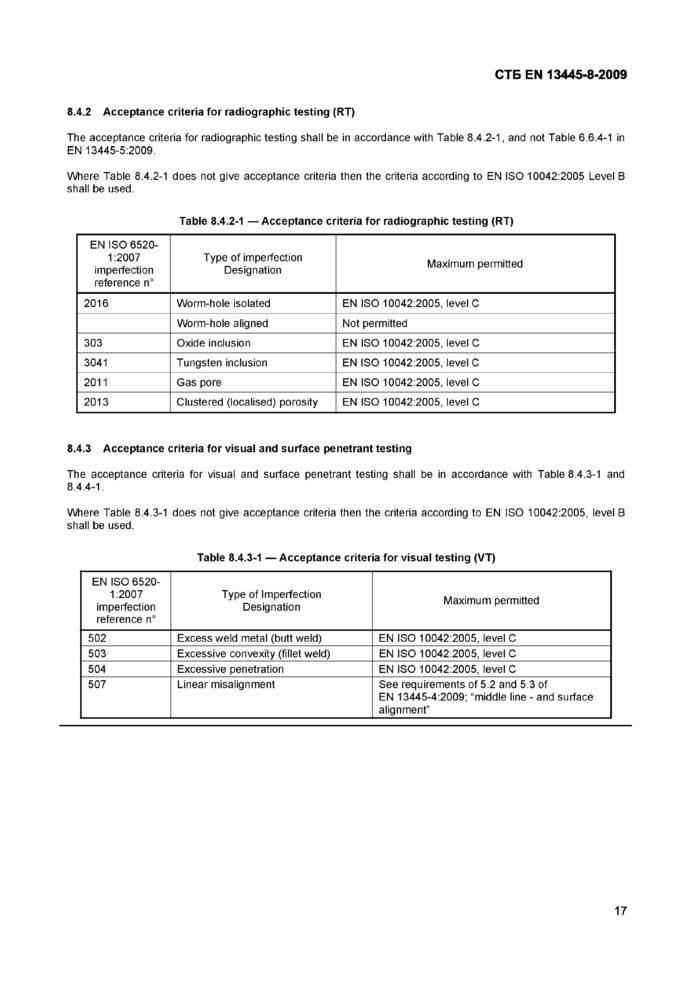
The acceptance criteria for radiographic testing shall be in accordance with Table 8.4.2-1, and not Table 6.6.4-1 in EN 13445-5:2009.
Where Table 8.4.2-1 does not give acceptance criteria then the criteria according to EN ISO 10042:2005 Level В shall be used.
|
Table 8.4.2-1 —Acceptance criteria for radiographic testing (RT) | |||||||||||||||||||||
|
8.4.3 Acceptance criteria for visual and surface penetrant testing
The acceptance criteria for visual and surface penetrant testing shall be in accordance with Table 8.4.3-1 and 8.4.4-1.
Where Table 8.4.3-1 does not give acceptance criteria then the criteria according to EN ISO 10042:2005, level В shall be used.
|
Table 8.4.3-1 — Acceptance criteria for visual testing (VT) | |||||||||||||||
|
17
СТБ EN 13445-8-2009
Введение
Настоящий стандарт содержит текст европейского стандарта EN 13445-8:2009 на языке оригинала и его перевод на русский язык (справочное приложение Д.А).
Введен в действие как стандарт, на который есть ссылка в Еврокоде EN 1993-1-8:2005.
ГОСУДАРСТВЕННЫЙ СТАНДАРТ РЕСПУБЛИКИ БЕЛАРУСЬ
СОСУДЫ, РАБОТАЮЩИЕ ПОД ДАВЛЕНИЕМ Часть 8
Дополнительные требования к сосудам, работающим под давлением, из алюминия и алюминиевых сплавов
ПАСУД31НЫ, ПРАЦУЮЧЫЯ ПАД Ц1СКАМ Частка 8
Дадатковыя патрабаванш да пасудзш, працуючых пад ц1скам, з алюмш1ю i алюм1шевых сплавау
Unfired pressure vessels Part 8
Additional requirements for pressure vessels of aluminium and aluminium alloys
Дата введения 2010-01-01
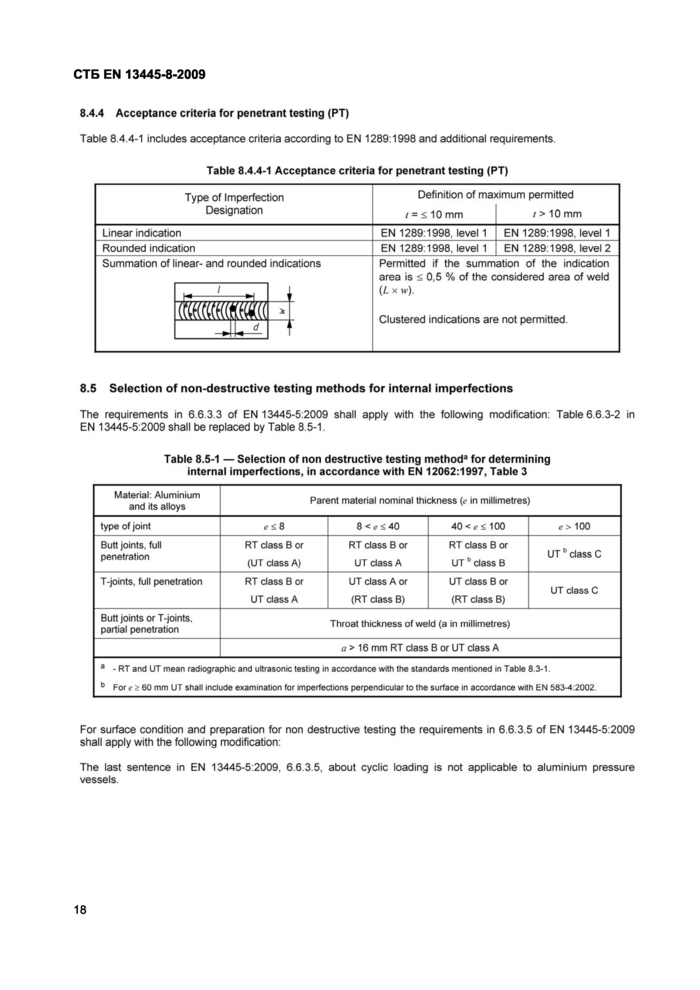
СТБ EN 13445-8-20098.4.4 Acceptance criteria for penetrant testing (PT)
Table 8.4.4-1 includes acceptance criteria according to EN 1289:1998 and additional requirements.
|
Table 8.4.4-1 Acceptance criteria for penetrant testing (PT) | ||||||||||||||||||||||||||||||||||||||||
| ||||||||||||||||||||||||||||||||||||||||
8.5 Selection of non-destructive testing methods for internal imperfections
The requirements in 6.6.3.3 of EN 13445-5:2009 shall apply with the following modification: Table 6.6.3-2 in EN 13445-5:2009 shall be replaced by Table 8.5-1.
|
Table 8.5-1 — Selection of non destructive testing method3 for determining internal imperfections, in accordance with EN 12062:1997, Table 3 | |||||||||||||||||||||||||||||||||||
| |||||||||||||||||||||||||||||||||||
For surface condition and preparation for non destructive testing the requirements in 6.6.3.5 of EN 13445-5:2009 shall apply with the following modification:
The last sentence in EN 13445-5:2009, 6.6.3.5, about cyclic loading is not applicable to aluminium pressure vessels.
18СТБ EN 13445-8-2009
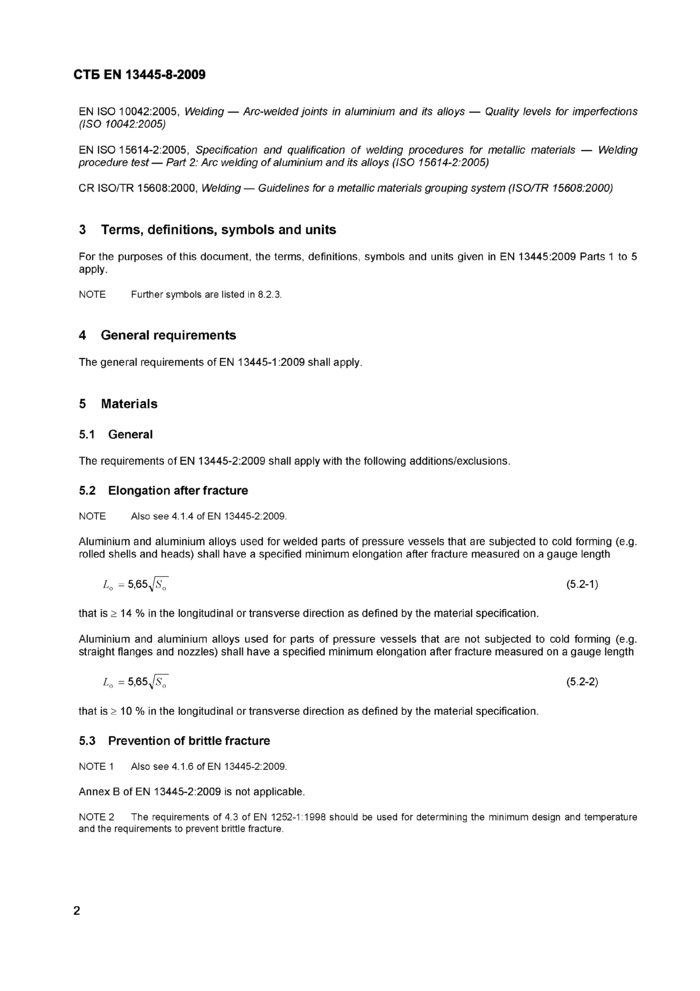
1 Scope
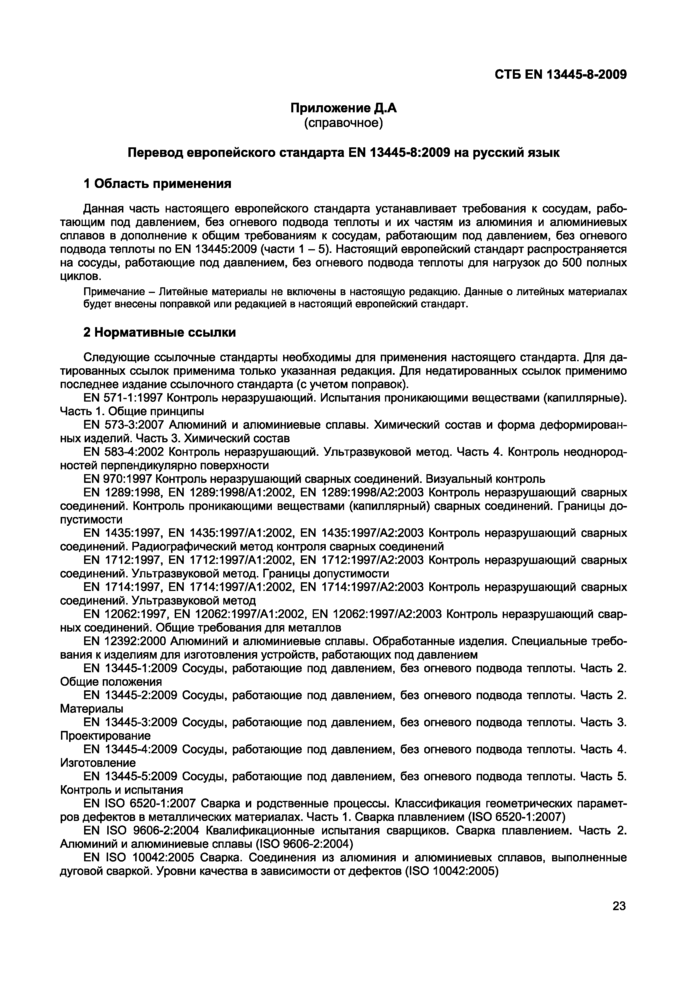
This Part 8 of this European Standard specifies requirements for unfired pressure vessels and their parts made of aluminium and aluminium alloys in addition to the general requirements for unfired pressure vessels under EN 13445:2009 Parts 1 to 5. This European Standard specifies unfired pressure vessels for loads up to 500 full cycles.
NOTE Cast materials are not included in this version. Details regarding cast materials will be subject to an amendment to or a revision of this European Standard.
2 Normative references
The following referenced documents are indispensable for the application of this document. For dated references, only the edition cited applies. For undated references, the latest edition of the referenced document (including any amendments) applies.
EN 571-1:1997, Non-destructive testing — Penetrant testing — Part 1: General principles
EN 573-3:2007, Aluminium and aluminium alloys — Chemical composition and form of wrought products — Part 3: Chemical composition
EN 583-4:2002, Non-destructive testing — Ultrasonic examination — Part 4: Examination for discontinuities perpendicular to the surface
EN 970:1997, Non-destructive examination of fusion welds— Visual examination
EN 1289:1998, EN 1289:1998/A1:2002, EN 1289:1998/A2:2003, Non-destructive examination of welds — Penetrant testing of welds — Acceptance levels
EN 1435:1997, EN 1435:1997/A1:2002, EN 1435:1997/A2:2003, Non-destructive examination of welds — Radiographic examination of welded joints
EN 1712:1997, EN 1712:1997/A1:2002, EN 1712:1997/A2:2003, Non-destructive examination of welds —
Ultrasonic examination of welded joints — Acceptance levels
EN 1714:1997, EN 1714:1997/A1:2002, EN 1714:1997/A2:2003, Non-destructive examination of welds —
Ultrasonic examination of welded joints
EN 12062:1997, EN 12062:1997/A1:2002, EN 12062:1997/A2:2003, Non-destructive examination of welds — General rules for metallic materials
EN 12392:2000, Aluminium and aluminium alloys — Wrought products — Special requirements for products intended for the production of pressure equipment
EN 13445-1:2009, Unfired pressure vessels — Part 1: General
EN 13445-2:2009, Unfired pressure vessels — Part 2: Materials
EN 13445-3:2009, Unfired pressure vessels— Part 3: Design
fm 13445-4:2009, Unfired pressure vessels — Pert 4/ Fsbricetion
EN 13445-5:2009, Unfired pressure vessels — Part 5: Inspection and testing
EN ISO 6520-1:2007, Welding and allied processes — Classification of geometric imperfections in metallic materials — Part 1: Fusion welding (ISO 6520-1:2007)
EN ISO 9606-2:2004, Qualification test of welders — Fusion welding — Part 2: Aluminium and aluminium alloys (ISO 9606-2:2004)
1
СТБ EN 13445-8-2009
EN ISO 10042:2005, Welding — Arc-welded joints in aluminium and its alloys — Quality levels for imperfections (ISO 10042:2005)
EN ISO 15614-2:2005, Specification and qualification of welding procedures for metallic materials — Welding procedure test— Part 2: Arc welding of aluminium and its alloys (ISO 15614-2:2005)
CR ISO/TR 15608:2000, Welding — Guidelines for a metallic materials grouping system (ISO/TR 15608:2000)
3 Terms, definitions, symbols and units
For the purposes of this document, the terms, definitions, symbols and units given in EN 13445:2009 Parts 1 to 5 apply.
NOTE Further symbols are listed in 8.2.3.
4 General requirements
The general requirements of EN 13445-1:2009 shall apply.
5 Materials
5.1 General
The requirements of EN 13445-2:2009 shall apply with the following additions/exclusions.
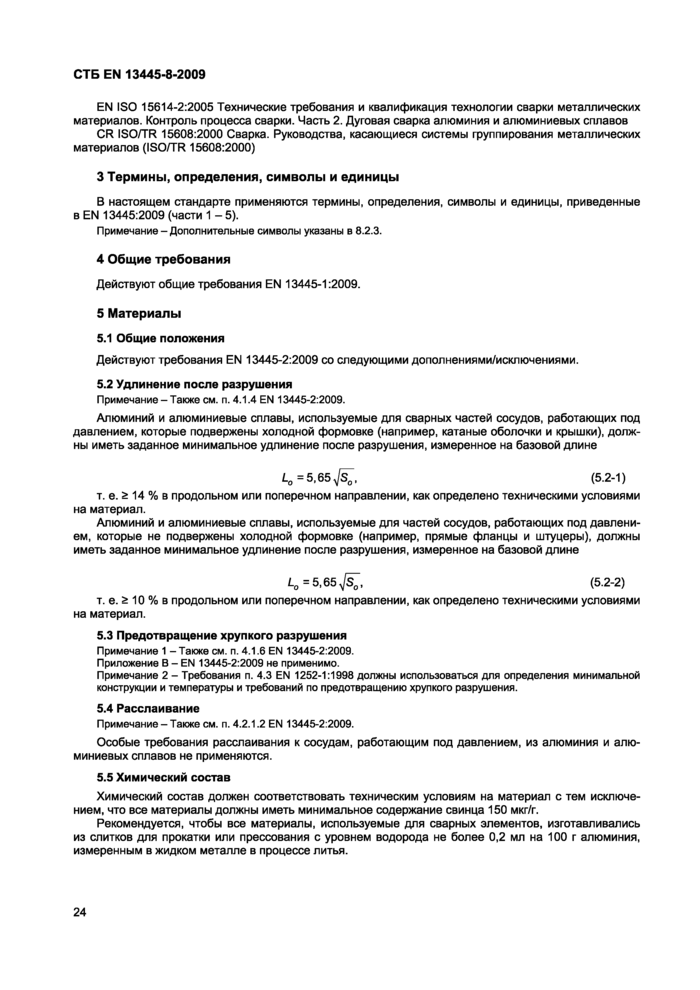
5.2 Elongation after fracture
NOTE Also see 4.1.4 of EN 13445-2:2009.
Aluminium and aluminium alloys used for welded parts of pressure vessels that are subjected to cold forming (e.g. rolled shells and heads) shall have a specified minimum elongation after fracture measured on a gauge length
L0 = 5,65^7 (5-2-1)
that is > 14 % in the longitudinal or transverse direction as defined by the material specification.
Aluminium and aluminium alloys used for parts of pressure vessels that are not subjected to cold forming (e.g. straight flanges and nozzles) shall have a specified minimum elongation after fracture measured on a gauge length
L0 = 5,65^ (5.2-2)
that is > 10 % in the longitudinal or transverse direction as defined by the material specification.
5.3 Prevention of brittle fracture
NOTE 1 Also see 4.1.6 of EN 13445-2:2009.
Annex В of EN 13445-2:2009 is not applicable.
NOTE 2 The requirements of 4.3 of EN 1252-1:1998 should be used for determining the minimum design and temperature and the requirements to prevent brittle fracture.
2
СТБ EN 13445-8-2009
5.4 Lamellar tearing
NOTE Also see 4.2.1.2 of EN 13445-2:2009.
Specific requirements of lamellar tearing for pressure vessels of aluminium and its alloys are not applicable.
5.5 Chemical composition
The chemical composition shall be in accordance with their material specification, except that all materials sha have a maximum lead content of 150 pig/g.
It is recommended that the material to be used for welded components be produced from rolling or extrusion ingot: with hydrogen level no greater than 0,2 ml per 100 g aluminium, measured on liquid metal during casting.
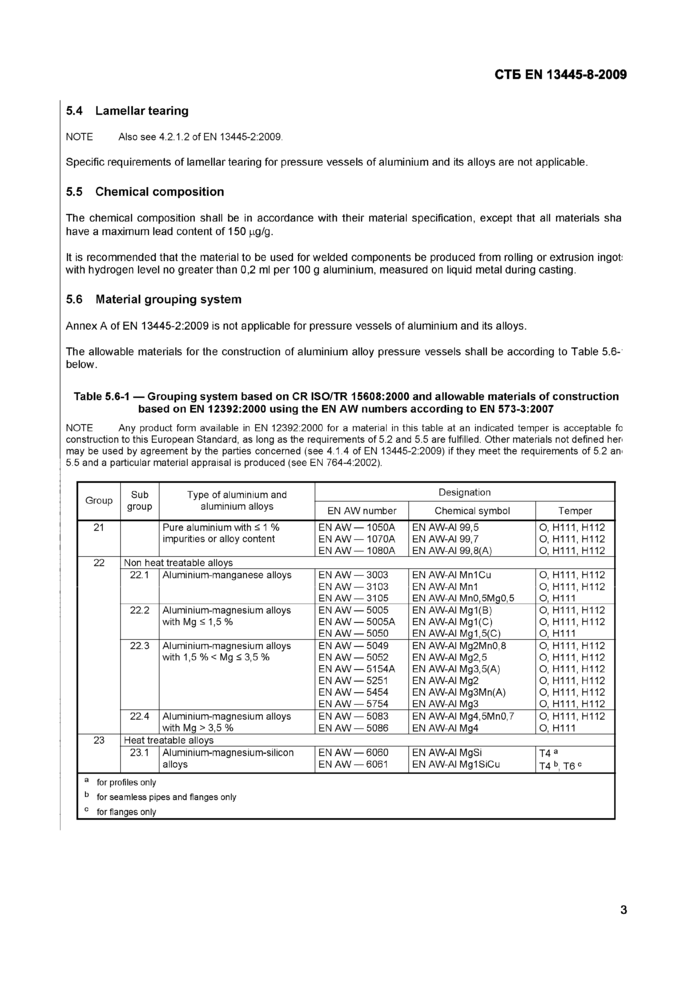
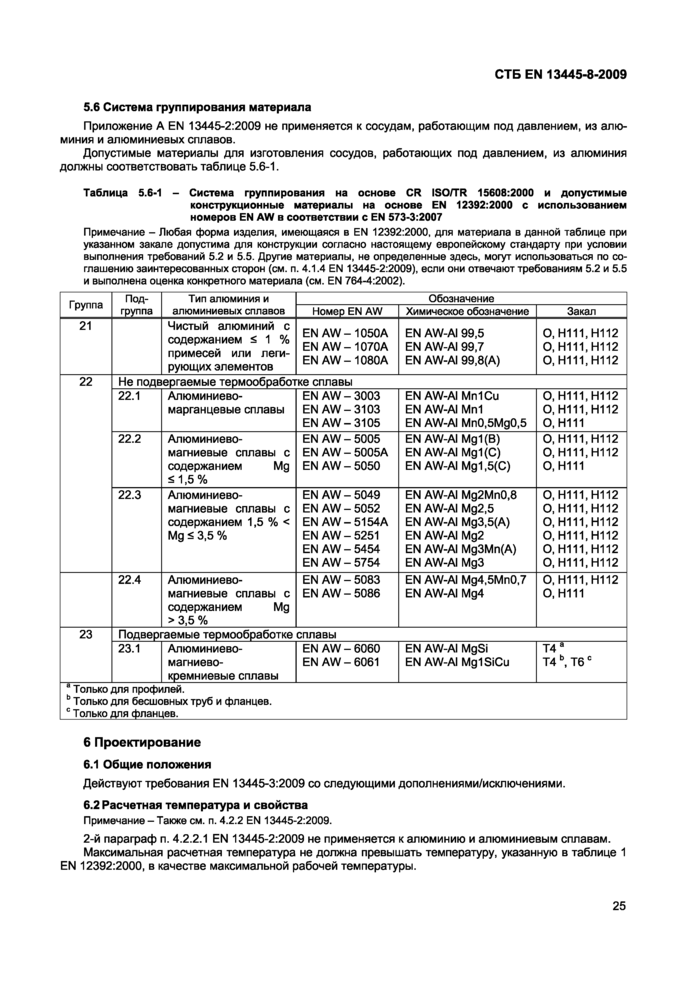
5.6 Material grouping system
Annex A of EN 13445-2:2009 is not applicable for pressure vessels of aluminium and its alloys.
The allowable materials for the construction of aluminium alloy pressure vessels shall be according to Table 5.6-below.
Table 5.6-1 — Grouping system based on CR ISO/TR 15608:2000 and allowable materials of construction based on EN 12392:2000 using the EN AW numbers according to EN 573-3:2007
|
NOTE Any product form available in EN 12392:2000 for a material in this table at an indicated temper is acceptable fo construction to this European Standard, as long as the requirements of 5.2 and 5.5 are fulfilled. Other materials not defined hen may be used by agreement by the parties concerned (see 4.1.4 of EN 13445-2:2009) if they meet the requirements of 5.2 an< 5.5 and a particular material appraisal is produced (see EN 764-4:2002). | ||||||||||||||||||||||||||||||||||||||||||||||||||||
| ||||||||||||||||||||||||||||||||||||||||||||||||||||
|
a for profiles only b for seamless pipes and flanges only 0 for flanges only | ||||||||||||||||||||||||||||||||||||||||||||||||||||
3
СТБ EN 13445-8-20096 Design6.1 General
6.1 General
The requirements of EN 13445-3:2009 shall apply with the following additions/exclusions.
6.2 Design temperature and properties
NOTE Also see 4.2.2 of EN 13445-2:2009.
The 2nd paragraph of 4.2.2.1 of EN 13445-2:2009 is not applicable for aluminium and its alloys.
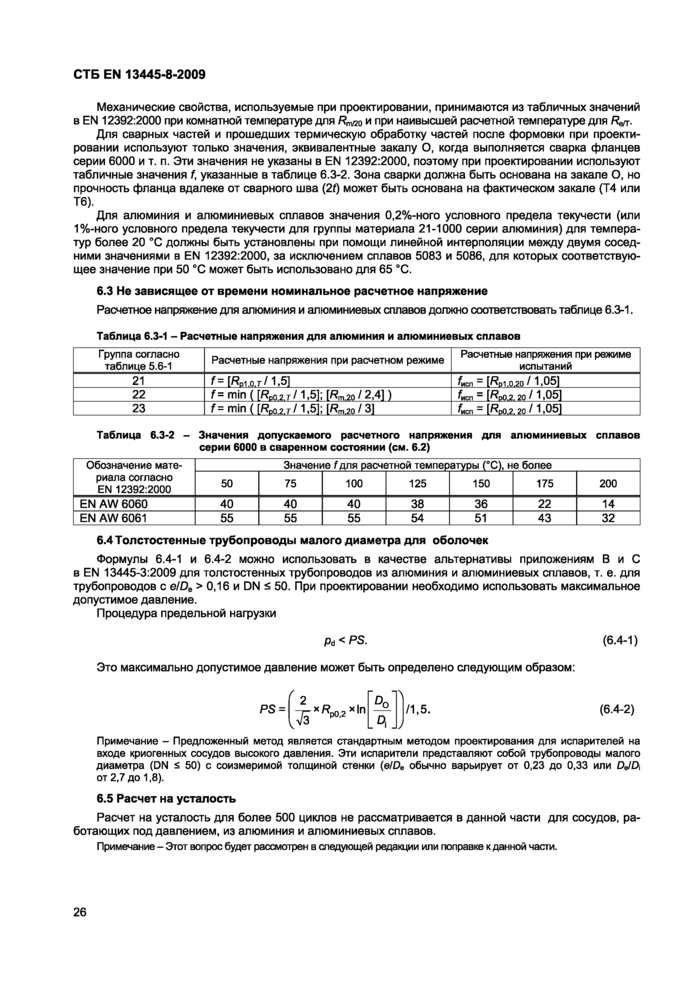
The maximum design temperature shall not exceed that defined in Table 1 of EN 12392:2000 as the maximum working temperature.
The mechanical properties used for design shall be taken from the tabulated values in EN 12392:2000 at room temperature forR^o and at the highest design temperature former.
For welded parts and heat treated parts after forming only the values equivalent to the О temper shall be used for design when 6000 series flanges etc. are welded. These values are not quoted in EN 12392:2000 and so the tabulated values for/shown in Table 6.3-2 shall be used for design. The weld area shall be based on the О temper but the flange strength away from the weld (21) may be based on the actual temper (T4 or T6).
For aluminium and aluminium alloys values of 0,2 % proof strength (or 1 % proof strength for material group 21-1000 series aluminium) for temperatures above 20 °C shall be established by linear interpolation between two adjacent values in EN 12392:2000 except that for alloys 5083 and 5086 the respective value at 50 °C may be used for 65 °C.
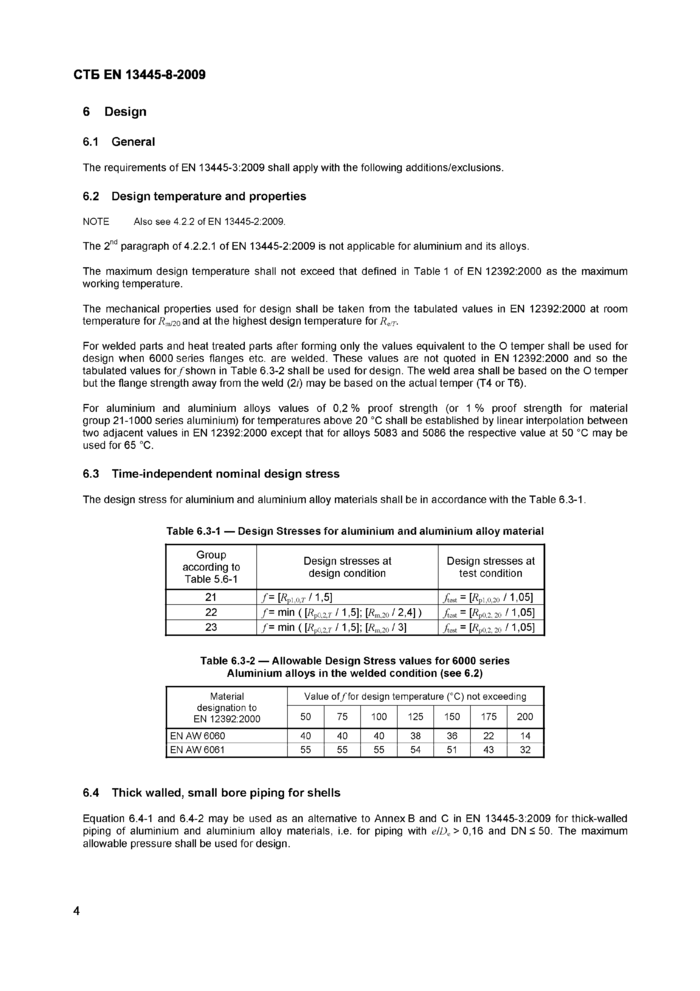
6.3 Time-independent nominal design stress
The design stress for aluminium and aluminium alloy materials shall be in accordance with the Table 6.3-1.
|
Table 8.3-1 — Desiyn Stresses for aluminium and aiuminiuiii alloy material | ||||||||||||
|
|
Table 6.3-2 — Allowable Design Stress values for 6000 series Aluminium alloys in the welded condition (see 6.2) | |||||||||||||||||||||||||||||||
| |||||||||||||||||||||||||||||||
6.4 Thick walled, small bore piping for shells
Equation 6.4-1 and 6.4-2 may be used as an alternative to Annex В and C in EN 13445-3:2009 for thick-walled piping of aluminium and aluminium alloy materials, i.e. for piping with е/Д,>0,16 and DN < 50. The maximum allowable pressure shall be used for design.
4
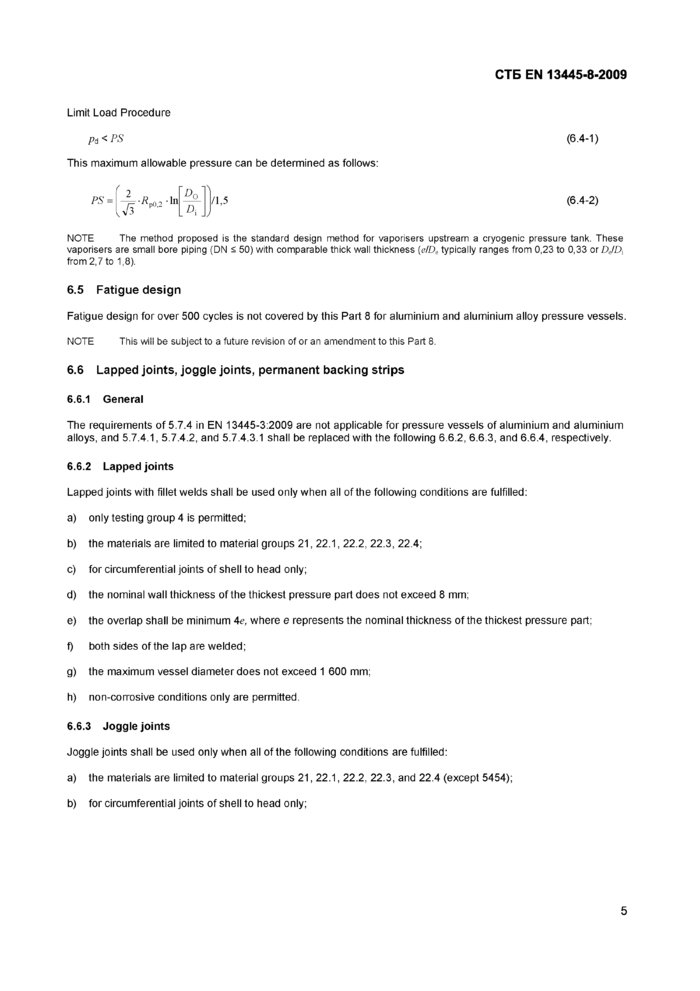
Limit Load Procedure
Pa < PS
This maximum allowable pressure can be determined as follows:
PS =
vr^2'ln
Dc
A
/1,5
СТБ EN 13445-8-2009
(6.4-1)
(6.4-2)
NOTE The method proposed is the standard design method for vaporisers upstream a cryogenic pressure tank. These vaporisers are small bore piping (DN < 50) with comparable thick wall thickness (е/Д typically ranges from 0,23 to 0,33 or Д/Д from 2,7 to 1,8).
6.5 Fatigue design
Fatigue design for over 500 cycles is not covered by this Part 8 for aluminium and aluminium alloy pressure vessels.
nvj i c. i niS Win ue SUujeCi iu a iliiUre revisiun ui иГ an аГПемшЛбш iu niiS rail o.
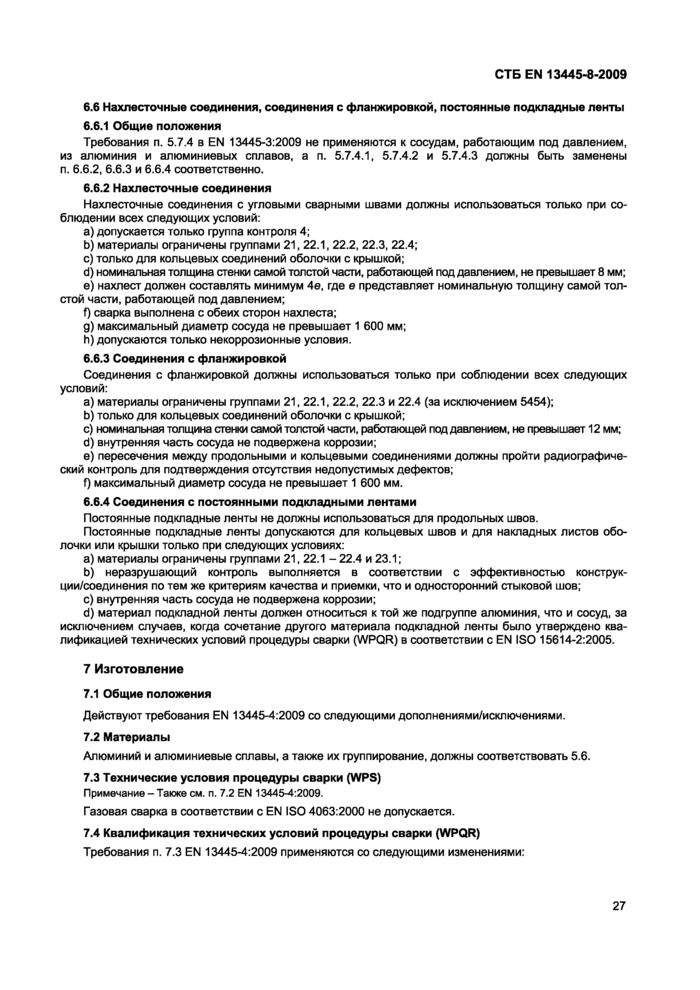
6.6 Lapped joints, joggle joints, permanent backing strips6.6.1 General
The requirements of 5.7.4 in EN 13445-3:2009 are not applicable for pressure vessels of aluminium and aluminium alloys, and 5.7.4.1,5.7.4.2, and 5.7.4.3.1 shall be replaced with the following 6.6.2, 6.6.3, and 6.6.4, respectively.
6.6.2 Lapped joints
Lapped joints with fillet welds shall be used only when all of the following conditions are fulfilled:
a) only testing group 4 is permitted;
b) the materials are limited to material groups 21,22.1,22.2, 22.3, 22.4;
c) for circumferential joints of shell to head only;
d) the nominal wall thickness of the thickest pressure part does not exceed 8 mm;
e) the overlap shall be minimum Ae, where e represents the nominal thickness of the thickest pressure part;
f) both sides of the lap are welded;
g) the maximum vessel diameter does not exceed 1 600 mm;
h) non-corrosive conditions only are permitted.
6.6.3 Joggle joints
Joggle joints shall be used only when all of the following conditions are fulfilled:
a) the materials are limited to material groups 21,22.1,22.2, 22.3, and 22.4 (except 5454);
b) for circumferential joints of shell to head only;
5
СТБ EN 13445-8-2009
Limit Load Procedure
Pa < PS
This maximum allowable pressure can be determined as follows:
PS =
vr^2'ln
Dc
A
/1,5
СТБ EN 13445-8-2009
(6.4-1)
(6.4-2)
NOTE The method proposed is the standard design method for vaporisers upstream a cryogenic pressure tank. These vaporisers are small bore piping (DN < 50) with comparable thick wall thickness (е/Д typically ranges from 0,23 to 0,33 or Д/Д from 2,7 to 1,8).
6.5 Fatigue design
Fatigue design for over 500 cycles is not covered by this Part 8 for aluminium and aluminium alloy pressure vessels.
nvj i c. i niS Win ue SUujeCi iu a iliiUre revisiun ui иГ an аГПемшЛбш iu niiS rail o.
6.6 Lapped joints, joggle joints, permanent backing strips6.6.1 General
The requirements of 5.7.4 in EN 13445-3:2009 are not applicable for pressure vessels of aluminium and aluminium alloys, and 5.7.4.1,5.7.4.2, and 5.7.4.3.1 shall be replaced with the following 6.6.2, 6.6.3, and 6.6.4, respectively.
6.6.2 Lapped joints
Lapped joints with fillet welds shall be used only when all of the following conditions are fulfilled:
a) only testing group 4 is permitted;
b) the materials are limited to material groups 21,22.1,22.2, 22.3, 22.4;
c) for circumferential joints of shell to head only;
d) the nominal wall thickness of the thickest pressure part does not exceed 8 mm;
e) the overlap shall be minimum Ae, where e represents the nominal thickness of the thickest pressure part;
f) both sides of the lap are welded;
g) the maximum vessel diameter does not exceed 1 600 mm;
h) non-corrosive conditions only are permitted.
6.6.3 Joggle joints
Joggle joints shall be used only when all of the following conditions are fulfilled:
a) the materials are limited to material groups 21,22.1,22.2, 22.3, and 22.4 (except 5454);
b) for circumferential joints of shell to head only;
5
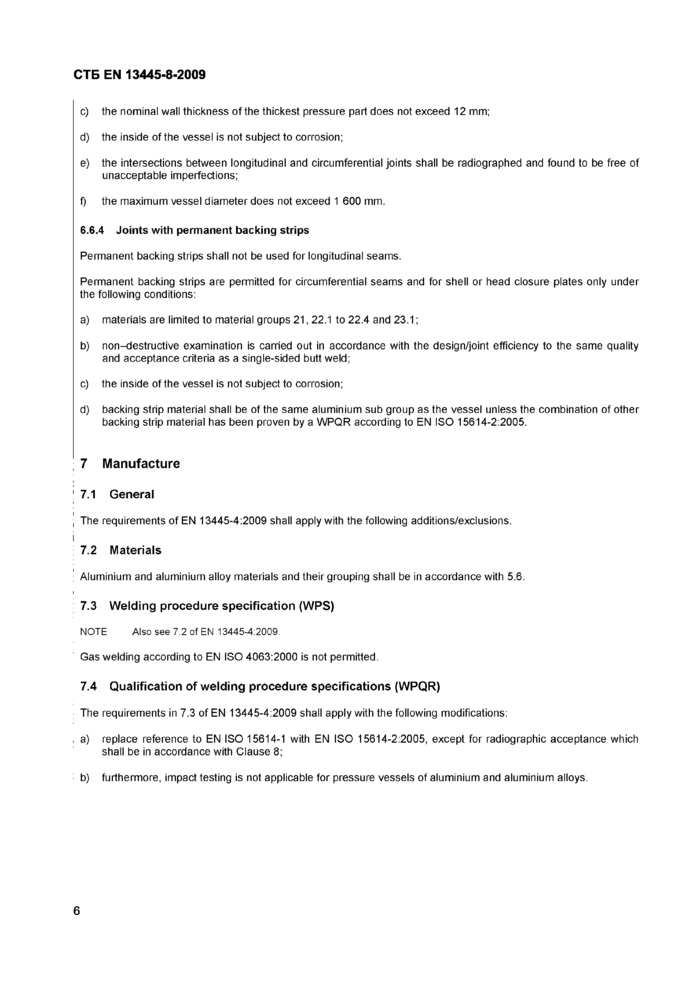
c) the nominal wall thickness of the thickest pressure part does not exceed 12 mm;
d) the inside of the vessel is not subject to corrosion;
e) the intersections between longitudinal and circumferential joints shall be radiographed and found to be free of unacceptable imperfections;
f) the maximum vessel diameter does not exceed 1 600 mm.
6.6.4 Joints with permanent backing strips
Permanent backing strips shall not be used for longitudinal seams.
Permanent backing strips are permitted for circumferential seams and for shell or head closure plates only under the following conditions:
a) materials are limited to material groups 21,22.1 to 22.4 and 23.1;
b) non-destructive examination is carried out in accordance with the design/joint efficiency to the same quality and acceptance criteria as a single-sided buttweld;
c) the inside of the vessel is not subject to corrosion;
d) backing strip material shall be of the same aluminium sub group as the vessel unless the combination of other backing strip material has been proven by a WPQR according to EN ISO 15614-2:2005.
7 Manufacture7.1 General
The requirements of EN 13445-4:2009 shall apply with the following additions/exclusions.
7.2 Materials
Aluminium and aluminium alloy materials and their grouping shall be in accordance with 5.6.
7.3 Welding procedure specification (WPS)
NOTE Also see 7.2 of EN 13445-4:2009.
Gas welding according to EN ISO 4063:2000 is not permitted.
7.4 Qualification of welding procedure specifications (WPQR)
The requirements in 7.3 of EN 13445-4:2009 shall apply with the following modifications:
a) replace reference to EN ISO 15614-1 with EN ISO 15614-2:2005, except for radiographic acceptance which shall be in accordance with Clause 8;
b) furthermore, impact testing is not applicable for pressure vessels of aluminium and aluminium alloys.
6
СТБ EN 13445-8-2009
7.5 Qualification of welders and welding operators
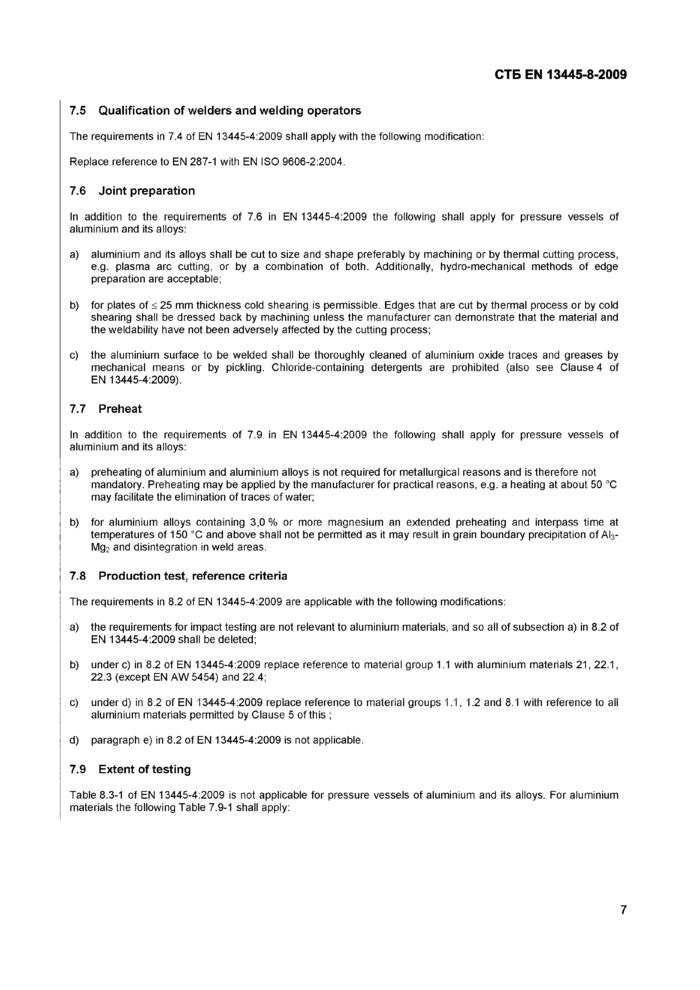
The requirements in 7.4 of EN 13445-4:2009 shall apply with the following modification: Replace reference to EN 287-1 with EN ISO 9606-2:2004.
7.6 Joint preparation
In addition to the requirements of 7.6 in EN 13445-4:2009 the following shall apply for pressure vessels of
aluminium and its alloys:
a) aluminium and its alloys shall be cut to size and shape preferably by machining or by thermal cutting process, e.g. plasma arc cutting, or by a combination of both. Additionally, hydro-mechanical methods of edge preparation are acceptable;
b) for plates of < 25 mm thickness cold shearing is permissible. Edges that are cut by thermal process or by cold shearing shall be dressed back by machining unless the manufacturer can demonstrate that the material and the weldability have not been adversely affected by the cutting process;
c) the aluminium surface to be welded shall be thoroughly cleaned of aluminium oxide traces and greases by mechanical means or by pickling. Chloride-containing detergents are prohibited (also see Clause 4 of EN 13445-4:2009).
7.7 Preheat
In addition to the requirements of 7.9 in EN 13445-4:2009 the following shall apply for pressure vessels of aluminium and its alloys:
a) preheating of aluminium and aluminium alloys is not required for metallurgical reasons and is therefore not mandatory. Preheating may be applied by the manufacturer for practical reasons, e.g. a heating at about 50 “C may facilitate the elimination of traces of water;
b) for aluminium alloys containing 3,0 % or more magnesium an extended preheating and interpass time at temperatures of 150 °C and above shall not be permitted as it may result in grain boundary precipitation of Al3-Mg2 and disintegration in weld areas.
7.8 Production test, reference criteria
The requirements in 8.2 of EN 13445-4:2009 are applicable with the following modifications:
a) the requirements for impact testing are not relevant to aluminium materials, and so all of subsection a) in 8.2 of EN 13445-4:2009 shall be deleted;
1.2 and 8.1 with reference to aii
b) under c) in 8.2 of EN 13445-4:2009 replace reference to material group 1.1 with aluminium materials 21,22.1, 22.3 (except EN AW 5454) and 22.4;
c) under a) in 8.2 of EN 13445-4:2009 replace reference to material groups 1 aluminium materials permitted by Clause 5 of this ;
d) paragraph e) in 8.2 of EN 13445-4:2009 is not applicable.
7.9 Extent of testing
Table 8.3-1 of EN 13445-4:2009 is not applicable for pressure vessels of aluminium and its alloys. For aluminium materials the following Table 7.9-1 shall apply: