СТБ EN 13445-5-2009
Сосуды, работающие под давлением. Часть 5. Контроль и испытания
Купить СТБ EN 13445-5-2009 — бумажный документ с голограммой и синими печатями. подробнее
Цена на этот документ пока неизвестна. Нажмите кнопку "Купить" и сделайте заказ, и мы пришлем вам цену.
Распространяем нормативную документацию с 1999 года. Пробиваем чеки, платим налоги, принимаем к оплате все законные формы платежей без дополнительных процентов. Наши клиенты защищены Законом. ООО "ЦНТИ Нормоконтроль"
Наши цены ниже, чем в других местах, потому что мы работаем напрямую с поставщиками документов.
Способы доставки
- Срочная курьерская доставка (1-3 дня)
- Курьерская доставка (7 дней)
- Самовывоз из московского офиса
- Почта РФ
Часть европейского стандарта определяет проверки и испытания сосудов, работающих под давлением, индивидуального и серийного производства, изготовленных из сталей в соответствии с EN 13445-2:2009, при условии преимущественно нециклической эксплуатации (например, сосуды, испытывающие в процессе эксплуатации менее 500 полных эквивалентных циклов изменения давления).
Оглавление
Введение
Приложение Д,А (справочное) Перевод европейского стандарта EN 13445-5:2009 на русский язык
1 Область применения
2 Нормативные ссылки
3 Термины и определения
4 Выполнение контроля и испытаний
5 Техническая документация
6 Контроль и испытания во время изготовления
7 Субподрядные элементы
8 Прочие испытания
9 Калибровка
10 Окончательная оценка
11 Маркировка и заявление о соответствии с настоящим стандартом
12 Протоколы
13 Транспортировка
Приложение A (обязательное) Контроль и испытания серийно производимых сосудов, работающих под давлением. Приемка модели
Приложение B (обязательное) Подробные требования в отношении размеров сосудов, работающих под давлением
Приложение C (обязательное) Отверстия для обслуживания и контроля, закрывающие механизмы и специальные элементы блокировки
Приложение D (справочное) Испытания на герметичность
Приложение E (справочное) Акустическая эмиссия
Приложение F (обязательное) Контроль и испытания сосудов или их частей, работающих под давлением, подверженных ползучести
Приложение G (обязательное) Контроль и испытания сосудов, работающих под давлением, подверженных циклическим нагрузкам
Приложение Н (справочное) Заявление о соответствии настоящему стандарту
Приложение I (справочное) Особые испытания во время сооружения для оказания содействия в контроле в течение срока службы
Приложение Y (справочное) Различия между EN 13445-5:2002 и EN 13445-5:2009
Приложение ZA (справочное) Соответствие между настоящим европейским стандартом и существенными требованиями Директивы 97/23/ЕС об оборудовании, работающем под давлением
Библиография
| Дата введения | 01.01.2010 |
|---|---|
| Добавлен в базу | 01.01.2019 |
| Актуализация | 01.01.2021 |
Организации:
| 27.11.2009 | Утвержден | Госстандарт Республики Беларусь | 61 |
|---|---|---|---|
| Разработан | БелГИСС | ||
| Издан | БелГИСС | 2010 г. |
Unfired pressure vessels. Part 5. Inspection and testing
Чтобы бесплатно скачать этот документ в формате PDF, поддержите наш сайт и нажмите кнопку:
стр. 1
стр. 2
стр. 3
стр. 4
стр. 5
стр. 6
стр. 7
стр. 8
стр. 9
стр. 10
стр. 11
стр. 12
стр. 13
стр. 14
стр. 15
стр. 16
стр. 17
стр. 18
стр. 19
стр. 20
стр. 21
стр. 22
стр. 23
стр. 24
стр. 25
стр. 26
стр. 27
стр. 28
стр. 29
стр. 30
ГОСУДАРСТВЕННЫЙ СТАНДАРТ РЕСПУБЛИКИ БЕЛАРУСЬ
СОСУДЫ, РАБОТАЮЩИЕ ПОД ДАВЛЕНИЕМ
Часть 5
Контроль и испытания
ПАСУД31НЫ, ПРАЦУЮЧЫЯ ПАД Ц1СКАМ
Частка 5
Кантроль i выпрабаванш
(EN 13445-5:2009, ЮТ)
Издание официальное
Г осстандарт Минск
(SB
УДК 621.642-98(083.74)(476) МКС 23.020.30 КП 03 ЮТ
Ключевые слова: сосуды, работающие под давлением, методы контроля, испытания
Предисловие
Цели, основные принципы, положения по государственному регулированию и управлению в области технического нормирования и стандартизации установлены Законом Республики Беларусь «О техническом нормировании и стандартизации».
1 ПОДГОТОВЛЕН ПО УСКОРЕННОЙ ПРОЦЕДУРЕ научно-производственным республиканским унитарным предприятием «Белорусский государственный институт стандартизации и сертификации» (БелГИСС)
ВНЕСЕН Госстандартом Республики Беларусь
2 УТВЕРЖДЕН И ВВЕДЕН В ДЕЙСТВИЕ постановлением Госстандарта Республики Беларусь от 27 ноября 2009 г. № 61
3 Настоящий стандарт идентичен европейскому стандарту EN 13445-5:2009 Unfired pressure vessels - Part 5: Inspection and testing (Сосуды, работающие под давлением. Часть 5. Контроль и испытания).
Европейский стандарт разработан техническим комитетом по стандартизации CEN/TC 54 «Сосуды, работающие под давлением» Европейского комитета по стандартизации (CEN).
Перевод с английского языка (еп).
Официальные экземпляры европейского стандарта, на основе которого подготовлен настоящий государственный стандарт, и европейских стандартов, на которые даны ссылки, имеются в Национальном фонде ТИПА.
Степень соответствия - идентичная (ЮТ)
4 ВВЕДЕН ВПЕРВЫЕ
© Госстандарт, 2010
Настоящий стандарт не может быть воспроизведен, тиражирован и распространен в качестве официального издания без разрешения Госстандарта Республики Беларусь
Издан на русском языке
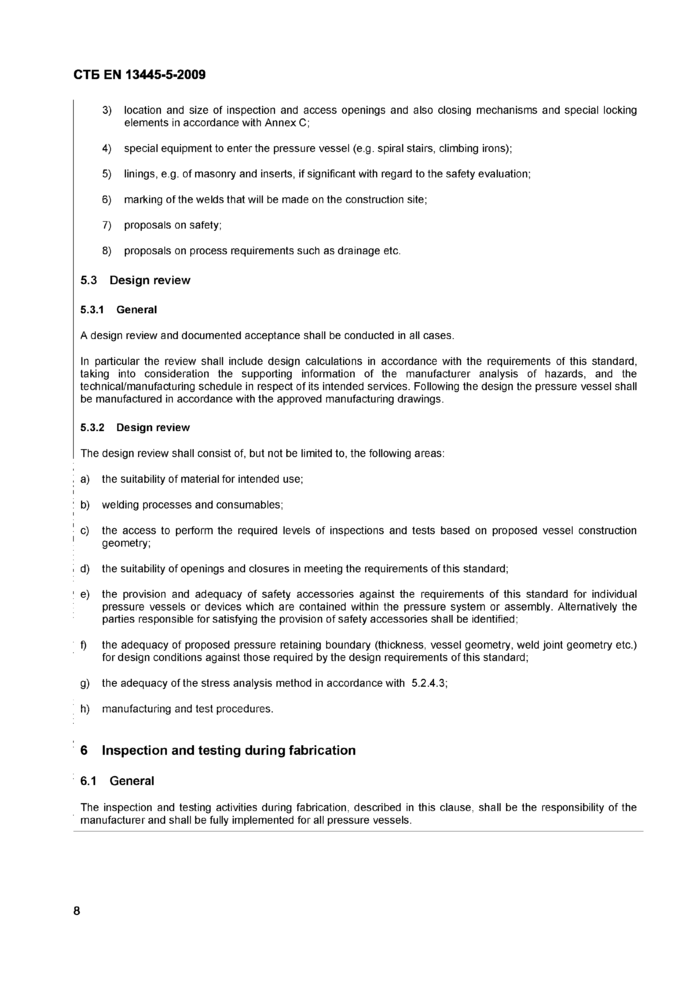
3) location and size of inspection and access openings and also closing mechanisms and special locking elements in accordance with Annex C;
4) special equipment to enter the pressure vessel (e.g. spiral stairs, climbing irons);
5) linings, e g. of masonry and inserts, if significant with regard to the safety evaluation;
6) marking of the welds that will be made on the construction site;
7) proposals on safety;
8) proposals on process requirements such as drainage etc.
5.3 Design review
5.3.1 General
A design review and documented acceptance shall be conducted in all cases.
In particular the review shall include design calculations in accordance with the requirements of this standard, taking into consideration the supporting information of the manufacturer analysis of hazards, and the technical/manufacturing schedule in respect of its intended services. Following the design the pressure vessel shall be manufactured in accordance with the approved manufacturing drawings.
5.3.2 Design review
The design review shall consist of, but not be limited to, the following areas:
; a) the suitability of material for intended use;
: b) welding processes and consumables;
' c) the access to perform the required levels of inspections and tests based on proposed vessel construction 1 geometry;
i d) the suitability of openings and closures in meeting the requirements of this standard;
1 e) the provision and adequacy of safety accessories against the requirements of this standard for individual pressure vessels or devices which are contained within the pressure system or assembly. Alternatively the parties responsible for satisfying the provision of safety accessories shall be identified;
f) the adequacy of proposed pressure retaining boundary (thickness, vessel geometry, weld joint geometry etc.) for design conditions against those required by the design requirements of this standard;
g) the adequacy of the stress analysis method in accordance with 5.2.4.3;
6 Inspection and testing during fabrication6.1 General
The inspection and testing activities during fabrication, described in this clause, shall be the responsibility of the manufacturer and shall be fully implemented for all pressure vessels.
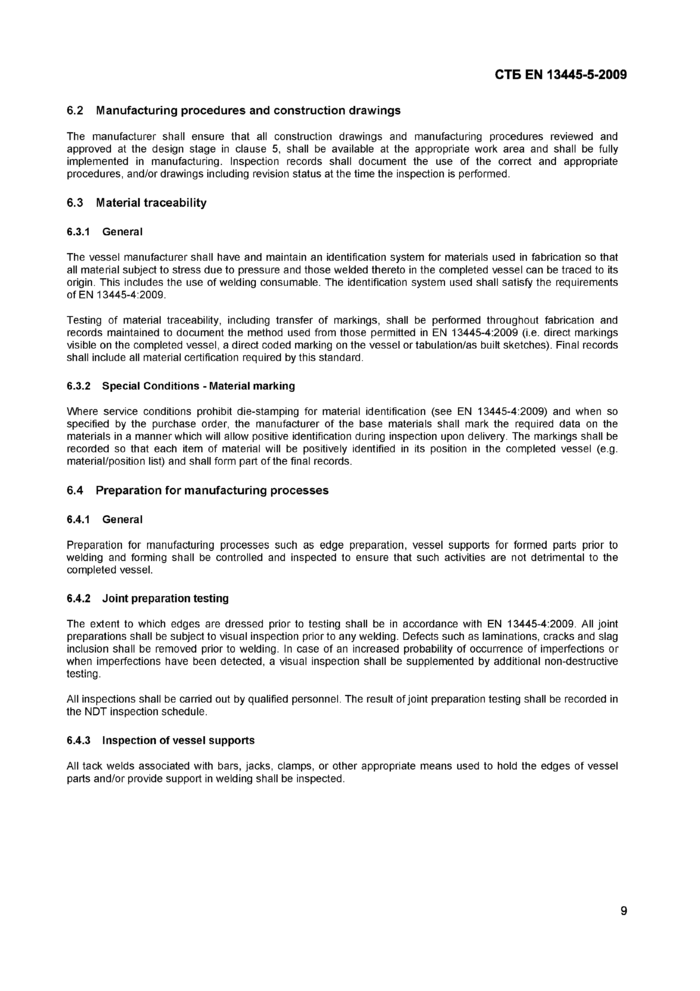
СТБ EN 13445-5-20096.2 Manufacturing procedures and construction drawings
The manufacturer shall ensure that all construction drawings and manufacturing procedures reviewed and approved at the design stage in clause 5, shall be available at the appropriate work area and shall be fully implemented in manufacturing. Inspection records shall document the use of the correct and appropriate procedures, and/or drawings including revision status at the time the inspection is performed.
6.3 Material traceability6.3.1 General
The vessel manufacturer shall have and maintain an identification system for materials used in fabrication so that all material subject to stress due to pressure and those welded thereto in the completed vessel can be traced to its origin. This includes the use of welding consumable. The identification system used shall satisfy the requirements of EN 13445-4:2009.
Testing of material traceability, including transfer of markings, shall be performed throughout fabrication and records maintained to document the method used from those permitted in EN 13445-4:2009 (i.e. direct markings visible on the completed vessel, a direct coded marking on the vessel ortabulation/as built sketches). Final records shall include all material certification required by this standard.
6.3.2 Special Conditions - Material marking
Where service conditions prohibit die-stamping for material identification (see EN 13445-4:2009) and when so specified by the purchase order, the manufacturer of the base materials shall mark the required data on the materials in a manner which will allow positive identification during inspection upon delivery. The markings shall be recorded so that each item of material will be positively identified in its position in the completed vessel (e.g. material/position list) and shall form part of the final records.
6.4 Preparation for manufacturing processes6.4.1 General
Preparation for manufacturing processes such as edge preparation, vessel supports for formed parts prior to welding and forming shall be controlled and inspected to ensure that such activities are not detrimental to the completed vessel.
6.4.2 Joint preparation testing
The extent to which edges are dressed prior to testing shall be in accordance with EN 13445-4:2009. All joint preparations shall be subject to visual inspection prior to any welding. Defects such as laminations, cracks and slag inclusion shall be removed prior to welding. In case of an increased probability of occurrence of imperfections or when imperfections have been detected, a visual inspection shall be supplemented by additional non-destructive
All inspections shall be carried out by qualified personnel. The result of joint preparation testing shall be recorded in the NDT inspection schedule.
6.4.3 Inspection of vessel supports
All tack welds associated with bars, jacks, clamps, or other appropriate means used to hold the edges of vessel parts and/or provide support in welding shall be inspected.
9СТБ EN 13445-5-2009
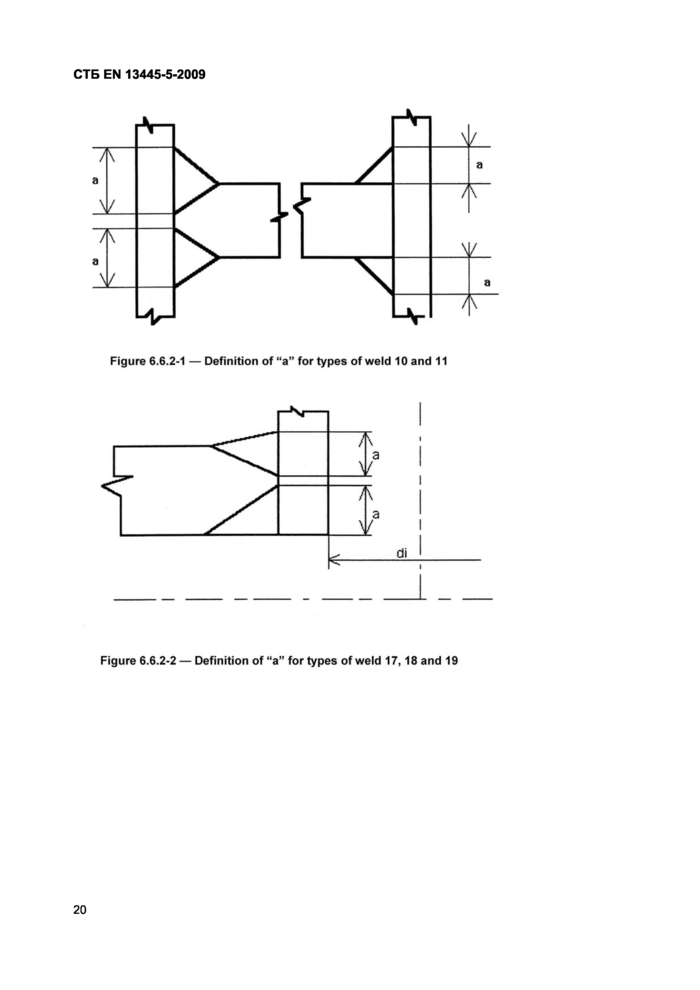
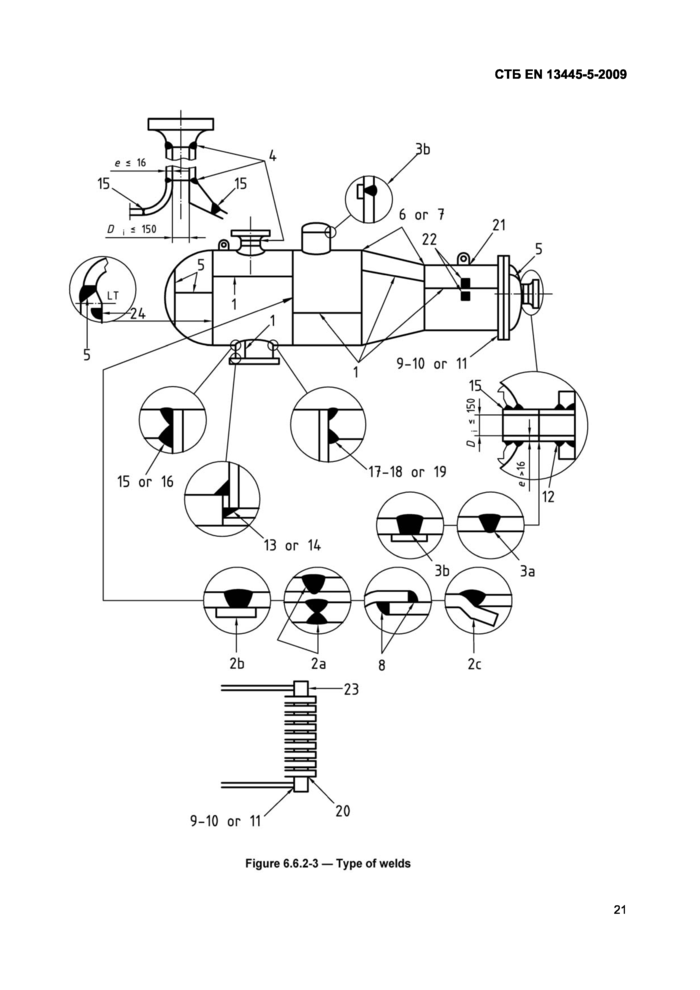
— Welds of permanent attachments to pressure parts shall be examined to the extent described in Table 6.6.2-1 (line 21).
— Welds of temporary attachments shall be examined after removal for surface cracks to the extent described in Table 6.6.2-1 (line 22).
— Any repairs necessary following removal of temporary attachments shall be tested as described in 6.5.3.
Prior to any forming the material to be formed shall be subject to visual inspection and thickness measurement in accordance with the requirements of EN 13445-4:2009. The result of the inspection shall be recorded in the NDT inspection schedule.
6.4.5 Testing of areas subject to significant through thickness tensile stress
In case of an increased probability of internal damage in areas subject to significant through thickness tensile stress caused by welding, these areas shall be examined for internal imperfections prior to welding. The result of the inspection shall be recorded in the NDT inspection schedule
6.5 Welding6.5.1 General
When permitted by EN 13445-3:2009, permanent backing strip and joggle joint shall be fitted and adjusted such that the quality of the weld achieved is the same as a conventional single-sided butt weld. The weld shall be subject
Welds in all testing groups shall be subject to in-process inspections, especially welds of testing groups 3 or 4 not required to be subject to NDT under Table 6.6.1.2-1 shall be specifically subject to visual inspection at the "fit-up" and "chip back of second side of sound metal" stages.
i All finished welding shall be subject to visual inspection. In addition, depending on the testing group, the finished welds shall be subject to NDT in accordance with Tables 6.6.1-1 and 6.6.2-1 for that type of weld.
6.5.2 Verification of welder and welding operator approval and procedures approval
The vessel manufacturer shall verify that welding has been done only by welders and operators who have been approved under the requirements of EN 287-1:2004 and EN 1418:1997. Procedures shall be qualified in accordance with EN 13445-4:2009.
Welder and welding operators identification shall be controlled in accordance with EN 13445-4:2009.
Traceability of the welder and welding operator shall be monitored by inspection throughout construction of the pressure vessel and shall be verified at the final assessment, see 10.2.2.
10
СТБ EN 13445-5-2009
6.5.3 Inspection of repairs
All welded repairs shall be subject to the same non-destructive testing requirements as those which detected the imperfection. This includes the same acceptance criteria. Such repairs shall be carried out using approved weld procedures and approved welders and welding operators. The extent of testing of repairs shall comply with Table 6.6.2-1 and cover 100 % of the area repaired.
Non welded repairs by surface dressing are permissible providing that the area of repair is subject to NDT according to Table 6.6.2-1 and free from unacceptable imperfections, see 6.6.5 for retesting requirements.
Weld metal deposited to restore base material shall be subject to non-destructive testing for the full surface area involved, using Magnetic Particle Testing (MT) or Penetrant Testing (PT).
6.6 Non-destructive testing of welded joints
6.6.1 Extent of non-destructive testing
The required extent of non-destructive testing depends both on the testing group and the type of the welded joints. Guidance to determine the required extent of testing is given in the following clauses.
For serially produced pressure vessels an alternative route is given in Annex A. This annex is not applicable to vessels or vessel parts designed according to Design by Analysis - Direct Route of Annex В of EN 13445-3:2009 or designed according to 6.3 of EN 13445-3:2009. This annex is not applicable for vessels or vessel parts working in the creep range.
6.6.1.1 Use of testing groups
6.6.1.1.1 General
The non-destructive testing of welded joints for final acceptance purposes shall depend upon the testing group or subgroup of the welded joint under consideration.
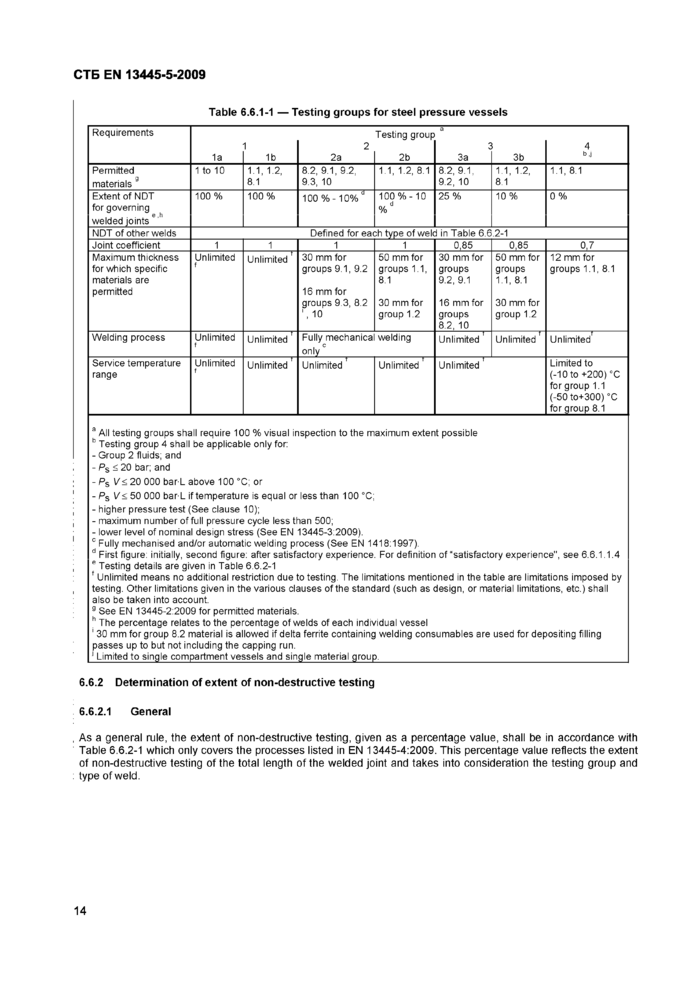
In Table 6.6.1-1, testing groups 1, 2, 3 and 4 apply below the creep range. Testing groups 1, 2 and 3 are
III I СШ1С I I
of Annex F, testing sub-groups 1c and 3c apply to creep.
NOTE 1 The testing groups or sub-groups take into consideration the manufacturing difficulties associated with different groups of steel, maximum thickness, welding process, service temperature range and joint coefficient. It is intended that any of the testing groups will provide adequate integrity for typical applications within the limitations contained within Tables 6.6.1-1 and F.2-1.
For vessels (or vessel parts) designed according to Design by Analysis - Direct Route of Annex В of EN 13445-3:2009 or designed according to 6.3 of EN 13445-3:2009, only testing group 1 is permissible.
NOTE 2 Further restrictions are given in Annex A of EN 13445-3:2009.
For vessels designed by experimental methods, the testing group to be considered for the vessel or vessel part shall be determined according to the rules given in Table 6.6.1-1 and the possible limitations stated in T.5 of EN 13445-3:2009.
NOTE 3 The joint coefficient is not used in design by the experimental method without calculation.
11
СТБ EN 13445-5-2009
For vessels (or vessel parts) working in the creep range only testing groups 1c and 3c are permissible. The extent of NDT is given in Table F.2-1 of Annex F. Testing groups 1, 2 and 3 are permissible for any welded joint not subjected to creep.
6.6.1.1.2 Testing groups 1, 2 and 3
It is intended that a single testing group is applied to the entire vessel.
When the vessel is made of several sections (courses), a combination of testing groups 1, 2, and 3 is permissible providing that the requirements of Table 6.6.1-1 are met.
If a combination of testing groups is necessary, for example as the result the use of DBA Direct Route, of the Alternative Route, of design in the creep range or for fatigue in a section (course), the following shall apply:
a) in each section (course) of the vessel, the testing group of the shell governing welded joints, where present, shall determine the minimum testing group for all the welds, including the nozzle welds, in that section;
b) the testing group of the weld between two welded sections of different testing groups shall be the higher of the two testing groups;
c) the minimum testing group (i.e. the one with the lower level of NDT) of the welds between a welded component and a seamless one (not welded), or between two seamless components, shall be determined by the available thickness (i.e. actual thickness less tolerances less corrosion allowance) at the weld. Where the available thickness is greater than 1,17 (this is equivalent to 1/0,85) times the minimum thickness, the testing group of the weld shall be 3 as a minimum requirement. Otherwise it shall be testing group 1 or 2 according to Table 6.6.1-1.
6.6.1.1.3 Testing group 4
Testing group 4 shall be used as a single group for the entire vessel and shall not be used with any other testing group.
6.6.1.1.4 Demonstration of satisfactory experience for testing group 2
Satisfactory experience shall be a minimum amount of welds or vessels of successfully produced and tested within the scope/parameters of the welding procedure approval test, as given below:
— in case of groups 1.1, 1.2 and 8.1 materials, the successful production is 25 consecutive pressure vessels or 50 consecutive metres of governing welded joints;
— in case of materials of other groups, it is 50 consecutive pressure vessels or consecutive 100 m of governing welded joints;
— experience in material group 3.1 covers experience in material groups 1.1, 1.2 and 1.3;
— experience in material group 1.3 covers experience in material groups 1.1, 1.2;
— experience is accepted as long as there is a valid welding procedure approval test for a more critical or at least a comparable material.
Any imperfection requiring repair during the process of demonstrating experience shall require that the manufacturer start again the complete demonstration process.
Subsequently, (after demonstration of experience) isolated imperfections shall be handled in accordance with 6.5.3. and shall not affect the demonstration of experience.
12
However, multiple, systematic or process imperfections shall be investigated, corrected and the full demonstration of experience repeated. Such imperfections tend to be repetitive and similar in nature. They can be the result of inadequate welding parameters (e.g. resulting from equipment malfunction, a too large range of parameters, incorrect use of parameters within the range of approval) or operator error. In the case of inadequate parameters, consideration of requalification of the Welding Procedure Specification (WPS) should be performed.
Documentary evidence of the process of demonstration of experience shall be maintained by the manufacturer.
13
СТБ EN 13445-5-2009
|
Table 6.6.1-1 — Testing groups for steel pressure vessels | ||||||||||||||||||||||||||||||||||||||||||||||||||||||||||||||||||||||||
| ||||||||||||||||||||||||||||||||||||||||||||||||||||||||||||||||||||||||
6.6.2 Determination of extent of non-destructive testing6.6.2.1 General
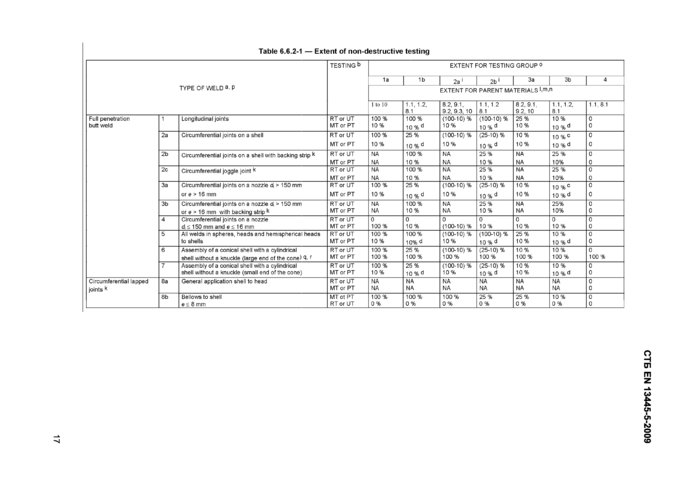
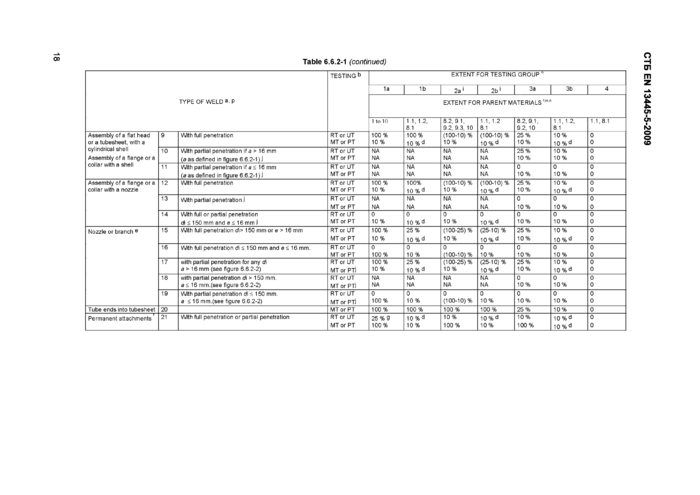
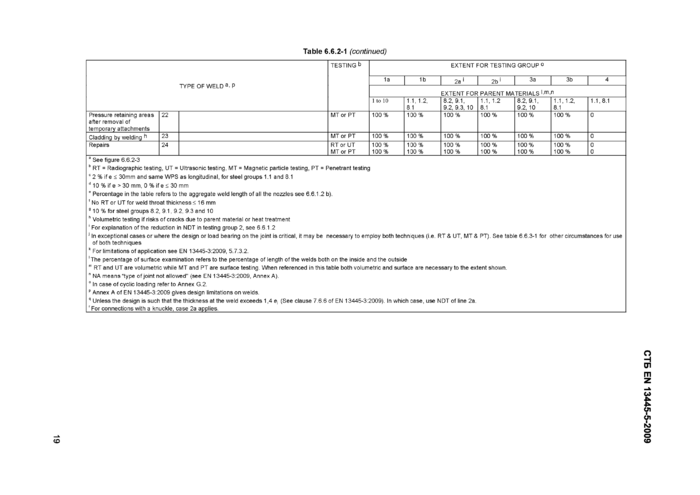
As a general rule, the extent of non-destructive testing, given as a percentage value, shall be in accordance with Table 6.6.2-1 which only covers the processes listed in EN 13445-4:2009. This percentage value reflects the extent of non-destructive testing of the total length of the welded joint and takes into consideration the testing group and type of weld.
14
СТБ EN 13445-5-2009
For vessels designed by experimental methods, the required extent of non-destructive testing of welded joints shall be determined according to the rules given in Table 6.6.2-1.
In case where it is not obvious whether the welded joint is a governing one or not, due to the complex shape of the vessel and/or the particular location of that joint, a conservative assumption shall be made, i.e. the welded joint shall be considered as a governing welded joint and tested accordingly.
NOTE For definition of governing welded joint, see EN 13445-3:2009, definition 3.13. For examples of governing welded joints, see EN 13445-3:2009, subclause 5.6.
If no weld is present in the vessel or vessel part, testing group 1 shall be assumed.
6.6.2.2 Welded joints covered by Table 6.6.2-1
Table 6.6.2-1 is designed for steel for:
— multilayer welds welded as single or double side welds;
unc oiuc on oui i нем cm uiai vvciuo,
— performed with consumables;
— produced by the following typical processes: Manual Metal Arc (MMA) 111, Submerged Arc (SAW) 121, Metal Active Gas (MAG) 135, Metal Inert Gas (MIG) 131, Tungsten Inert Gas (TIG) 141, Plasma MIG welding 151.
6.6.2.3 Other welded joints6.6.2.3.1 General
Special problems arising from elements such as those described below are not covered in Table 6.6.2-1 and shall be considered for all butt-welded joints especially for longitudinal/governing joints:
— single run one side governing welds;
— joints between dissimilar materials or dissimilar consumables.
6.6.2.3.2 Single run one side governing welds
For single run governing welds made from one side, the thickness shall be limited to 10 mm. It is also noted that these vessels are limited to non cyclic duty i.e. 500 full pressure cycles. For volumetric NDT of single runs, one of the two options below shall be used:
a) NDT extent shall be as prescribed in Table 6.6.2-1 conditional upon a hydrotest at a higher test pressure performed as specified in paragraph 10.2.3.3.1, Table 10.2.3.3-1 with control of peaking and excess weld.
b) NDT extent prescribed in Table 6.6.2-1 shall be multiplied by 2 without exceeding 100 % but not less than 25 % for longitudinal and 10 % for circumferential. When there is a change which could influence the performance of the welding process (e.g. before changing the copper bar or the gas, after changing the wire or the powder and production test specimens, before changing the copper bar or gas and after changing wire) additional NDT shall be performed at the start of those seams.
For both a) and b), welding shall require qualification with welding procedure test, as requested in EN 13445-4:2009, on the actual nominal thickness of the weld joint that is welded by the single run from one side. The range of qualification shall be restricted to 0,8 • / to t, where t is the actual nominal thickness of the test coupon.
СТБ EN 13445-5-2009
For all thicknesses, X-Ray in the direction of the weld preparation shall be used.
6.6.2.3.3 Non destructive testing of joints between dissimilar materials or dissimilar consumables
NDT on these joints must be performed to a specific written procedure with additional attention to interpretation of the results.
6.6.2.4 Testing group 2
For testing group 2, the reduction in percentage of NDT given in Table 6.6.2-1 is given by the two figures (e.g. 100 % -10 %). The first value refers to the initial extent of NDT required until sufficient satisfactory experience (See 6.6.1.1.4) is established when the second lower value applies.
6.6.2.5 When less than 100 % NDT is required by the selected testing group in Table 6.6.1-1
In case of less than 100 % required testing, the extent and location of non-destructive testing shall be determined by the following criteria. The joints selected shall be representative of all welding on the pressure vessel.
a) For shells, formed heads, communicating chambers and jackets
1) non-destructive testing shall be performed at all intersections of longitudinal and circumferential butt joints. The minimum tested length shall be 200 mm. Where the inclusion of all intersections exceeds the percentage in Table 6.6.2-1 then this higher value will apply;
2) if necessary to attain the percentage required in Table 6.6.2-1, additional randomly selected locations on the butt welded joint shall be subject to non-destructive testing;
3) openings within main welds (longitudinal or circumferential) or within a distance of 12 mm from the main welds shall be examined for a length of not less than the diameter of the opening on each side of the opening. These shall be included as an addition to the percentage in Table 6.6.2-1, if applicable.
b) Nozzles and branches attached to the vessel (butt welds).
To determine the extent of non-destructive testing, the total number of nozzles and branches which have full penetration butt welds shall be grouped as follows:
1) for 100 % non-destructive testing: the size of the group is 1 (i.e. every individual nozzle and branch) ;
2) for 25 % non-destructive testing: the size group size is 4 (i.e. at least one complete nozzle or branch for each group of 4) ;
3) for 10 % non-destructive testing: the size of the group is 10 (i.e. at least one complete nozzle or branch for each group of 10).
Thereafter, the complete circumferential and longitudinal butt joints of at least one nozzle or branch in each group or partial group shall be tested. When the inclusion of the number of complete circumferential and longitudinal butt welds or nozzles exceeds the percentage in Table 6.6.2-1, then the higher value will apply.
16
|
Table 6.6.2-1 — Extent of non-destructive testing | ||||||||||||||||||||||||||||||||||||||||||||||||||||||||||||||||||||||||||||||||||||||||||||||||||||||||||||||||||||||||||||||||||||||||||||||||||||||||||||||||||||||||||||||||||||||||||||||||||||||||||||||||||||||||||||||||||||||||||||||||||||||||||||||||||||||||||||||||||||||||||||||||||||||||
| ||||||||||||||||||||||||||||||||||||||||||||||||||||||||||||||||||||||||||||||||||||||||||||||||||||||||||||||||||||||||||||||||||||||||||||||||||||||||||||||||||||||||||||||||||||||||||||||||||||||||||||||||||||||||||||||||||||||||||||||||||||||||||||||||||||||||||||||||||||||||||||||||||||||||
СТБ EN 13445-5-2009
Введение
Настоящий стандарт содержит текст европейского стандарта EN 13445-5:2009 на языке оригинала и его перевод на русский язык (справочное приложение Д.А).
Введен в действие как стандарт, на который есть ссылка в Еврокоде EN 1993-1-8:2005.
ГОСУДАРСТВЕННЫЙ СТАНДАРТ РЕСПУБЛИКИ БЕЛАРУСЬ
СОСУДЫ, РАБОТАЮЩИЕ ПОД ДАВЛЕНИЕМ Часть 5 Контроль и испытания
ПАСУД31НЫ, ПРАЦУЮЧЫЯ ПАД Ц1СКАМ Частка 5 Кантроль i выпрабаванш
Unfired pressure vessels Part 5 Inspection and testing
|
Table 6.6.2-1 (continued) | |||||||||||||||||||||||||||||||||||||||||||||||||||||||||||||||||||||||||||||||||||||||||||||||||||||||||||||||||||||||||||||||||||||||||||||||||||||||||||||||||||||||||||||||||||||||||||||||||||||||||||||||||||||||||||||||||||||||||||||||||||||||||||||||||||||||||||||||||||||||||||||||||||||||||||||||||||
| |||||||||||||||||||||||||||||||||||||||||||||||||||||||||||||||||||||||||||||||||||||||||||||||||||||||||||||||||||||||||||||||||||||||||||||||||||||||||||||||||||||||||||||||||||||||||||||||||||||||||||||||||||||||||||||||||||||||||||||||||||||||||||||||||||||||||||||||||||||||||||||||||||||||||||||||||||
СТБ EN 13445-5-2009
СТБ EN 13445-5-20091 Scope
This Part of this European Standard specifies the inspection and testing of individual and serially produced pressure vessels made of steels in accordance with EN 13445-2:2009 subject to predominantly non_cyclic operation (i.e. vessels operating below 500 full equivalent pressure cycles).
Special provisions for cyclic operation are given in EN 13445-3:2009 and in Annex G of this Part.
Special provisions for vessels or vessel parts working in the creep range are given in Clause 5, Clause 6, Clause 10, Annex H and Annex I of this Part.
NOTE The responsibilities of parties involved in the conformity assessment procedures are given in Directive 97/23/EC. Guidance on this can be found in CR 13445-7.
2 Normative references
This European Standard incorporates by dated or undated reference, provisions from other publications. These normative references are cited at the appropriate places in the text and the publications are listed hereafter. For dated references, subsequent amendments to or revisions of any of these publications apply to this European Standard only when incorporated in it by amendment or revision. For undated references the latest edition of the publication referred to applies (including amendments).
EN 287-1:2004, EN 287-1:2004/A2:2005, Qualification test of welders — Fusion welding — Part 1: Steels.
EN 473:2008, Non-destructive testing — Qualification and certification of NDT personnel— General principles.
EN 571-1:1997, Non-destructive testing — Penetrant testing — Part 1: General principles.
CEN/TS 764-6:2004, Pressure equipment— Part 6: Structure and content of operating instructions.
EN 583-4:2002, EN 583-4:2002/A1:2003, Non-destructive testing — Ultrasonic examination — Part 4: Examination for discontinuities perpendicular to the surface.
EN 895:1995, Destructive tests on welds in metallic materials — Transverse tensile test.
EN 970:1997, Non-destructive examination of fusion welds— Visual examination.
EN 1289:1998, EN 1289:1998/A1:2002, EN 1289:1998/A2:2003, Non-destructive testing of welds — Penetrant testing of welds — Acceptance levels.
EN 1290:1998, EN 1290:1998/A1:2002, EN 1290:1998/A2:2003, Non-destructive testing of welds — Magnetic particle testing of welds.
EN 1291:1998, EN 1291:1998/A1:2002, EN 1291:1998/A2:2003, Non-destructive testing of welds — Magnetic particle testing of welds — Acceptance levels.
EN 1418:1997, Welding personnel — Approval testing of welding operators for fusion welding and resistance weld setters for fully mechanized and automatic welding of metallic materials.
EN 1435:1997, EN 1435:1997/A1:2002, EN 1435:1997/A2:2003, Non-destructive testing of welds — Radiographic testing of welded joints.
EN 1712:1997, EN 1712:1997/A1:2002, EN 1712:1997/A2:2003, Non-destructive testing of welds — Ultrasonic testing of welded joints — Acceptance levels.
СТБ EN 13445-5-2009
EN 1713:1998, EN 1713:1998/A1:2002, EN 1713:1998/A2:2003, Non-destructive testing of welds — Ultrasonic testing— Characterization of indications in welds.
EN 1714:1997, EN 1714:1997/A1:2002, EN 1714:1997/A2:2003, Non-destructive examination of welds — Ultrasonic examination of welded joints.
EN 1779:1999, EN 1779:1999/A1:2003, Non-destructive testing — Leak testing — Criteria for method and technique selection.
EN 12062:1997, EN 12062:1997/A1:2202, EN 12062:1997/A2:2003, Non-destructive testing of welds — General rules for metallic materials.
EN 12517-1:2006, Non-destructive testing of welds — Radiographic testing of welded joints — Acceptance levels. EN 13445-1:2009, Unfired pressure vessels— Part 2: General.
EN 13445-2:2009, Unfired pressure vessels— Part 2: Materials.
EN 13445-3:2009, Unfired pressure vessels— Part 3: Design.
EN 13445-4:2009, Unfired pressure vessels— Part 4: Fabrication.
EN ISO 4063:2000, Welding and allied processes - Nomenclature of processes and reference numbers (ISO 4063:1998).
EN ISO 5817:2007, Welding — Fusion-welded joints in steel, nickel, titanium and their alloys (beam welding excluded) - Quality levels for imperfections (ISO 5817:2003).
EN ISO 6520-1:2007, Welding and allied processes — Classification of geometric imperfections in metallic materials — Part 1: Fusion welding (ISO 6520-1:2007).
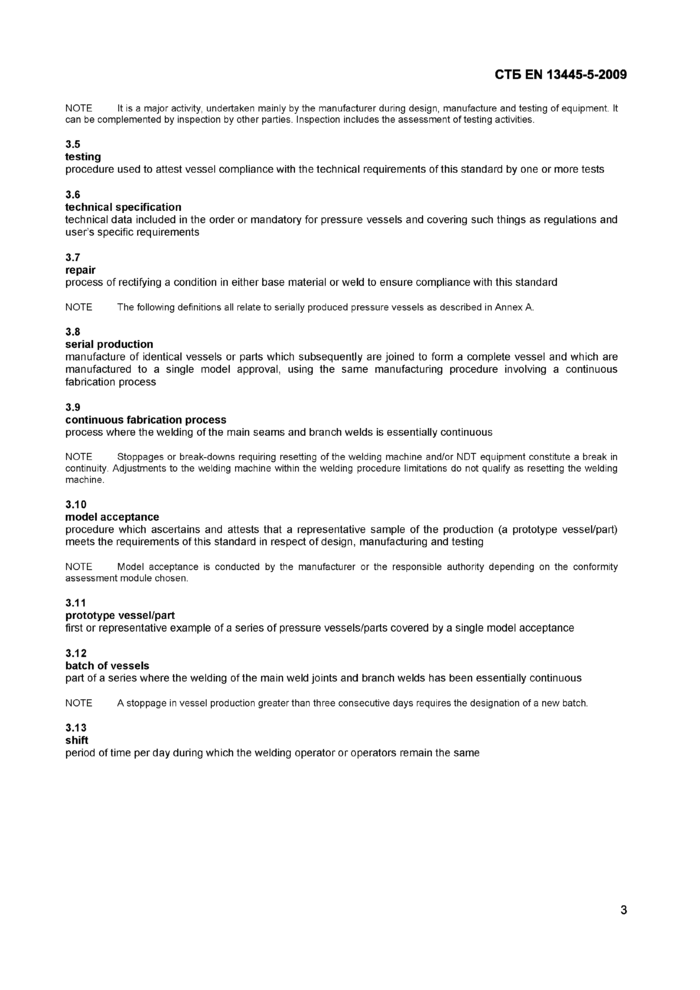
3 Terms and definitions
For the purposes of this European Standard the following terms and definitions apply.
3.1
design review
procedure by which a manufacturer ascertains and attests that the design meets the requirements of this standard
3.2
design approval
procedure by which a responsible authority ascertains and attests that the design meets the requirements of this standard
3.3
testing group
grouping which determines the appropriate level of non-destructive testing (NDT) on a welded joint NOTE There are four testing groups.
3.4
inspection
survey activity which assesses the compliance of the pressure vessel to the technical specification
2
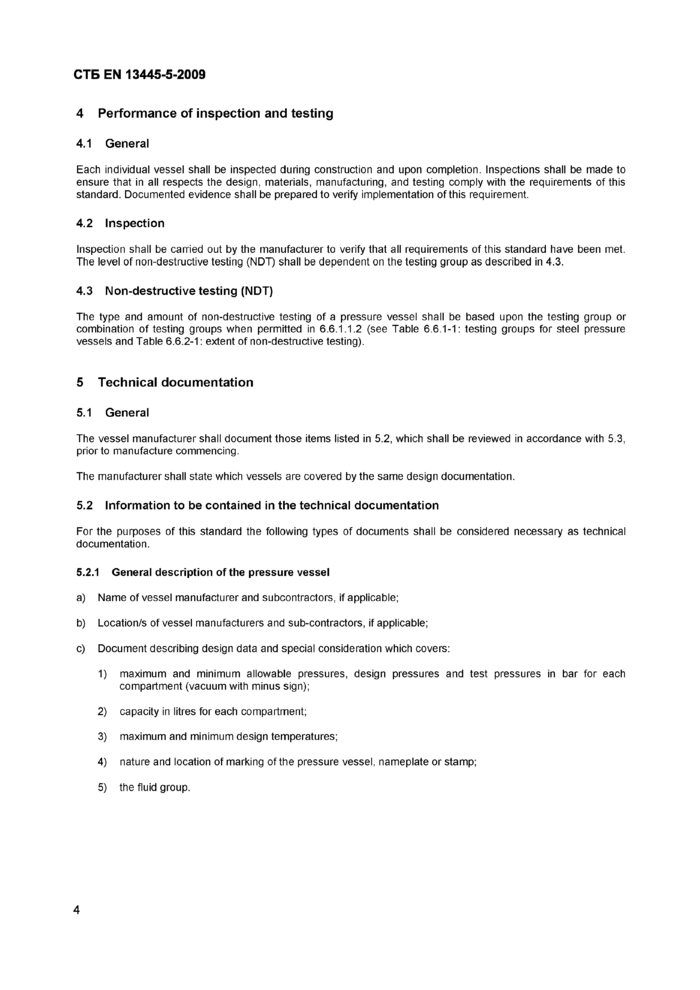
СТБ EN 13445-5-2009
NOTE It is a major activity, undertaken mainly by the manufacturer during design, manufacture and testing of equipment. It can be complemented by inspection by other parties. Inspection includes the assessment of testing activities.
3.5
testing
procedure used to attest vessel compliance with the technical requirements of this standard by one or more tests
3.6
technical specification
technical data included in the order or mandatory for pressure vessels and covering such things as regulations and user’s specific requirements
3.7
repair
process of rectifying a condition in either base material or weld to ensure compliance with this standard NOTE The following definitions all relate to serially produced pressure vessels as described in Annex A.
3.8
serial production
manufacture of identical vessels or parts which subsequently are joined to form a complete vessel and which are manufactured to a single model approval, using the same manufacturing procedure involving a continuous fabrication process
3.9
continuous fabrication process
process where the welding of the main seams and branch welds is essentially continuous
NOTE Stoppages or break-downs requiring resetting of the welding machine and/or NDT equipment constitute a break in continuity. Adjustments to the welding machine within the welding procedure limitations do not qualify as resetting the welding machine.
3.10
model acceptance
procedure which ascertains and attests that a representative sample of the production (a prototype vessel/part) meets the requirements of this standard in respect of design, manufacturing and testing
NOTE Model acceptance is conducted by the manufacturer or the responsible authority depending on the conformity assessment module chosen.
3.11
prototype vessel/part
first or representative example of a series of pressure vessels/parts covered by a single model acceptance
3.12
batch of vessels
part of a series where the welding of the main weld joints and branch welds has been essentially continuous NOTE A stoppage in vessel production greater than three consecutive days requires the designation of a new batch.
3.13 shift
period of time per day during which the welding operator or operators remain the same
3
СТБ EN 13445-5-2009
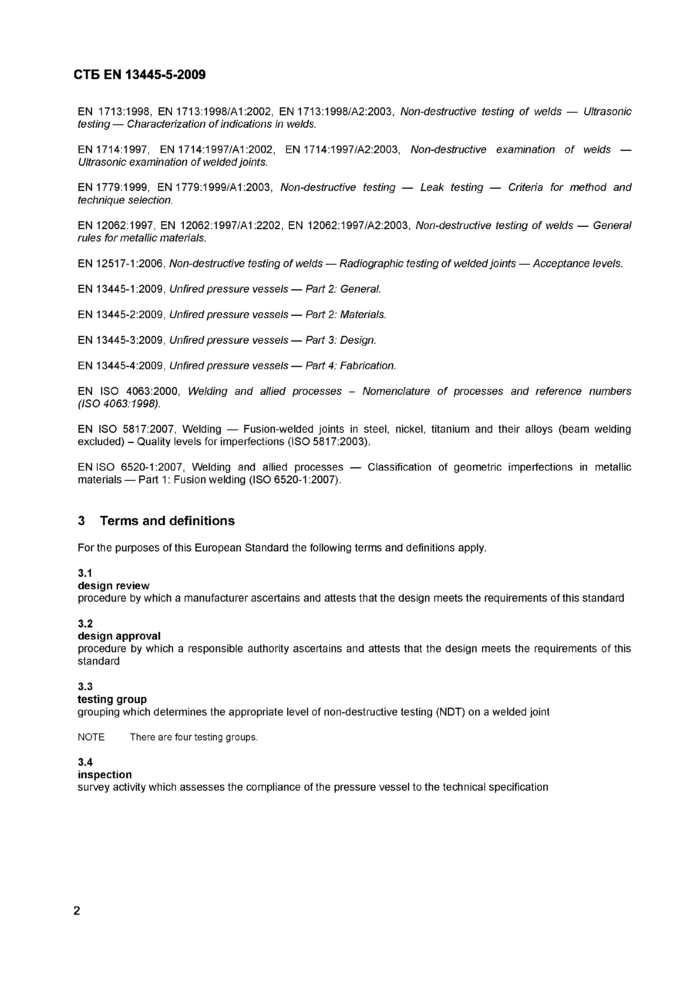
4 Performance of inspection and testing
4.1 General
Each individual vessel shall be inspected during construction and upon completion. Inspections shall be made to ensure that in all respects the design, materials, manufacturing, and testing comply with the requirements of this standard. Documented evidence shall be prepared to verify implementation of this requirement.
4.2 Inspection
Inspection shall be carried out by the manufacturer to verify that all requirements of this standard have been met. The level of non-destructive testing (NDT) shall be dependent on the testing group as described in 4.3.
4.3 Non-destructive testing (NDT)
The type and amount of non-destructive testing of a pressure vessel shall be based upon the testing group or combination of testing groups when permitted in 6.6.1.1.2 (see Table 6.6.1-1: testing groups for steel pressure vessels and Table 6.6.2-1: extent of non-destructive testing).
5 Technical documentation
5.1 General
The vessel manufacturer shall document those items listed in 5.2, which shall be reviewed in accordance with 5.3, prior to manufacture commencing.
The manufacturer shall state which vessels are covered by the same design documentation.
5.2 Information to be contained in the technical documentation
For the purposes of this standard the following types of documents shall be considered necessary as technical documentation.
5.2.1 General description of the pressure vessel
a) Name of vessel manufacturer and subcontractors, if applicable;
b) Location/s of vessel manufacturers and sub-contractors, if applicable;
c) Document describing design data and special consideration which covers:
1) maximum and minimum allowable pressures, design pressures and test pressures in bar for each compartment (vacuum with minus sign);
2) capacity in litres for each compartment;
3) maximum and minimum design temperatures;
4) nature and location of marking of the pressure vessel, nameplate or stamp;
5) the fluid group.
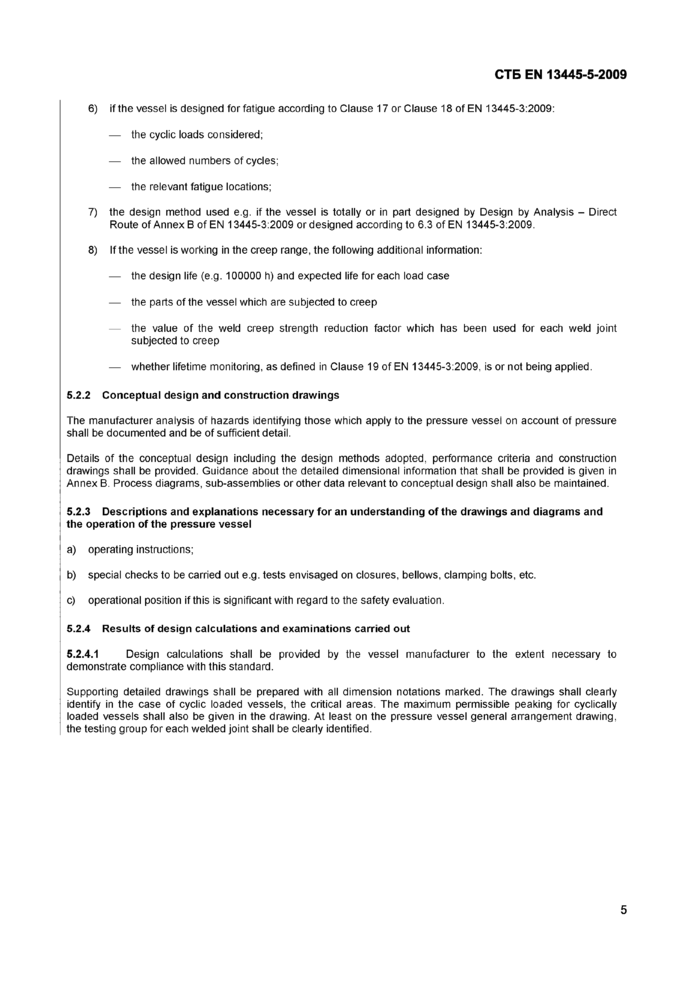
4СТБ EN 13445-5-2009
6) if the vessel is designed for fatigue according to Clause 17 or Clause 18 of EN 13445-3:2009:
— the cyclic loads considered;
— the allowed numbers of cycles;
— the relevant fatigue locations;
7) the design method used e.g. if the vessel is totally or in part designed by Design by Analysis - Direct Route of Annex В of EN 13445-3:2009 or designed according to 6.3 of EN 13445-3:2009.
8) If the vessel is working in the creep range, the following additional information:
— the design life (e.g. 100000 h) and expected life for each load case
— the parts of the vessel which are subjected to creep
— the value of the weld creep strength reduction factor which has been used for each weld joint subjected to creep
— whether lifetime monitoring, as defined in Clause 19 of EN 13445-3:2009, is or not being applied.
5.2.2 Conceptual design and construction drawings
The manufacturer anaiysis of hazards identifying those which appiy to the pressure vessei on account of pressure shall be documented and be of sufficient detail.
Details of the conceptual design including the design methods adopted, performance criteria and construction drawings shall be provided. Guidance about the detailed dimensional information that shall be provided is given in Annex B. Process diagrams, sub-assemblies or other data relevant to conceptual design shall also be maintained.
5.2.3 Descriptions and explanations necessary for an understanding of the drawings and diagrams and the operation of the pressure vessel
a) operating instructions;
b) special checks to be carried out e.g. tests envisaged on closures, bellows, clamping bolts, etc.
c) operational position if this is significant with regard to the safety evaluation.
5.2.4 Results of design calculations and examinations carried out
5.2.4.1 Design calculations shall be provided by the vessel manufacturer to the extent necessary to demonstrate compliance with this standard.
Supporting detailed drawings shall be prepared with all dimension notations marked. The drawings shall clearly identify in the case of cyclic loaded vessels, the critical areas. The maximum permissible peaking for cyclically loaded vessels shall also be given in the drawing. At least on the pressure vessel general arrangement drawing, the testing group for each welded joint shall be clearly identified.
5
СТБ EN 13445-5-2009
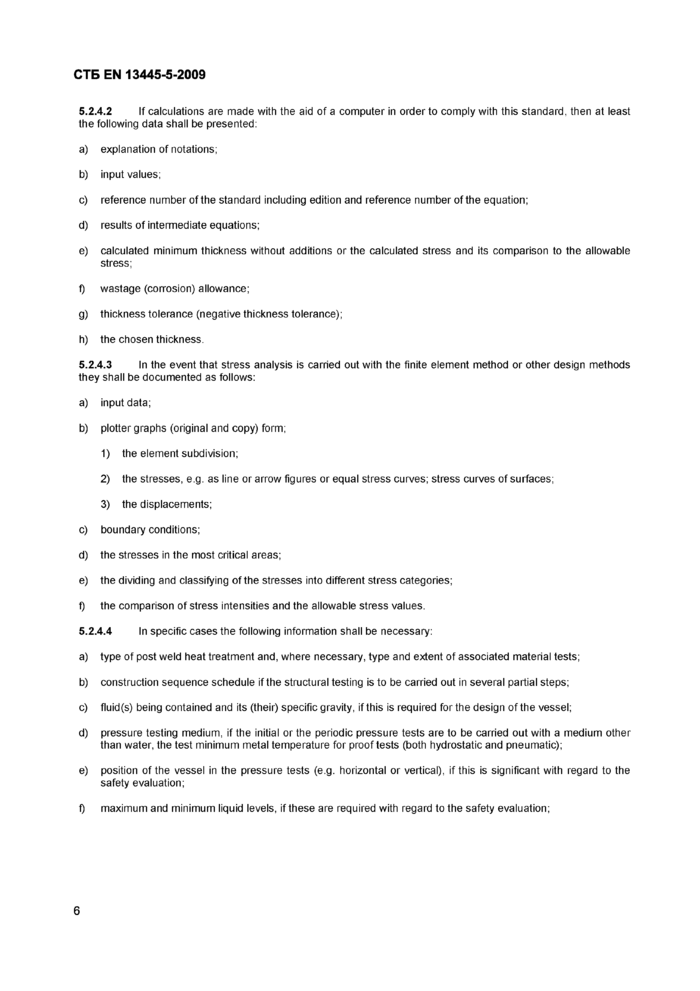
5.2Л.2 If calculations are made with the aid of a computer in order to comply with this standard, then at least the following data shall be presented:
a) explanation of notations;
b) input values;
c) reference number of the standard including edition and reference number of the equation;
d) results of intermediate equations;
e) calculated minimum thickness without additions or the calculated stress and its comparison to the allowable stress;
f) wastage (corrosion) allowance;
g) thickness tolerance (negative thickness tolerance);
h) the chosen thickness.
5.2.4.3 In the event that stress analysis is carried out with the finite element method or other design methods they shall be documented as follows:
a) input data;
b) plotter graphs (original and copy) form;
1) the element subdivision;
2) the stresses, e.g. as line or arrow figures or equal stress curves; stress curves of surfaces;
3) the displacements;
c) boundary conditions;
d) the stresses in the most critical areas;
e) the dividing and classifying of the stresses into different stress categories;
f) the comparison of stress intensities and the allowable stress values.
5.2.4.4 In specific cases the following information shall be necessary:
a) type of post weld heat treatment and, where necessary, type and extent of associated material tests;
b) construction sequence schedule if the structural testing is to be carried out in several partial steps;
c) fluid(s) being contained and its (their) specific gravity, if this is required for the design of the vessel;
d) pressure testing medium, if the initial or the periodic pressure tests are to be carried out with a medium other than water, the test minimum metal temperature for proof tests (both hydrostatic and pneumatic);
e) position of the vessel in the pressure tests (e.g. horizontal or vertical), if this is significant with regard to the safety evaluation;
f) maximum and minimum liquid levels, if these are required with regard to the safety evaluation;
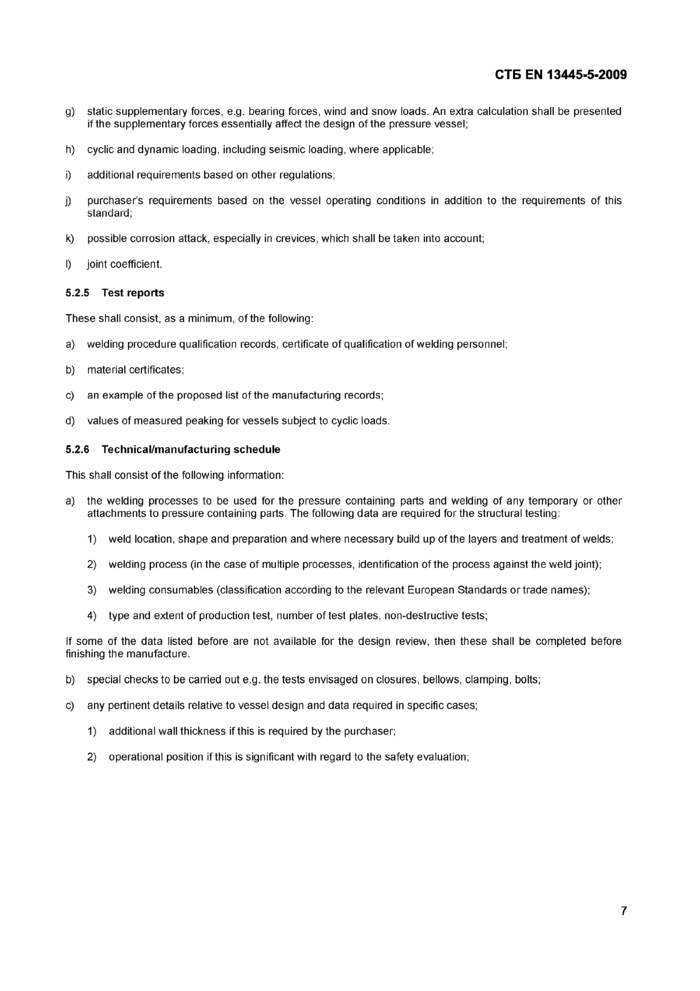
СТБ EN 13445-5-2009
g) static supplementary forces, e.g. bearing forces, wind and snow loads. An extra calculation shall be presented if the supplementary forces essentially affect the design of the pressure vessel;
h) cyclic and dynamic loading, including seismic loading, where applicable;
i) additional reguirements based on other regulations;
j) purchaser’s requirements based on the vessel operating conditions in addition to the requirements of this standard;
k) possible corrosion attack, especially in crevices, which shall be taken into account;
l) joint coefficient.
5.2.5 Test reports
These shall consist, as a minimum, of the following:
a) welding procedure qualification records, certificate of qualification of welding personnel;
b) material certificates;
c) an example of the proposed list of the manufacturing records;
d) values of measured peaking for vessels subject to cyclic loads.
5.2.6 Technical/manufacturing schedule This shall consist of the following information:
a) the welding processes to be used for the pressure containing parts and welding of any temporary or other attachments to pressure containing parts. The following data are required for the structural testing:
1) weld location, shape and preparation and where necessary build up of the layers and treatment of welds;
2) welding process (in the case of multiple processes, identification of the process against the weld joint);
3) welding consumables (classification according to the relevant European Standards or trade names);
4) type and extent of production test, number of test plates, non-destructive tests;
If some of the data listed before are not available for the design review, then these shall be completed before finishing the manufacture.
b) special checks to be carried out e.g. the tests envisaged on closures, bellows, clamping, bolts;
c) any pertinent details relative to vessel design and data required in specific cases;
1) additional wall thickness if this is required by the purchaser;
2) operational position if this is significant with regard to the safety evaluation;
7