СТБ EN 13445-2-2009
Сосуды, работающие под давлением. Часть 2. Материалы
Купить СТБ EN 13445-2-2009 — бумажный документ с голограммой и синими печатями. подробнее
Цена на этот документ пока неизвестна. Нажмите кнопку "Купить" и сделайте заказ, и мы пришлем вам цену.
Распространяем нормативную документацию с 1999 года. Пробиваем чеки, платим налоги, принимаем к оплате все законные формы платежей без дополнительных процентов. Наши клиенты защищены Законом. ООО "ЦНТИ Нормоконтроль"
Наши цены ниже, чем в других местах, потому что мы работаем напрямую с поставщиками документов.
Способы доставки
- Срочная курьерская доставка (1-3 дня)
- Курьерская доставка (7 дней)
- Самовывоз из московского офиса
- Почта РФ
Часть европейского стандарта устанавливает требования к материалам (включая плакированные материалы) для сосудов, работающих под давлением, без огневого подвода теплоты и опорам, рассматриваемым в EN 13445-1:2009 и изготавливаемым из металлических материалов. В настоящее время она ограничивается сталями с достаточной пластичностью, но для элементов, работающих в диапазоне ползучести, она также ограничивается материалами с достаточной пластичностью при ползучести.
Оглавление
Введение
Приложение Д.А (справочное) Перевод европейского стандарта EN 13445-2:2009 на русский язык
1 Область применения
2 Нормативные ссылки
3 Термины, определения, символы и единицы
4 Требования к материалам, используемым для частей, находящихся под давлением
5 Требования к материалам, используемым для частей, не находящихся под давлением
Приложение А (обязательное) Система групп сталей для оборудования, работающего под давлением
Приложение B (обязательное) Требования к предотвращению хрупкого разрушения при низких температурах
Приложение C (справочное) Процедура определения коэффициента ослабления прочности вследствие ползучести сварного шва
Приложение D (справочное) Технические условия поставки плакированных изделий для использования под давлением
Приложение Е (справочное) Европейские стали для использования под давлением
Приложение Y (справочное) Отличия между EN 13445-2:2002 и EN 13445-2:2009
Приложение ZA (справочное) Взаимосвязь между настоящим европейским стандартом и существенными требованиями директивы ЕС 97/23/ЕС по оборудованию, работающему под давлением
Библиография
| Дата введения | 01.01.2010 |
|---|---|
| Добавлен в базу | 01.01.2019 |
| Актуализация | 01.01.2021 |
Организации:
| 27.11.2009 | Утвержден | Госстандарт Республики Беларусь | 61 |
|---|---|---|---|
| Разработан | БелГИСС | ||
| Издан | БелГИСС | 2010 г. |
Unfired pressure vessels. Part 2. Materials
Чтобы бесплатно скачать этот документ в формате PDF, поддержите наш сайт и нажмите кнопку:
стр. 1
стр. 2
стр. 3
стр. 4
стр. 5
стр. 6
стр. 7
стр. 8
стр. 9
стр. 10
стр. 11
стр. 12
стр. 13
стр. 14
стр. 15
стр. 16
стр. 17
стр. 18
стр. 19
стр. 20
стр. 21
стр. 22
стр. 23
стр. 24
стр. 25
стр. 26
стр. 27
стр. 28
стр. 29
стр. 30
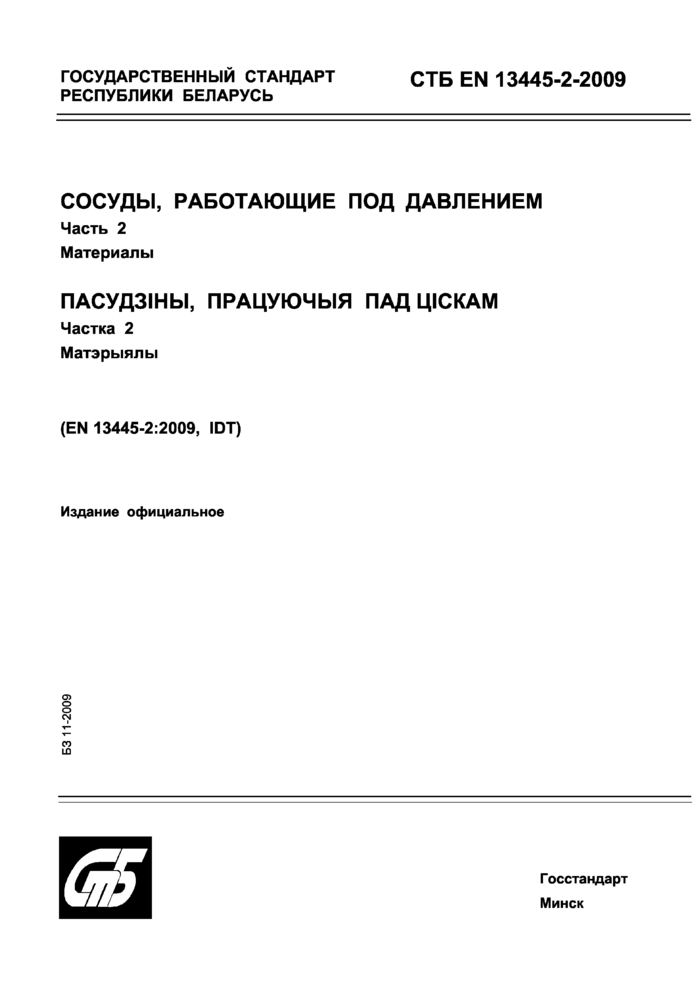
ГОСУДАРСТВЕННЫЙ СТАНДАРТ РЕСПУБЛИКИ БЕЛАРУСЬ
СОСУДЫ, РАБОТАЮЩИЕ ПОД ДАВЛЕНИЕМ
Часть 2 Материалы
ПАСУД31НЫ, ПРАЦУЮЧЫЯ ПАД Ц1СКАМ
Частка 2 Матэрыялы
(EN 13445-2:2009, ЮТ)
Издание официальное
Г осстандарт Минск
(SB
УДК 621,642.-98(083.74)(476) МКС 23.020.30 КП 03 ЮТ
Ключевые слова: сосуды, работающие под давлением, материалы
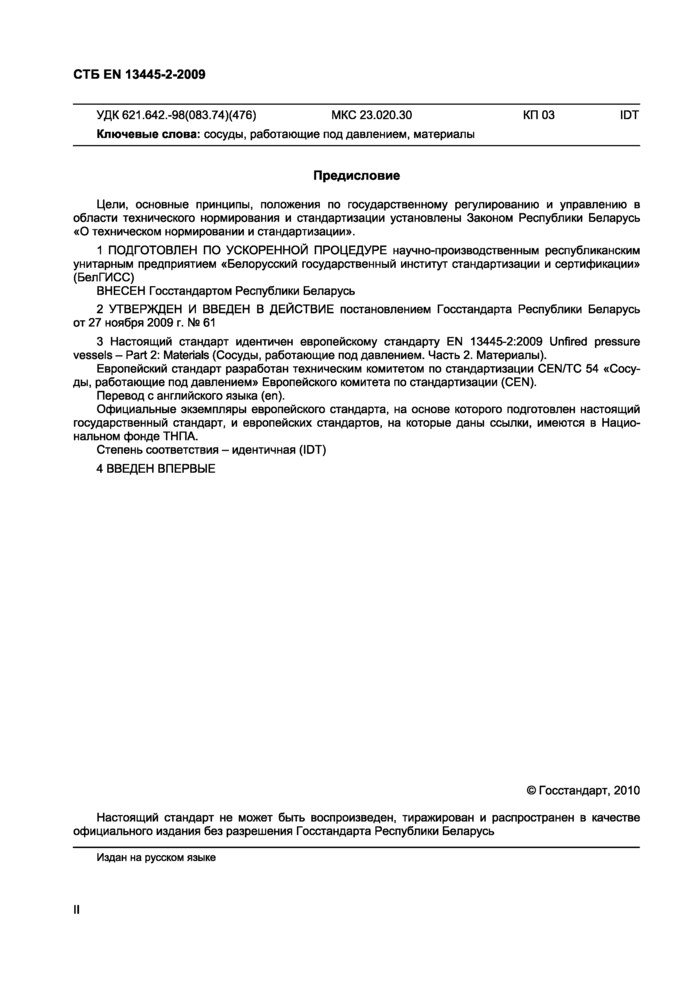
Предисловие
Цели, основные принципы, положения по государственному регулированию и управлению в области технического нормирования и стандартизации установлены Законом Республики Беларусь «О техническом нормировании и стандартизации».
1 ПОДГОТОВЛЕН ПО УСКОРЕННОЙ ПРОЦЕДУРЕ научно-производственным республиканским унитарным предприятием «Белорусский государственный институт стандартизации и сертификации» (БелГИСС)
ВНЕСЕН Госстандартом Республики Беларусь
2 УТВЕРЖДЕН И ВВЕДЕН В ДЕЙСТВИЕ постановлением Госстандарта Республики Беларусь от 27 ноября 2009 г. № 61
3 Настоящий стандарт идентичен европейскому стандарту EN 13445-2:2009 Unfired pressure vessels - Part 2: Materials (Сосуды, работающие под давлением. Часть 2. Материалы).
Европейский стандарт разработан техническим комитетом по стандартизации CEN/TC 54 «Сосуды, работающие под давлением» Европейского комитета по стандартизации (CEN).
Перевод с английского языка (еп).
Официальные экземпляры европейского стандарта, на основе которого подготовлен настоящий государственный стандарт, и европейских стандартов, на которые даны ссылки, имеются в Национальном фонде ТИПА.
Степень соответствия - идентичная (ЮТ)
4 ВВЕДЕН ВПЕРВЫЕ
© Госстандарт, 2010
Настоящий стандарт не может быть воспроизведен, тиражирован и распространен в качестве официального издания без разрешения Госстандарта Республики Беларусь
Издан на русском языке
СТБ EN 13445-2-2009
4.2 Special provisions
4.2.1 Special properties4.2.1.1 General
extent that would adversely affect the safety or service life of the pressure vessel, this shall be taken into consideration when specifying material.
Adverse effects may arise from:
— manufacturing processes: e g. degree of cold forming and heat treatment;
— operating conditions: e.g. hydrogen embrittlement, corrosion, scaling and ageing behaviour of the material after cold forming.
4.2.1.2 Lamellar tearing
Where lamellar tearing due to the joint design and loading needs to be addressed, steels shall be used which have improved deformation properties perpendicular to the surface and verified in accordance with EN 10164:2004.
NOTE For guidance see EN 1011-2.
4.2.2 Design temperature above 20 °C
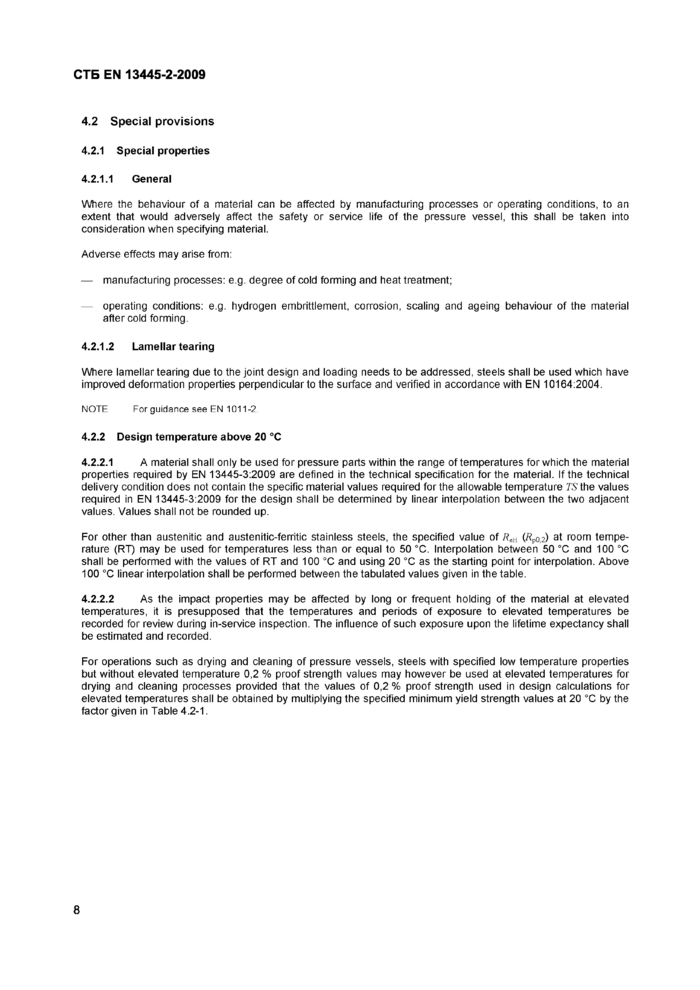
4.2.2.1 A material shall only be used for pressure parts within the range of temperatures for which the material properties required by EN 13445-3:2009 are defined in the technical specification for the material. If the technical delivery condition does not contain the specific material values required for the allowable temperature rathe values required in EN 13445-3:2009 for the design shall be determined by linear interpolation between the two adjacent values. Values shall not be rounded up.
For other than austenitic and austenitic-ferritic stainless steels, the specified value of Retl (Rv0|2) at room temperature (RT) may be used for temperatures less than or equal to 50 °C. Interpolation between 50 °C and 100 °C shall be performed with the values of RT and 100 °C and using 20 °C as the starting point for interpolation. Above 100 °C linear interpolation shall be performed between the tabulated values given in the table.
4.2.2.2 As the impact properties may be affected by long or frequent holding of the material at elevated temperatures, it is presupposed that the temperatures and periods of exposure to elevated temperatures be recorded for review during in-service inspection. The influence of such exposure upon the lifetime expectancy shall be estimated and recorded.
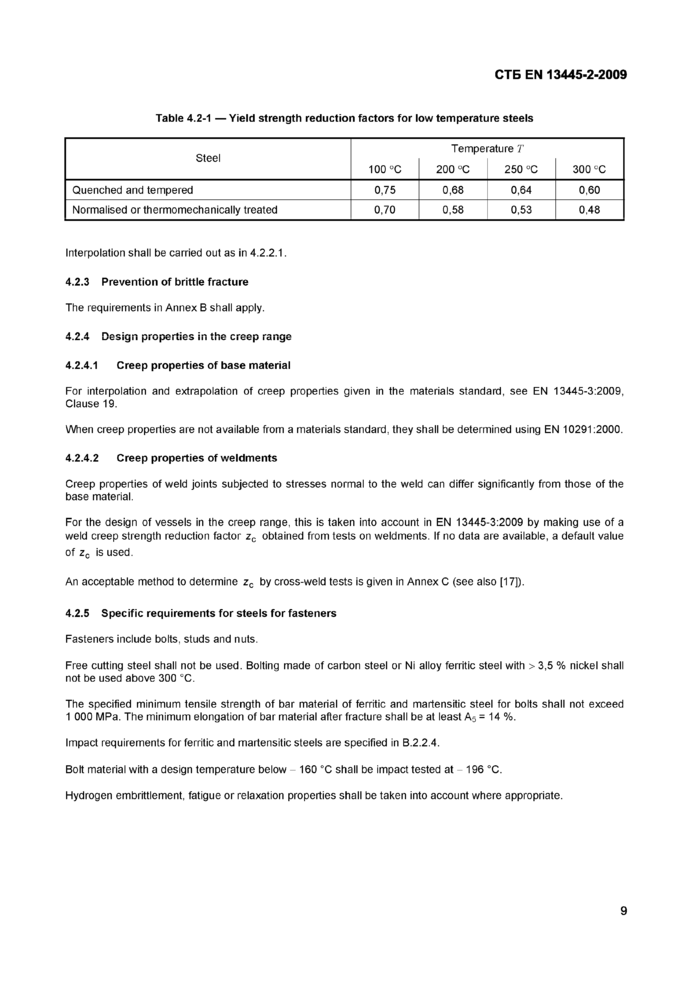
For operations such as drying and cleaning of pressure vessels, steels with specified low temperature properties but without elevated temperature 0,2 % proof strength values may however be used at elevated temperatures for drying and cleaning processes provided that the values of 0,2 % proof strength used in design calculations for elevated temperatures shall be obtained by multiplying the specified minimum yield strength values at 20 °C by the factor given in Table 4.2-1.
8
|
Table 4.2-1 — Yield strength reduction factors for low temperature steels | |||||||||||||||
|
Interpolation shall be carried out as in 4.2.2.1.
4.2.3 Prevention of brittle fracture
The requirements in Annex В shall apply.
4.2.4.1 Creep properties of base material
For interpolation and extrapolation of creep properties given in the materials standard, see EN 13445-3:2009, Clause 19.
When creep properties are not available from a materials standard, they shall be determined using EN 10291:2000.
4.2.4.2 Creep properties of weldments
Creep properties of weld joints subjected to stresses normal to the weld can differ significantly from those of the base material.
For the design of vessels in the creep range, this is taken into account in EN 13445-3:2009 by making use of a weld creep strength reduction factor zc obtained from tests on weldments. If no data are available, a default value of zc is used.
An acceptable method to determine zc by cross-weld tests is given in Annex C (see also [17]).
4.2.5 Specific requirements for steels for fasteners
Fasteners include bolts, studs and nuts.
Free cutting steel shall not be used. Bolting made of carbon steel or Ni alloy ferritic steel with > 3,5 % nickel shall not be used above 300 °C.
The specified minimum tensile strength of bar material of ferritic and martensitic steel for bolts shall not exceed 1 000 MPa. The minimum elongation of bar material after fracture shall be at least A5 = 14 %.
Impact requirements for ferritic and martensitic steels are specified in B.2.2.4.
Bolt material with a design temperature below - 160 °C shall be impact tested at - 196 °C.
Hydrogen embrittlement, fatigue or relaxation properties shall be taken into account where appropriate.
9
СТБ EN 13445-2-2009
NOTE 1 Detailed requirements on the surface condition and internal soundness of the bar can be necessary for some applications.
NOTE 2 Materials for fasteners compliant with the requirements of this standard should be certified on the basis of EN 10204:2004.
4.3 Technical delivery conditions
4.3.1 European Standards
The European Standards for plates, strips, bars, tubes, forgings and castings for pressure purposes shall be used.
NOTE 1 Table E.2-1 provides an overview on materials for pressure purposes specified in harmonised standards.
NOTE 2 Table E.1-1 contains an informative summary of European Materials Standards referred to and of European Standards covering components of pressure-bearing parts.
Special provisions due to fabrication and operation shall be taken into account, if appropriate.
4.3.2 European Approval for Materials
A material specified in an EMDS for pressure vessels shall only be used within its range of application and if 4.1 and 4.2 have been taken into consideration.
4.3.3 Particular material appraisals
Materials other than those specified in 4.3.1 and 4.3.2 may also be used provided that they have been undergone a particular material appraisal and if 4.1 and 4.2 have been taken into consideration.
4.3.4 Clad products
Technical delivery conditions for clad products for pressure parts shall be in accordance with the requirements of Annex D.
NOTE 1 European Standards specifying technical delivery conditions for clad products for pressure purposes are not currently available.
NOTE 2 Examples of national documents covering technical delivery condition for clad steels are given in [2] to [4].
4.3.5 Welding consumables
Technical delivery conditions for welding consumables used of pressure parts and attachments to pressure parts shall be in accordance with EN 13479:2004 and EN 12074:2000.
NOTE Equivalent national/international specifications are accepted which fulfil the same criteria with respect to the requirements for the Quality Assurance System and the requirements for manufacture, supply, distribution, test methods and evaluation of consumables.
4.4 Marking
The marking of the products or delivery units shall ensure traceability between the product or delivery unit and the inspection documents.
10
СТБ EN 13445-2-2009
For European standardised materials the marking shall fulfil the requirements of the relevant product standard.
For materials not contained in a European Standard the marking shall at least contain:
— the material specification (reference, material designation);
— the manufacturers name or mark;
— the stamp of the inspection representative, if applicable.
For material supplied with specific inspection the marking shall include an identification which permits the correlation between the product or delivery unit and the relevant inspection document.
5 Requirements for materials to be used for non-pressure parts
For non-pressure parts, e.g. for supporting lugs, skirts, baffles and similar parts welded to pressure vessels, material shall be used which are supplied to material specifications covering at least requirements for the chemical composition and the tensile properties. These materials shall not limit the operating conditions of the material to which they are attached.
11
СТБ EN 13445-2-2009
Annex A
(normative)
Grouping system for steels for pressure equipment
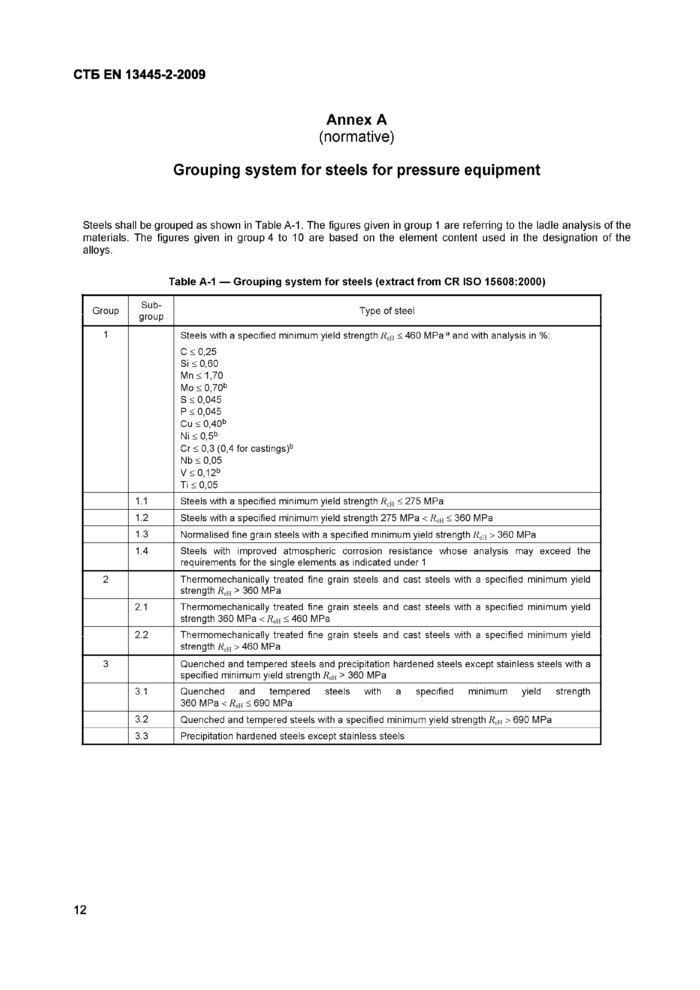
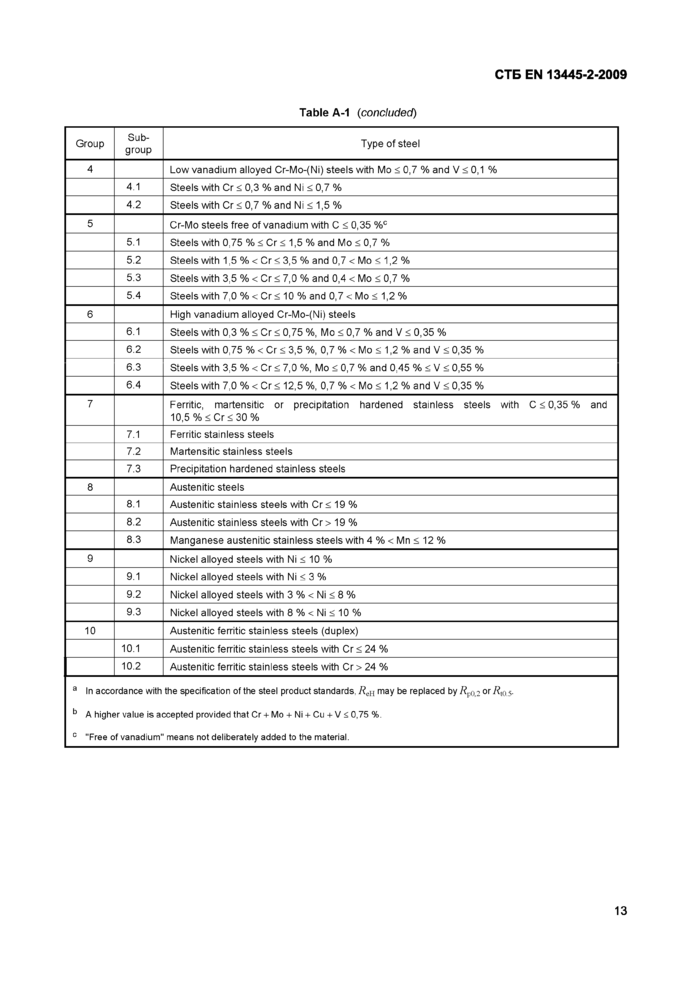
Steels shall be grouped as shown in Table A-1. The figures given in group 1 are referring to the ladle analysis of the materials. The figures given in group 4 to 10 are based on the element content used in the designation of the alloys.
|
Table A-1 — Grouping system for steels (extract from CR ISO 15608:2000) | |||||||||||||||||||||||||||||||||||||||
|
12
|
Table A-1 (concluded) | ||||||||||||||||||||||||||||||||||||||||||||||||||||||||||||||||||||||||||||||||||||||||||||||||
| ||||||||||||||||||||||||||||||||||||||||||||||||||||||||||||||||||||||||||||||||||||||||||||||||
13
СТБ EN 13445-2-2009Annex В
(normative)
Requirements for prevention of brittle fracture at low temperaturesB.1 General
This annex distinguishes between pressure equipment that has design temperature for normal operation higher or lower than 50 °C.
For pressure equipment with normal operation temperatures higher than 50 °C B.5 applies. If B.5 is not applicable, the following rules for lower normal operation temperatures shall be used.
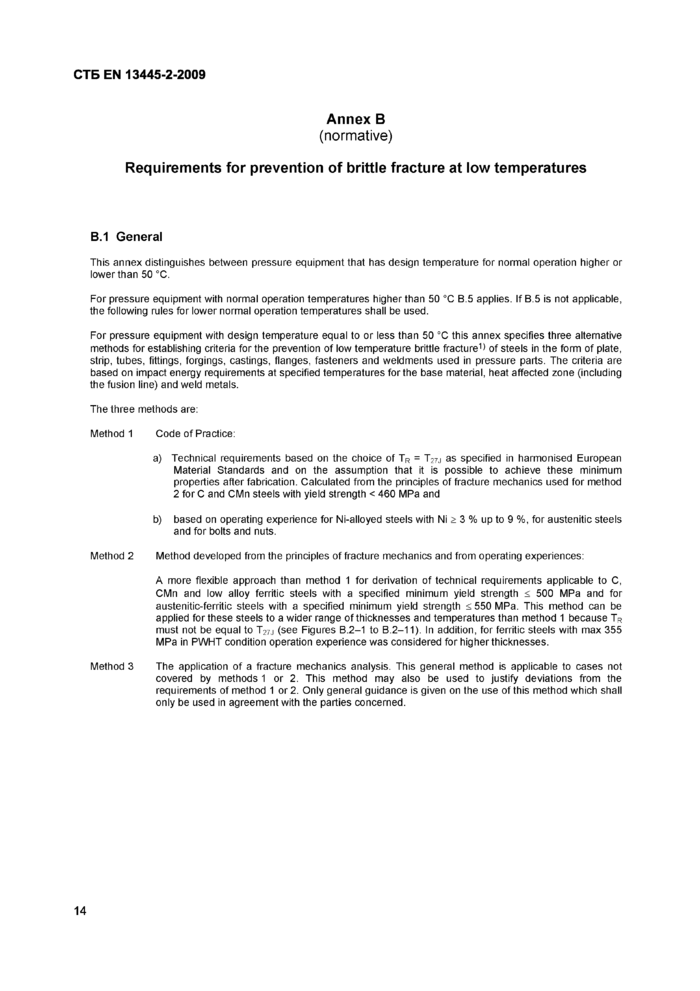
For pressure equipment with design temperature equal to or less than 50 °C this annex specifies three alternative methods for establishing criteria for the prevention of low temperature brittle fracture1) of steels in the form of plate, strip, tubes, fittings, forgings, castings, flanges, fasteners and weldments used in pressure parts. The criteria are based on impact energy requirements at specified temperatures for the base material, heat affected zone (including the fusion line) and weld metals.
The three methods are:
Method 1 Code of Practice:
a) Technical requirements based on the choice of TR = T27j as specified in harmonised European Material Standards and on the assumption that it is possible to achieve these minimum properties after fabrication. Calculated from the principles of fracture mechanics used for method 2 for C and CMn steels with yield strength < 460 MPa and
b) based on operating experience for Ni-alloyed steels with Ni > 3 % up to 9 %, for austenitic steels and for bolts and nuts.
Method 2 Method developed from the principles of fracture mechanics and from operating experiences:
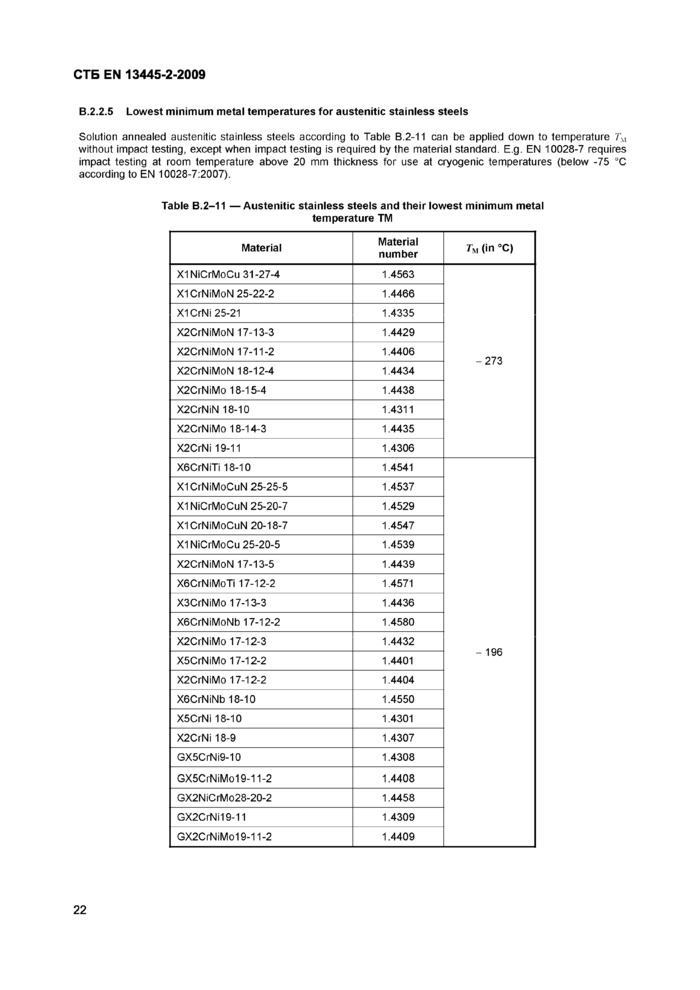
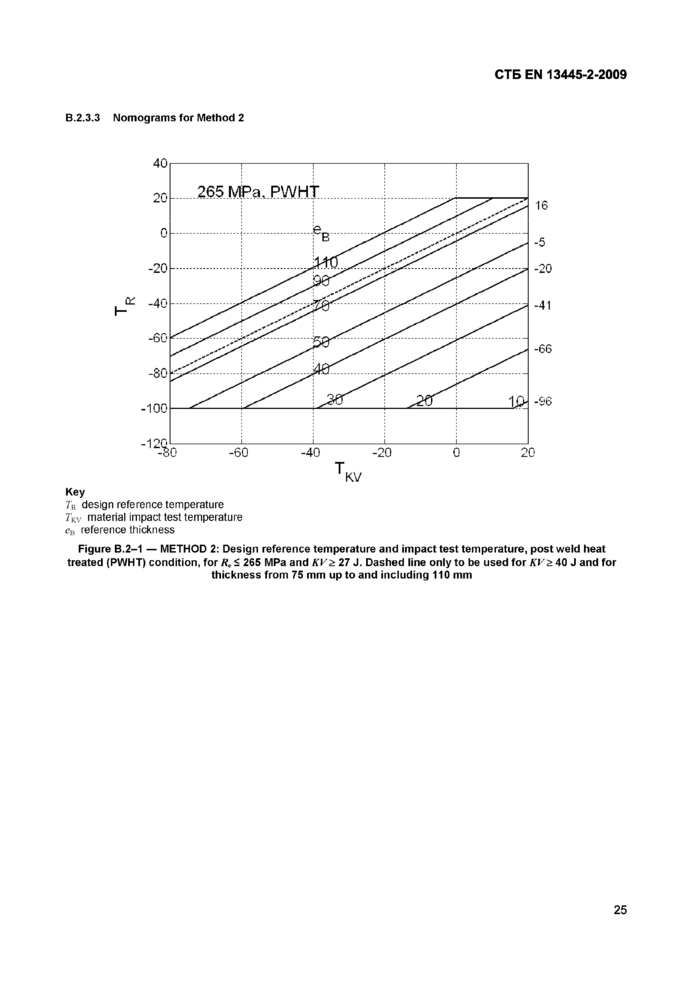
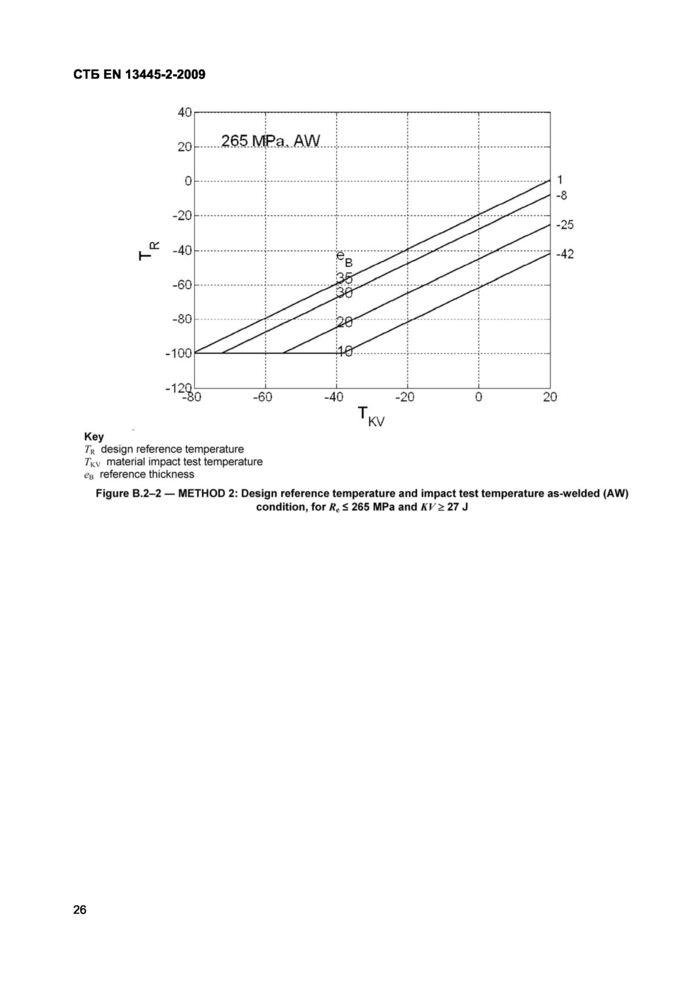
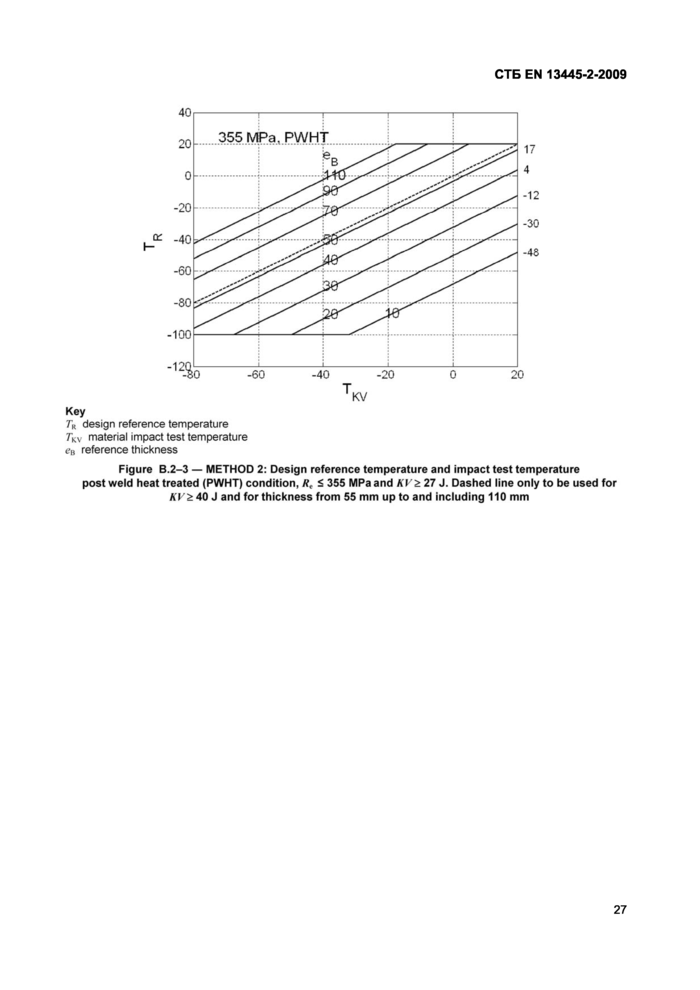
A more flexible approach than method 1 for derivation of technical requirements applicable to C, CMn and low alloy ferritic steels with a specified minimum yield strength < 500 MPa and for austenitic-ferritic steels with a specified minimum yield strength < 550 MPa. This method can be applied for these steels to a wider range of thicknesses and temperatures than method 1 because TR must not be equal to T27j (see Figures B.2-1 to B.2-11). In addition, for ferritic steels with max 355 MPa in PWHT condition operation experience was considered for higher thicknesses.
Method 3 The application of a fracture mechanics analysis. This general method is applicable to cases not covered by methods 1 or 2. This method may also be used to justify deviations from the requirements of method 1 or 2. Only general guidance is given on the use of this method which shall only be used in agreement with the parties concerned.
14
СТБ EN 13445-2-2009
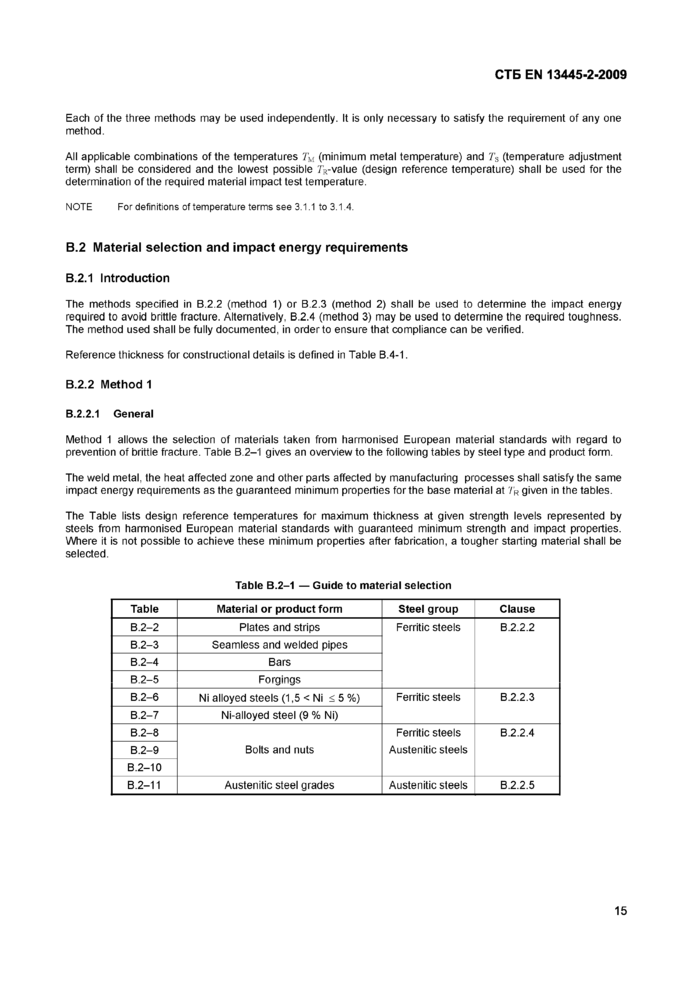
Each of the three methods may be used independently. It is only necessary to satisfy the requirement of any one method.
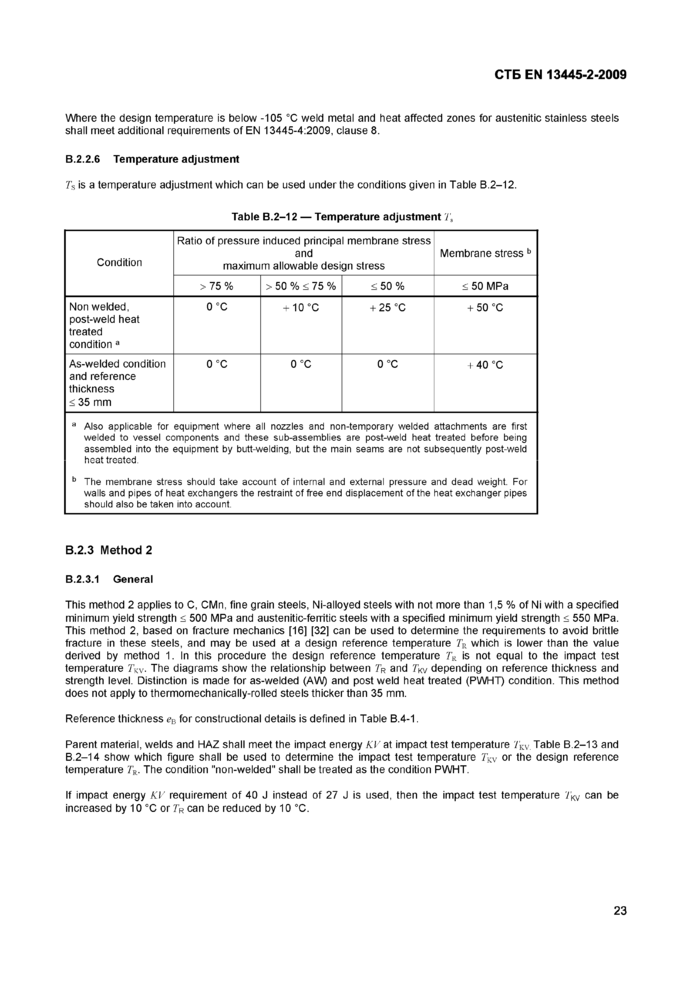
All applicable combinations of the temperatures TM (minimum metal temperature) and Ts (temperature adjustment term) shall be considered and the lowest possible revalue (design reference temperature) shall be used for the determination of the required material impact test temperature.
NOTE For definitions of temperature terms see 3.1.1 to 3.1.4.
B.2 Material selection and impact energy requirements B.2.1 Introduction
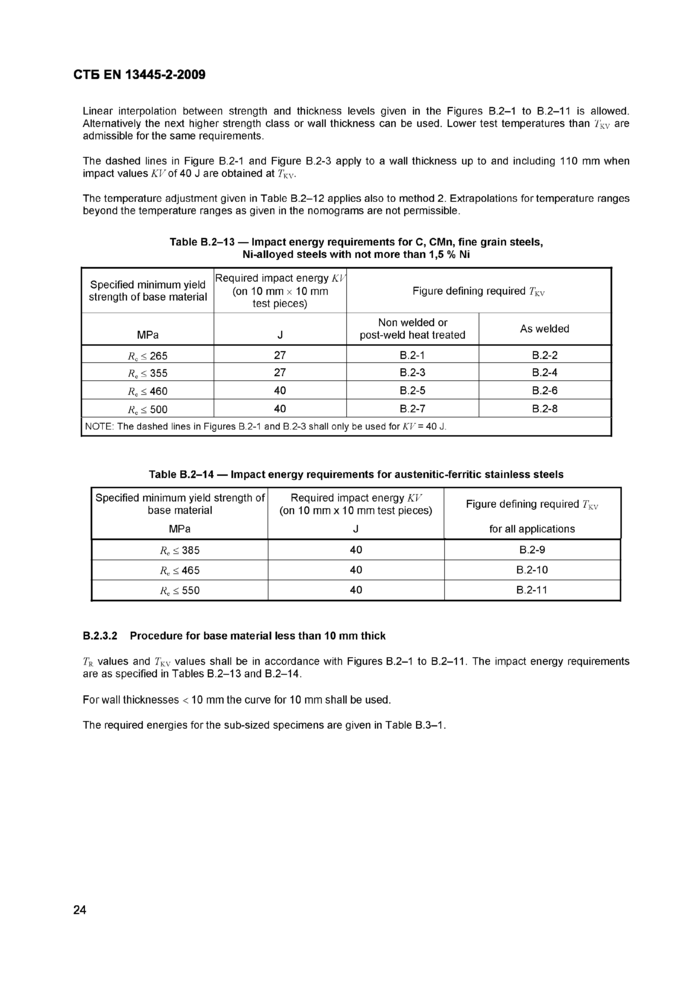
The methods specified in B.2.2 (method 1) or B.2.3 (method 2) shall be used to determine the impact energy required to avoid brittle fracture. Alternatively, B.2.4 (method 3) may be used to determine the required toughness. The method used shall be fully documented, in order to ensure that compliance can be verified.
Reference thickness for constructional details is defined in Table B.4-1.
B.2.2 Method 1 B.2.2.1 General
Method 1 allows the selection of materials taken from harmonised European material standards with regard to prevention of brittle fracture. Tabie B.2-1 gives an overview to the foiiowing tabies by steei type and product form.
The weld metal, the heat affected zone and other parts affected by manufacturing processes shall satisfy the same impact energy requirements as the guaranteed minimum properties for the base material at TR given in the tables.
The Table lists design reference temperatures for maximum thickness at given strength levels represented by steels from harmonised European material standards with guaranteed minimum strength and impact properties. Where it is not possible to achieve these minimum properties after fabrication, a tougher starting material shall be selected.
|
Table B.2-1 — Guide to material selection | ||||||||||||||||||||||||||||||||||||||||||||
|
15СТБ EN 13445-2-2009
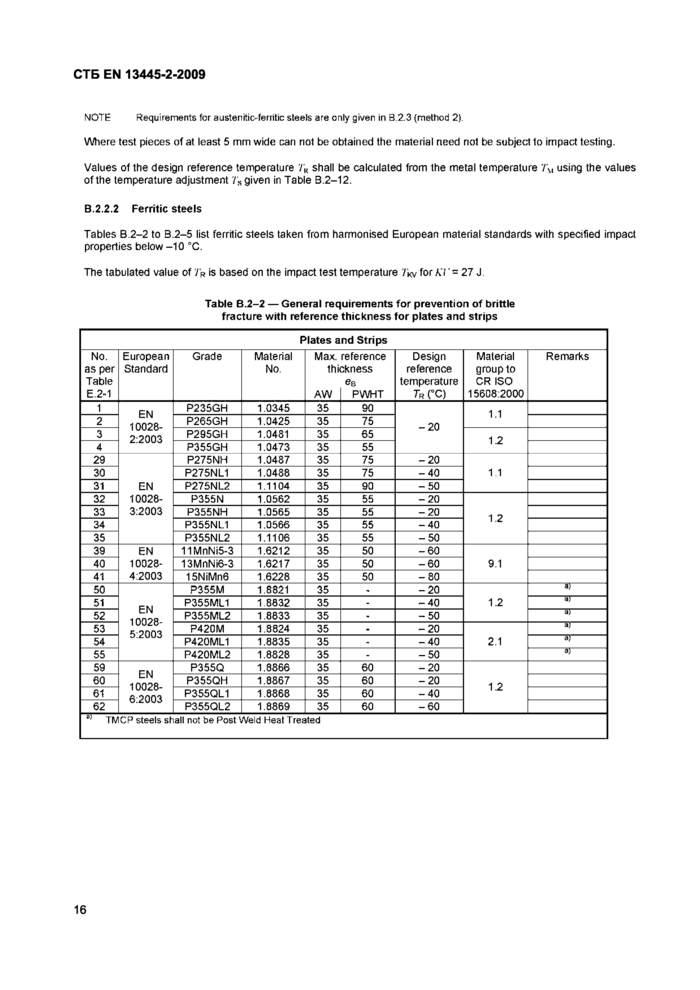
NOTE Requirements for austenitic-ferritic steels are only given in B.2.3 (method 2).
Where test pieces of at least 5 mm wide can not be obtained the material need not be subject to impact testing.
Values of the design reference temperature 7'к shall be calculated from the metal temperature 7'VI using the values of the temperature adjustment 7S given in Table B.2-12.
B.2.2.2 Ferritic steels
Tables B.2-2 to B.2-5 list ferritic steels taken from harmonised European material standards with specified impact properties below -10 °C.
The tabulated value of 7’R is based on the impact test temperature 7’kv for AT = 27 J.
Table B.2-2 — General requirements for prevention of brittle fracture with reference thickness for plates and strips
|
Plates and Strips | ||||||||
|
No. |
European |
Grade |
Material |
Max. reference |
Design |
Material |
Remarks | |
|
as per |
Standard |
No. |
thickness |
reference |
group to | |||
|
Table |
ев |
temperature |
CR ISO | |||||
|
E.2-1 |
AW |
PWHT |
Tr CC) |
15608:2000 | ||||
|
1 |
EN 10028- 2:2003 |
P235GH |
1.0345 |
35 |
90 |
1.1 | ||
|
2 |
P265GH |
1.0425 |
35 |
75 |
20 | |||
|
3 |
P295GH |
1.0481 |
35 |
65 |
1.2 | |||
|
4 |
P355GH |
1.0473 |
35 |
55 | ||||
|
29 |
P275NH |
1.0487 |
35 |
75 |
-20 | |||
|
30 |
P275NL1 |
1.0488 |
35 |
75 |
-40 |
1.1 | ||
|
31 |
EN |
P275NL2 |
1.1104 |
35 |
90 |
-50 | ||
|
32 |
10028- |
P355N |
1,0562 |
35 |
55 |
-20 | ||
|
33 |
3:2003 |
P355NH |
1.0565 |
35 |
55 |
-20 |
1.2 | |
|
34 |
P355NL1 |
1.0566 |
35 |
55 |
-40 | |||
|
35 |
P355NL2 |
1.1106 |
35 |
55 |
-50 | |||
|
39 |
EN |
11MnNi5-3 |
1.6212 |
35 |
50 |
-60 | ||
|
40 |
10028- |
13MnNi6-3 |
1.6217 |
35 |
50 |
-60 |
9.1 | |
|
41 |
4:2003 |
15NiMn6 |
1.6228 |
35 |
50 |
-80 | ||
|
50 |
Р355И |
1,8821 |
35 |
- |
-20 |
a) | ||
|
51 |
EN 10028-5:2003 |
P355ML1 |
1.8832 |
35 |
- |
-40 |
1.2 |
a) |
|
52 |
P355ML2 |
1,8833 |
35 |
- |
-50 |
a) | ||
|
53 |
P420M |
1,8824 |
35 |
- |
-20 |
aj | ||
|
54 |
P420ML1 |
1.8835 |
35 |
- |
-40 |
2.1 |
a) | |
|
55 |
P420ML2 |
1.8828 |
35 |
- |
-50 |
a) | ||
|
59 |
EN 10028-6:2003 |
P355Q |
1.8866 |
35 |
60 |
-20 | ||
|
60 |
P355QH |
1.8867 |
35 |
60 |
-20 |
1.2 | ||
|
61 |
P355QL1 |
1,8868 |
35 |
60 |
-40 | |||
|
62 |
P355QL2 |
1,8869 |
35 |
60 |
-60 | |||
|
a) TMCP steels shall not be Post Weld Heat Treated | ||||||||
16
СТБ EN 13445-2-2009
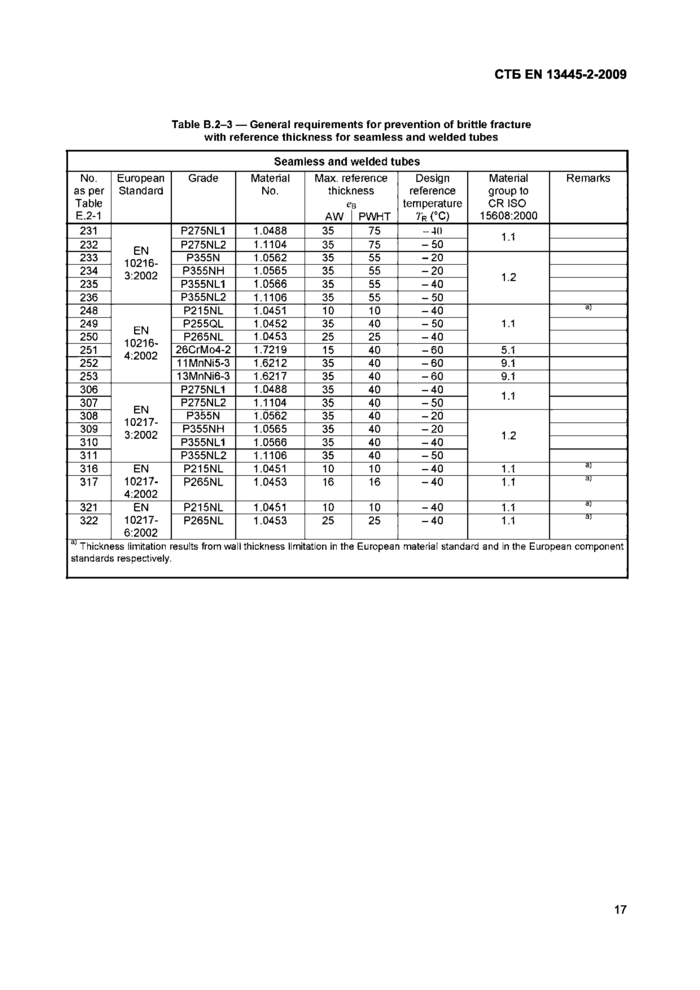
Table B.2-3 — General requirements for prevention of brittle fracture with reference thickness for seamless and welded tubes
|
Seamless and welded tubes | ||||||||||||||||||||||||||||||||||||||||||||||||||||||||||||||||||||||||||||||||||||||||||||||||||||||||||||||||||||||||||||||||||||||||||||||||||||||||||||||||||||||||||||||||||||
| ||||||||||||||||||||||||||||||||||||||||||||||||||||||||||||||||||||||||||||||||||||||||||||||||||||||||||||||||||||||||||||||||||||||||||||||||||||||||||||||||||||||||||||||||||||
|
31 Thickness limitation results from wall thickness limitation in the European material standard and in the European component standards respectively. |
17
СТБ EN 13445-2-2009
Введение
Настоящий стандарт содержит текст европейского стандарта EN 13445-2:2009 на языке оригинала и его перевод на русский язык (справочное приложение Д.А).
Введен в действие как стандарт, на который есть ссылка в Еврокоде EN 1993-1-8:2005.
ГОСУДАРСТВЕННЫЙ СТАНДАРТ РЕСПУБЛИКИ БЕЛАРУСЬ
СОСУДЫ, РАБОТАЮЩИЕ ПОД ДАВЛЕНИЕМ Часть 2 Материалы
ПАСУД31НЫ, ПРАЦУЮЧЫЯ ПАД Ц1СКАМ Частка 2 Матэрыялы
Unfired pressure vessels Part 2 Materials
Дата введения 2010-01-01
СТБ EN 13445-2-2009
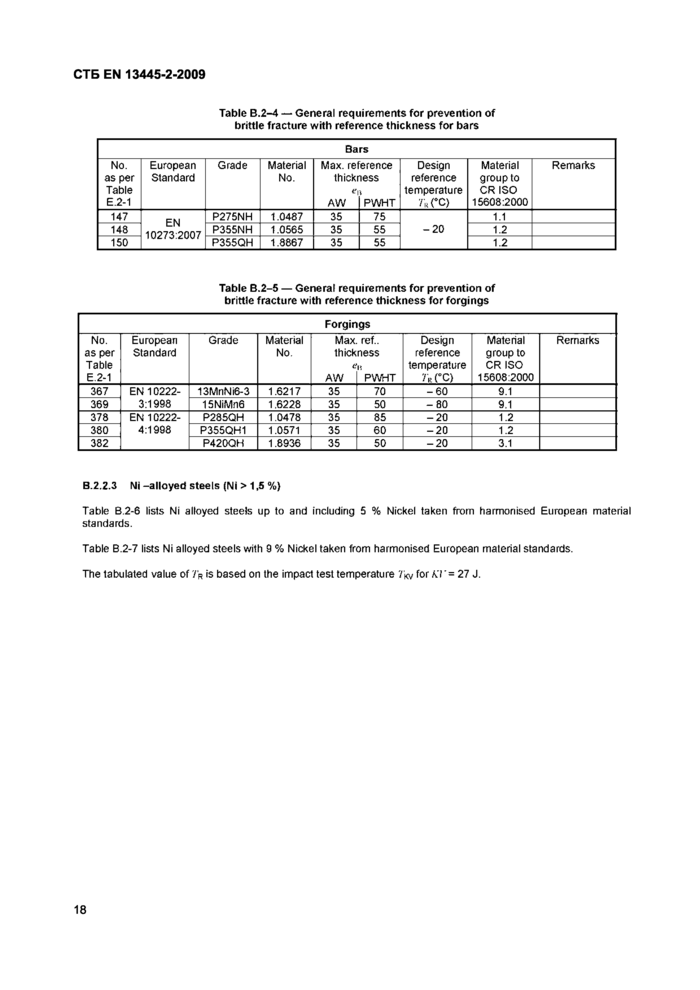
Table В.2-4 — General requirements for prevention of brittle fracture with reference thickness for bars
|
Bars | ||||||||
|
No. |
European |
Grade |
Material |
Max. reference |
Design |
Material |
Remarks | |
|
as per |
Standard |
No. |
thickness |
reference |
group to | |||
|
Table |
temperature |
CR ISO | ||||||
|
E.2-1 |
AW |
PWHT |
7rCC) |
15608:2000 | ||||
|
147 |
PM |
P275NH |
1.0487 |
35 |
75 |
1.1 | ||
|
148 |
10273:2007 |
P355NH |
1.0565 |
35 |
55 |
-20 |
1.2 | |
|
150 |
P355QH |
1.8867 |
35 |
55 |
1.2 | |||
Table B.2-5 — General requirements for prevention of brittle fracture with reference thickness for forgings
|
Forgings | ||||||||
|
No. |
European |
Grade |
Material |
Max. ref.. |
Design |
Material |
Remarks | |
|
as per |
Standard |
No. |
thickness |
reference |
group to | |||
|
Table |
tfii |
temperature |
CR ISO | |||||
|
E.2-1 |
AW |
PWHT |
ы°с> |
15608:2000 | ||||
|
367 |
EN 10222- |
13MnNi6-3 |
1.6217 |
35 |
70 |
-60 |
9.1 | |
|
369 |
3:1998 |
15NiMn6 |
1.6228 |
35 |
50 |
-80 |
9.1 | |
|
378 |
EN 10222- |
P285QH |
1.0478 |
35 |
85 |
-20 |
1.2 | |
|
380 |
4:1998 |
P355QH1 |
1.0571 |
35 |
60 |
-20 |
1.2 | |
|
382 |
P420QH |
1.8936 |
35 |
50 |
-20 |
3.1 | ||
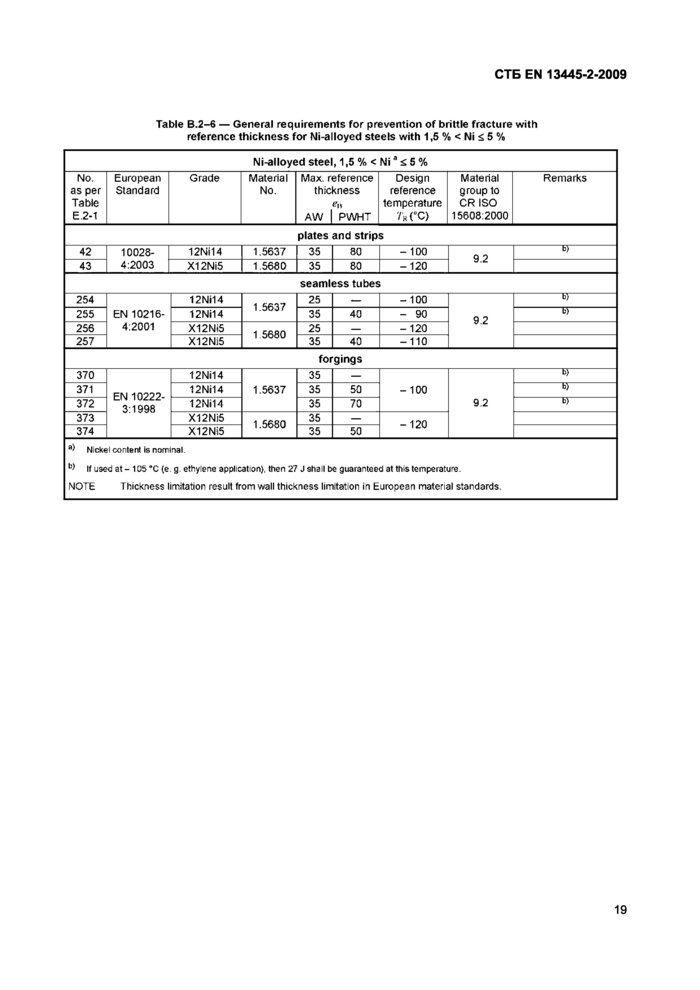
B.2.2.3 Ni -alloyed steels (Ni > 1,5 %)
Table B.2-6 lists Ni alloyed steels up to and including 5 % Nickel taken from harmonised European material standards.
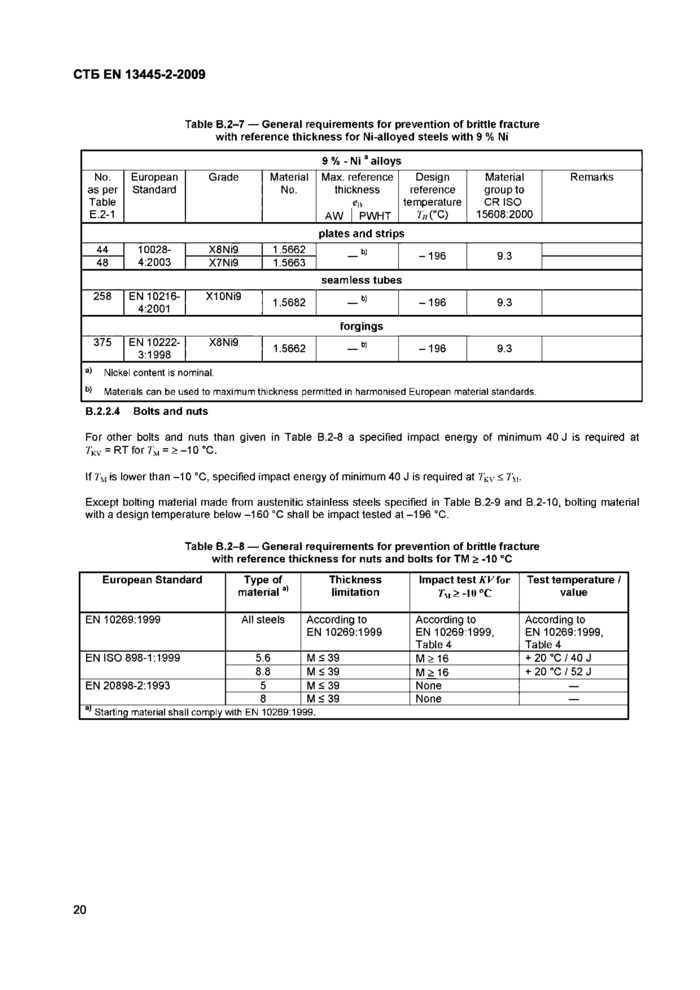
Table B.2-7 lists Ni alloyed steels with 9 % Nickel taken from harmonised European material standards.
The tabulated value of TR is based on the impact test temperature V'kv for КГ = 27 J.
18СТБ EN 13445-2-20091 Scope
1 Scope
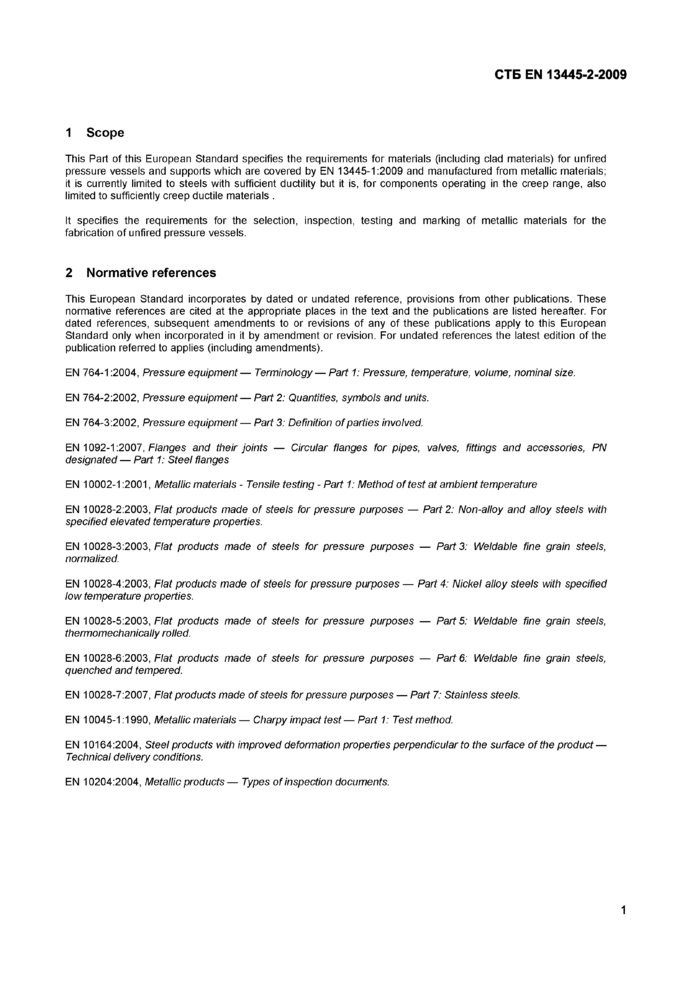
This Part of this European Standard specifies the requirements for materials (including clad materials) for unfired pressure vessels and supports which are covered by EN 13445-1:2009 and manufactured from metallic materials; it is currently limited to steels with sufficient ductility but it is, for components operating in the creep range, also limited to sufficiently creep ductile materials .
It specifies the requirements for the selection, inspection, testing and marking of metallic materials for the fabrication of unfired pressure vessels.
2 Normative references
This European Standard incorporates by dated or undated reference, provisions from other publications. These normative references are cited at the appropriate places in the text and the publications are listed hereafter. For dated references, subsequent amendments to or revisions of any of these publications apply to this European Standard only when incorporated in it by amendment or revision. For undated references the latest edition of the publication referred to applies (including amendments).
EN 764-1:2004, Pressure equipment— Terminology — Part 1: Pressure, temperature, volume, nominal size.
EN 764-2:2002, Pressure equipment— Part 2: Quantities, symbols and units.
EN 764-3:2002, Pressure equipment— Part 3: Definition of parties involved.
EN 1092-1:2007, Flanges and their joints — Circular flanges for pipes, valves, fittings and accessories, PN designated — Part 1: Steel flanges
EN 10002-1:2001, Metallic materials - Tensile testing - Part 1: Method of test at ambient temperature
EN 10028-2:2003, Flat products made of steels for pressure purposes — Part 2: Non-alloy and alloy steels with specified elevated temperature properties.
EN 10028-3:2003, Flat products made of steels for pressure purposes — Part3: Weldable fine grain steels, normalized.
EN 10028-4:2003, Flat products made of steels for pressure purposes — Part 4: Nickel alloy steels with specified low temperature properties.
EN 10028-5:2003, Flat products made of steels for pressure purposes — Part 5: Weldable fine grain steels, thermomechanicaiiy rolled.
EN 10028-6:2003, Flat products made of steels for pressure purposes — Part 6: Weldable fine grain steels, quenched and tempered.
EN 10028-7:2007, Flat products made of steels for pressure purposes — Part 7: Stainless steels.
EN 10045-1:1990, Metallic materials — Charpy impact test — Part 1: Test method.
EN 10164:2004, Steel products with improved deformation properties perpendicular to the surface of the product — Technical delivery conditions.
EN 10204:2004, Metallic products— Types of inspection documents.
1
СТБ EN 13445-2-2009
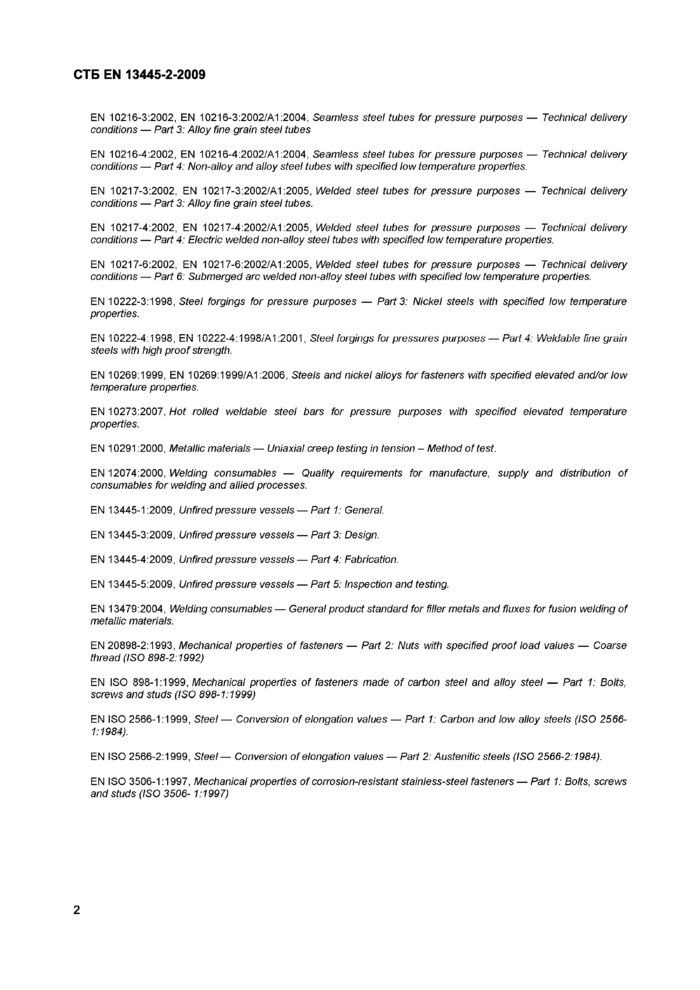
EN 10216-3:2002, EN 10216-3:2002/A1:2004, Seamless steel tubes for pressure purposes — Technical delivery conditions — Part 3: Alloy fine grain steel tubes
EN 10216-4:2002, EN 10216-4:2002/A1:2004, Seamless steel tubes for pressure purposes — Technical delivery conditions — Part 4: Non-alloy and alloy steel tubes with specified low temperature properties.
EN 10217-3:2002, EN 10217-3:2002/A1:2005, Welded steel tubes for pressure purposes — Technical delivery conditions — Part 3: Alloy fine grain steel tubes.
EN 10217-4:2002, EN 10217-4:2002/A1:2005, Welded steel tubes for pressure purposes — Technical delivery conditions — Part 4: Electric welded non-alloy steel tubes with specified low temperature properties.
EN 10217-6:2002, EN 10217-6:2002/A1:2005, Welded steel tubes for pressure purposes — Technical delivery conditions — Part 6: Submerged arc welded non-alloy steel tubes with specified low temperature properties.
cxeei rorgings тог pressures purposes — ran ч: vveiuaoie mie gram
EN 10222-3:1998, Steel forgings for pressure purposes — Part3: Nickel steels with specified low temperature properties.
cini iu^^-ч: laao, ein iaao/м i :^uu i,
steels with high proof strength.
EN 10269:1999, EN 10269:1999/A1:2006, Steels and nickel alloys for fasteners with specified elevated and/or low temperature properties.
EN 10273:2007, Hot rolled weldable steel bars for pressure purposes with specified elevated temperature properties.
EN 10291:2000, Metallic materials — Uniaxial creep testing in tension - Method of test.
EN 12074:2000, Welding consumables — Quality requirements for manufacture, supply and distribution of consumables for welding and allied processes.
EN 13445-1:2009, Unfired pressure vessels — Part 1: General.
EN 13445-3:2009, Unfired pressure vessels — Part3: Design.
EN 13445-4:2009, Unfired pressure vessels — Part 4: Fabrication.
EN 13445-5:2009, Unfired pressure vessels — Part 5: Inspection and testing.
EN 13479:2004, Welding consumables — General product standard for filler metals and fluxes for fusion welding of metallic materials.
EN 20898-2:1993, Mechanical properties of fasteners — Part 2: Nuts with specified proof load values — Coarse thread (ISO 898-2:1992)
EN ISO 898-1:1999, Mechanical properties of fasteners made of carbon steel and alloy steel — Part 1: Bolts, screws and studs (ISO 898-1:1999)
EN ISO 2566-1:1999, Steel— Conversion of elongation values — Part 1: Carbon and low alloy steels (ISO 2566-1:1984).
EN ISO 2566-2:1999, Steel— Conversion of elongation values — Part 2: Austenitic steels (ISO 2566-2:1984).
EN ISO 3506-1:1997, Mechanical properties of corrosion-resistant stainless-steel fasteners — Part 1: Bolts, screws and studs (ISO 3506- 1:1997)
2
СТБ EN 13445-2-2009
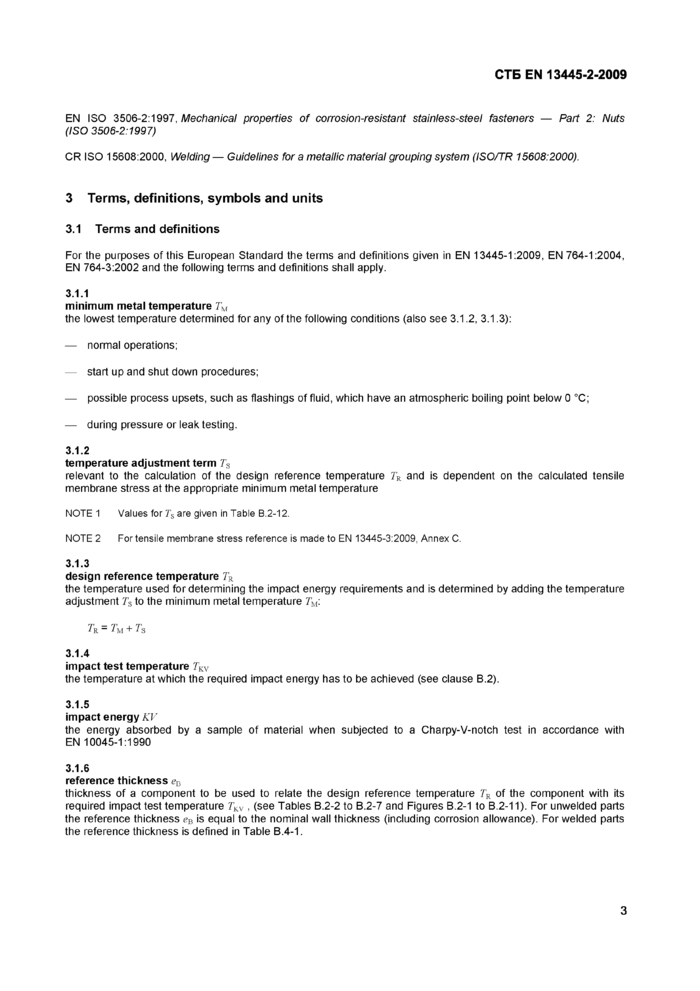
EN ISO 3506-2:1997, Mechanical properties of corrosion-resistant stainless-steel fasteners — Part 2: Nuts (ISO 3506-2:1997)
CR ISO 15608:2000, Welding — Guidelines for a metallic material grouping system (ISO/TR 15608:2000).
3 Terms, definitions, symbols and units
3.1 Terms and definitions
For the purposes of this European Standard the terms and definitions given in EN 13445-1:2009, EN 764-1:2004, EN 764-3:2002 and the following terms and definitions shall apply.
3.1.1
minimum metal temperature 7m
the lowest temperature determined for any of the following conditions (also see 3.1.2, 3.1.3):
— normal operations;
— start up and shut down procedures;
— possible process upsets, such as flashings of fluid, which have an atmospheric boiling point below 0 °C;
— during pressure or leak testing.
3.1.2
temperature adjustment term Ts
relevant to the calculation of the design reference temperature TR and is dependent on the calculated tensile membrane stress at the appropriate minimum metal temperature
NOTE 1 Values for Ts are given in Table B.2-12.
NOTE 2 For tensile membrane stress reference is made to EN 13445-3:2009, Annex C.
3.1.3
design reference temperature TR
the temperature used for determining the impact energy requirements and is determined by adding the temperature adjustment Ts to the minimum metal temperature 7m-
TR - TM + Ts
3.1.4
impact test temperature Tkv
the temperature at which the required impact energy has to be achieved (see clause B.2).
3.1.5
impact energy KV
the energy absorbed by a sample of material when subjected to a Charpy-V-notch test in accordance with EN 10045-1:1990
3.1.6
reference thickness eD
thickness of a component to be used to relate the design reference temperature TR of the component with its required impact test temperature TKV , (see Tables B.2-2 to B.2-7 and Figures B.2-1 to B.2-11). For unwelded parts the reference thickness eB is equal to the nominal wall thickness (including corrosion allowance). For welded parts the reference thickness is defined in Table B.4-1.
3
СТБ EN 13445-2-20093.1.7
weld creep strength reduction factor (WCSRF)
factor to account for creep strength reduction at the weldment
3.2 Symbols and units
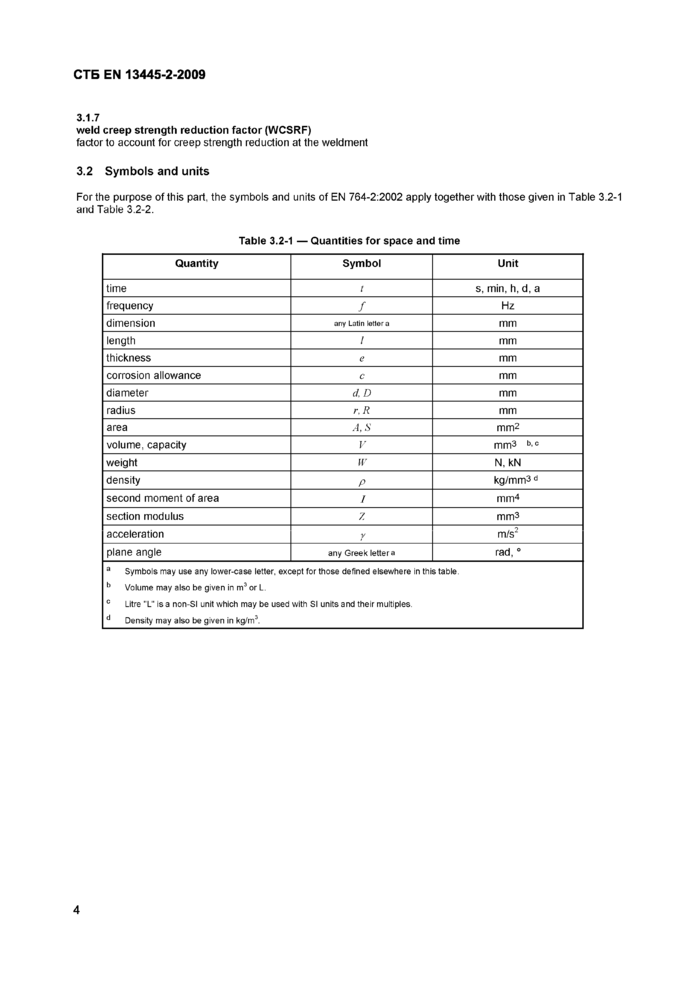
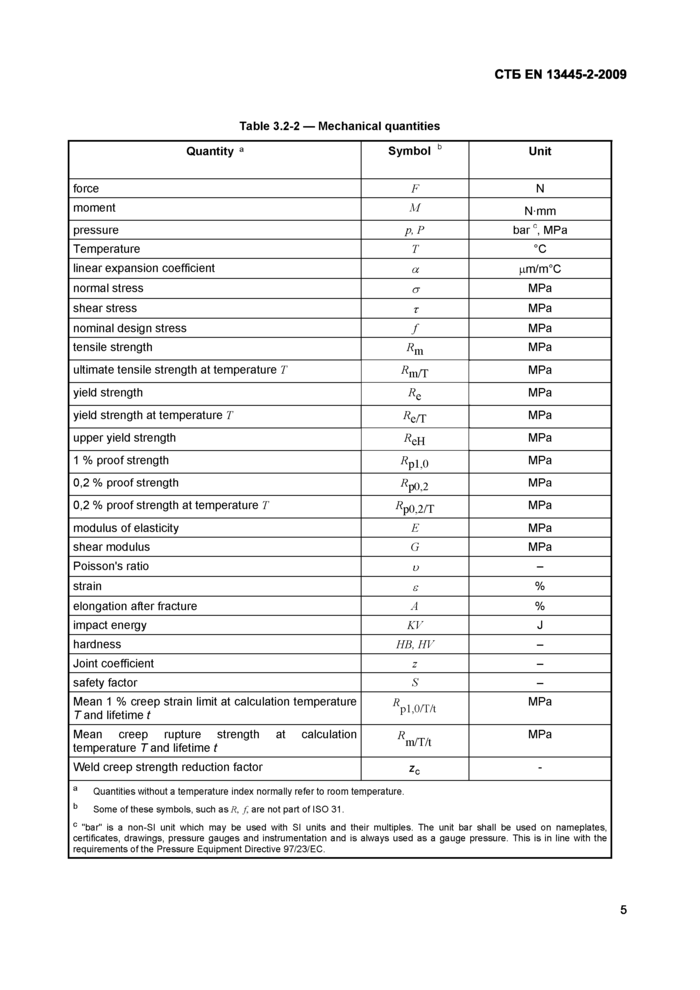
For the purpose of this part, the symbols and units of EN 764-2:2002 apply together with those given in Table 3.2-1 and Table 3.2-2.
|
Table 3.2-1 — Quantities for space and time | ||||||||||||||||||||||||||||||||||||||||||||||||||||||
| ||||||||||||||||||||||||||||||||||||||||||||||||||||||
4
СТБ EN 13445-2-2009
|
Table 3.2-2 — Mechanical quantities | ||||||||||||||||||||||||||||||||||||||||||||||||||||||||||||||||||||||||||||||||||||||||||||||||
| ||||||||||||||||||||||||||||||||||||||||||||||||||||||||||||||||||||||||||||||||||||||||||||||||
5
СТБ EN 13445-2-20094 Requirements for materials to be used for pressure-bearing parts
4.1 General
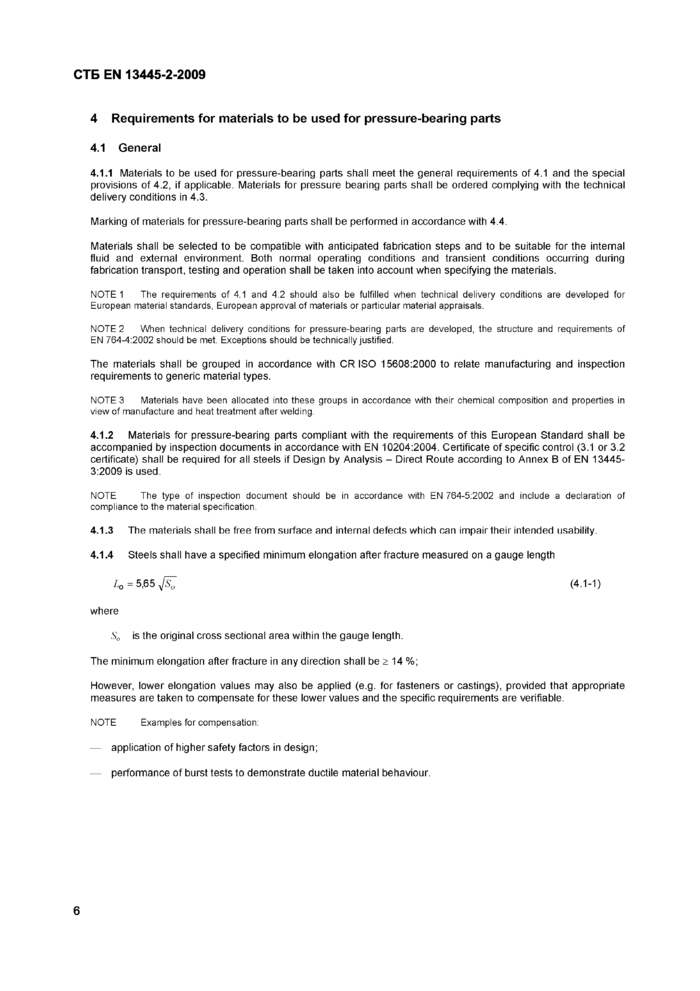
4.1.1 Materials to be used for pressure-bearing parts shall meet the general requirements of 4.1 and the special provisions of 4.2, if applicable. Materials for pressure bearing parts shall be ordered complying with the technical delivery conditions in 4.3.
Marking of materials for pressure-bearing parts shall be performed in accordance with 4.4.
Materials shall be selected to be compatible with anticipated fabrication steps and to be suitable for the internal fluid and external environment. Both normal operating conditions and transient conditions occurring during fabrication transport, testing and operation shall be taken into account when specifying the materials.
NOTE 1 The requirements of 4.1 and 4.2 should also be fulfilled when technical delivery conditions are developed for European material standards, European approval of materials or particular material appraisals.
NOTE 2 When technical delivery conditions for pressure-bearing parts are developed, the structure and requirements of EN 764-4:2002 should be met. Exceptions should be technically justified.
The materials shall be grouped in accordance with CR ISO 15608:2000 to relate manufacturing and inspection requirements to generic material types.
NOTE 3 Materials have been allocated into these groups in accordance with their chemical composition and properties in view of manufacture and heat treatment after welding.
4.1.2 Materials for pressure-bearing parts compliant with the requirements of this European Standard shall be accompanied by inspection documents in accordance with EN 10204:2004. Certificate of specific control (3.1 or 3.2 certificate) shall be required for all steels if Design by Analysis - Direct Route according to Annex В of EN 13445-3:2009 is used.
NOTE The type of inspection document should be in accordance with EN 764-5:2002 and include a declaration of compliance to the material specification.
4.1.3 The materials shall be free from surface and internal defects which can impair their intended usability.
4.1.4 Steels shall have a specified minimum elongation after fracture measured on a gauge length
L0 = 5,65 7^ (4.1-1)
where
S0 is the original cross sectional area within the gauge length.
The minimum elongation after fracture in any direction shall be > 14 %;
However, lower elongation values may also be applied (e.g. for fasteners or castings), provided that appropriate measures are taken to compensate for these lower values and the specific requirements are verifiable.
NOTE Examples for compensation:
— application of higher safety factors in design;
— performance of burst tests to demonstrate ductile material behaviour.
6
СТБ EN 13445-2-2009
4.1.5 When measured on a gauge length other than that stated in 4.1.4, the minimum elongation after fracture shall be determined by converting the elongation given in 4.1.4 in accordance with
— EN ISO 2566-1:1999 for carbon and low alloy steels;
— EN ISO 2566-2:1999 for austenitic steels.
4.1.6 Steels shall have a specified minimum impact energy measured on a Charpy-V-notch impact test specimen (EN 10045-1:1990) as follows:
— > 27 J for ferritic and 1,5 % to 5 % Ni alloy steels;
— > 40 J for steels of material group 8, 9.3 and 10
at a test temperature in accordance with Annex B, but not higher than 20 °C. The other requirements of Annex В shall also apply.
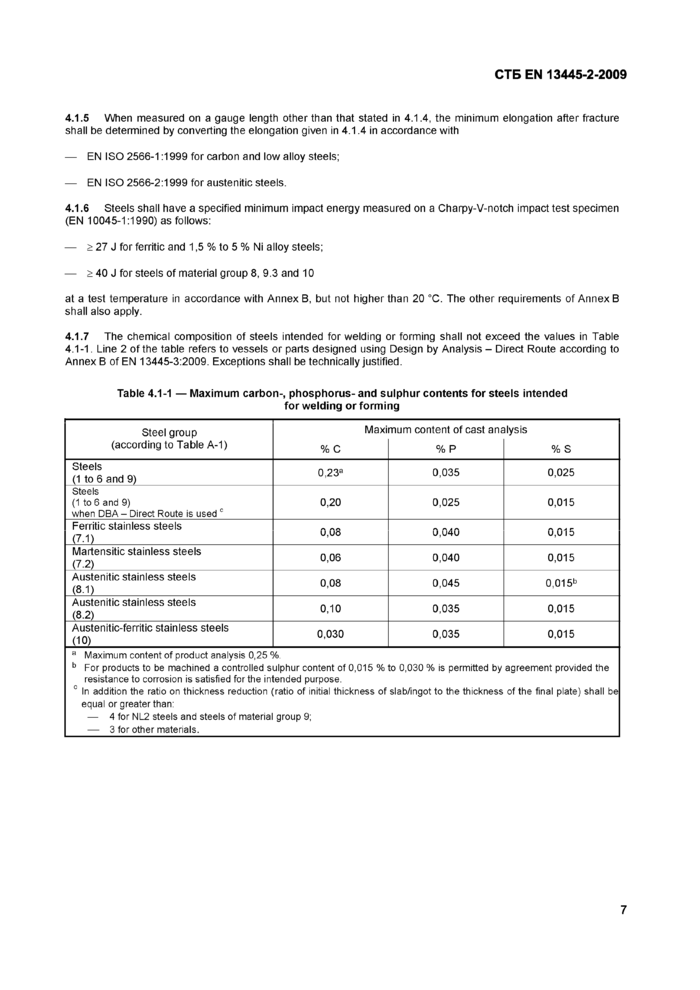
4.1.7 The chemical composition of steels intended for welding or forming shall not exceed the values in Table 4.1-1. Line 2 of the table refers to vessels or parts designed using Design by Analysis - Direct Route according to Annex В ofEN 13445-3:2009. Exceptions shall be technically justified.
|
Table 4.1-1 — Maximum carbon-, phosphorus- and sulphur contents for steels intended for welding or forming | ||||||||||||||||||||||||||||||||||||
| ||||||||||||||||||||||||||||||||||||
7