СТБ EN 13445-1-2009
Сосуды, работающие под давлением. Часть 1. Общие положения
Купить СТБ EN 13445-1-2009 — бумажный документ с голограммой и синими печатями. подробнее
Цена на этот документ пока неизвестна. Нажмите кнопку "Купить" и сделайте заказ, и мы пришлем вам цену.
Распространяем нормативную документацию с 1999 года. Пробиваем чеки, платим налоги, принимаем к оплате все законные формы платежей без дополнительных процентов. Наши клиенты защищены Законом. ООО "ЦНТИ Нормоконтроль"
Наши цены ниже, чем в других местах, потому что мы работаем напрямую с поставщиками документов.
Способы доставки
- Срочная курьерская доставка (1-3 дня)
- Курьерская доставка (7 дней)
- Самовывоз из московского офиса
- Почта РФ
Часть настоящего европейского стандарта устанавливает термины, определения, величины, символы и единицы, используемые в EN 13445. Она также содержит инструкции о том, как применять стандарт (приложение А), а также указатель, относящийся ко всему стандарту (приложение В). Эта информация призвана помочь пользователю EN 13445. Европейский стандарт применяется к сосудам, работающим под давлением, без огневого подвода теплоты с максимальным допустимым давлением более 0,5 бар изб., но может использоваться для сосудов, работающих при более низких давлениях, в том числе и при вакууме.
Оглавление
Введение
Приложение Д.А (Справочное) Перевод европейского стандарта EN 13445-1:2009 на русский язык
1 Область применения
2 Нормативные ссылки
3 Термины и определения
4 Взаимозависимость частей серии
5 Величины, символы и единицы
Приложение А (справочное) Применение стандарта
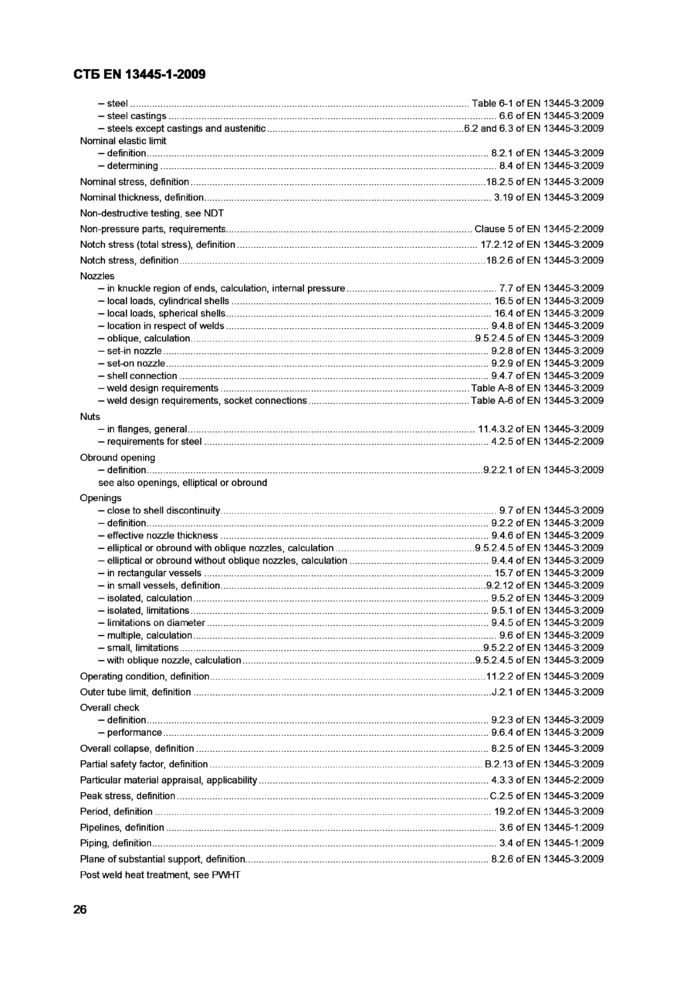
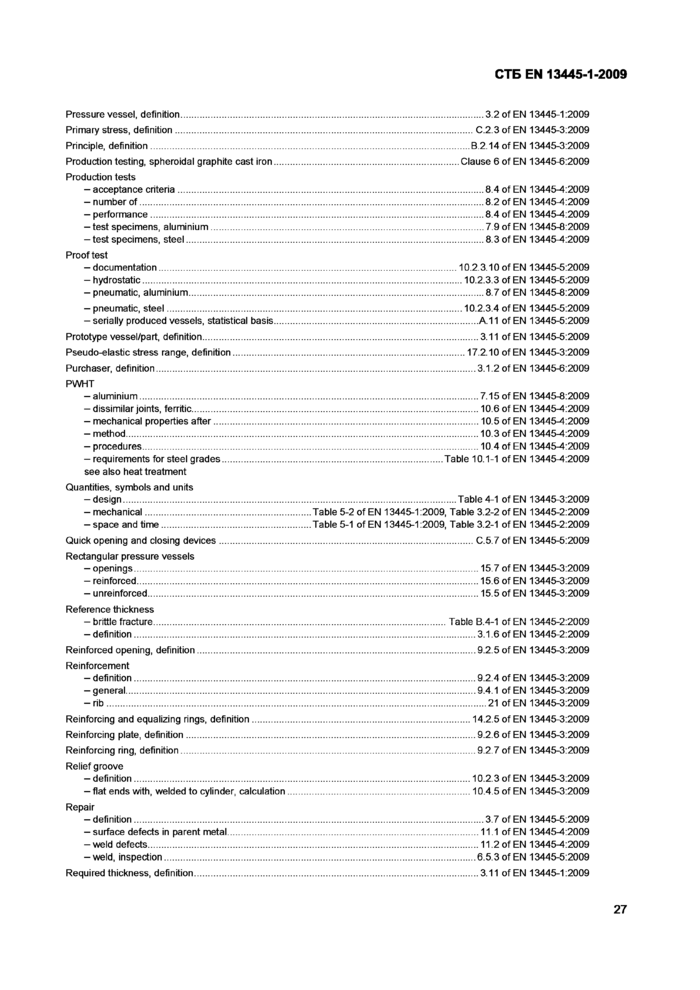
Приложение B (справочное) Указатель
Приложение Y (справочное) Отличия между EN 13445:2002 и EN 13445:2009
Приложение ZA (справочное) Взаимосвязь между настоящим европейским стандартом и существенными требованиями Директивы ЕС 97/23/EC по оборудованию, работающему под давлением
Библиография
| Дата введения | 01.01.2010 |
|---|---|
| Добавлен в базу | 01.01.2019 |
| Актуализация | 01.01.2021 |
Организации:
| 27.11.2009 | Утвержден | Госстандарт Республики Беларусь | 61 |
|---|---|---|---|
| Разработан | БелГИСС | ||
| Издан | БелГИСС | 2010 г. |
Unfired pressure vessels. Part 1. General
Чтобы бесплатно скачать этот документ в формате PDF, поддержите наш сайт и нажмите кнопку:
стр. 1
стр. 2
стр. 3
стр. 4
стр. 5
стр. 6
стр. 7
стр. 8
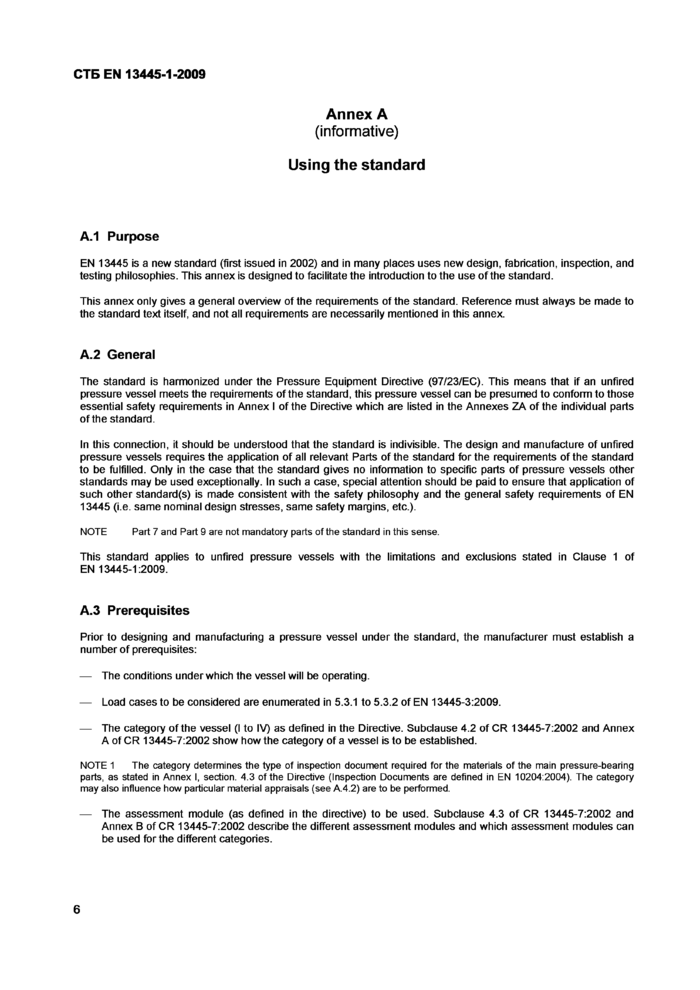
стр. 9
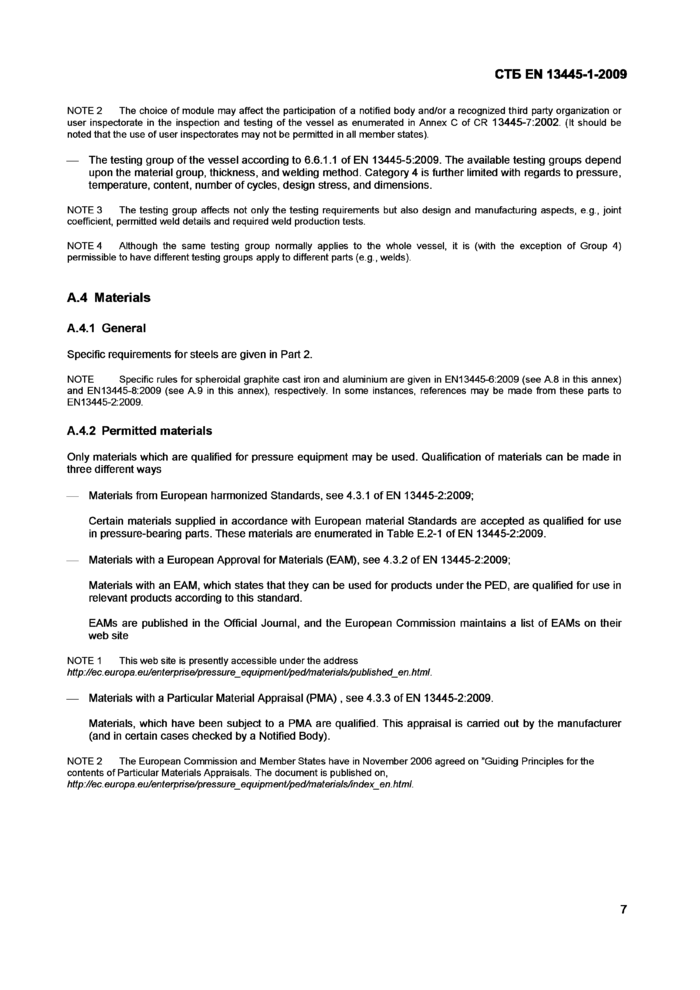
стр. 10
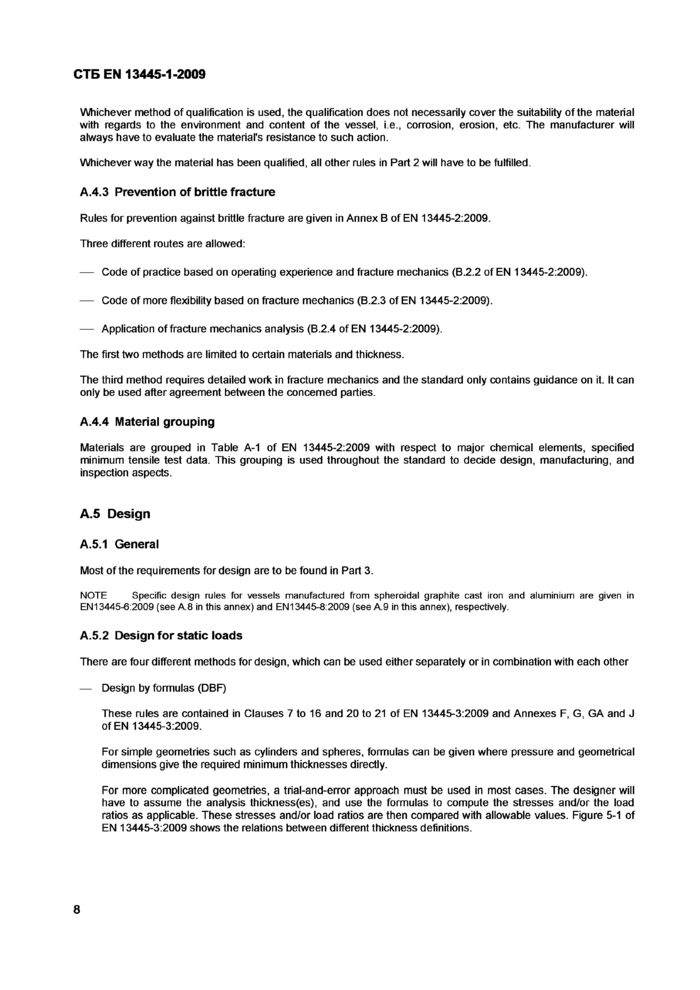
стр. 11
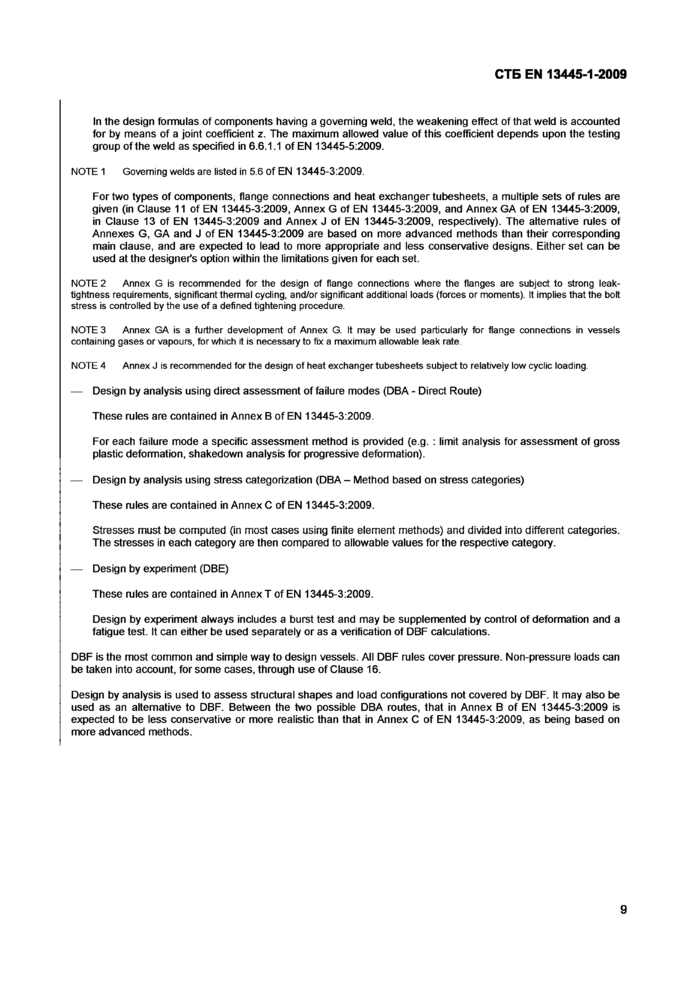
стр. 12
стр. 13
стр. 14
стр. 15
стр. 16
стр. 17
стр. 18
стр. 19
стр. 20
стр. 21
стр. 22
стр. 23
стр. 24
стр. 25
стр. 26
стр. 27
стр. 28
стр. 29
стр. 30
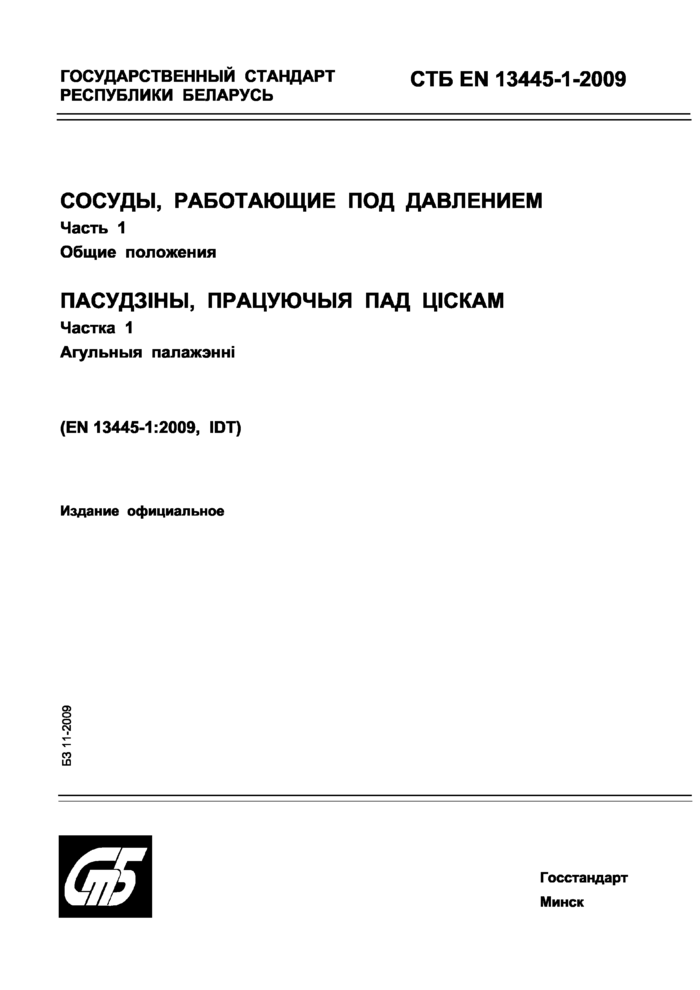
СТБ EN 13445-1-2009
ГОСУДАРСТВЕННЫЙ СТАНДАРТ РЕСПУБЛИКИ БЕЛАРУСЬ
СОСУДЫ, РАБОТАЮЩИЕ ПОД ДАВЛЕНИЕМ
Часть 1
Общие положения
ПАСУД31НЫ, ПРАЦУЮЧЫЯ ПАД Ц1СКАМ
Частка 1
Агульныя палажэнж
(EN 13445-1:2009, ЮТ)
Издание официальное
Щ
Госстандарт
Минск
(лБСТБ EN 13445-1-2009
УДК 621.642-98(083.74)(476) МКС 23.020.30 КП 03 ЮТ
Ключевые слова: сосуды, работающие под давлением, трубопроводы
Предисловие
Цели, основные принципы, положения по государственному регулированию и управлению в области технического нормирования и стандартизации установлены Законом Республики Беларусь «О техническом нормировании и стандартизации».
1 ПОДГОТОВЛЕН ПО УСКОРЕННОЙ ПРОЦЕДУРЕ научно-производственным республиканским унитарным предприятием «Белорусский государственный институт стандартизации и сертификации» (БелГИСС)
ВНЕСЕН Госстандартом Республики Беларусь
2 УТВЕРЖДЕН И ВВЕДЕН В ДЕЙСТВИЕ постановлением Госстандарта Республики Беларусь от 27 ноября 2009 г. № 61
3 Настоящий стандарт идентичен европейскому стандарту EN 13445-1:2009 Unfired pressure vessels - Part 1: General (Сосуды, работающие под давлением. Часть 1. Общие положения).
Европейский стандарт разработан техническим комитетом по стандартизации CEN/TC 54 «Сосуды, работающие под давлением» Европейского комитета по стандартизации (CEN).
Перевод с английского языка (еп).
Официальные экземпляры европейского стандарта, на основе которого подготовлен настоящий государственный стандарт, и европейских стандартов, на которые даны ссылки, имеются в Национальном фонде ТИПА.
Степень соответствия - идентичная (ЮТ)
4 ВВЕДЕН ВПЕРВЫЕ
© Госстандарт, 2010
Настоящий стандарт не может быть воспроизведен, тиражирован и распространен в качестве официального издания без разрешения Госстандарта Республики Беларусь
Издан на русском языке
СТБ EN 13445-1-2009
Whichever method of qualification is used, the qualification does not necessarily cover the suitability of the material with regards to the environment and content of the vessel, i.e., corrosion, erosion, etc. The manufacturer will always have to evaluate the material's resistance to such action.
Whichever way the material has been qualified, all other rules in Part 2 will have to be fulfilled.
A.4.3 Prevention of brittle fracture
Rules for prevention against brittle fracture are given in Annex В of EN 13445-2:2009.
Three different routes are allowed:
— Code of practice based on operating experience and fracture mechanics (B.2.2 of EN 13445-2:2009).
— Code of more flexibility based on fracture mechanics (B.2.3 of EN 13445-2:2009).
— Application of fracture mechanics analysis (B.2.4 of EN 13445-2:2009).
The first two methods are limited to certain materials and thickness.
The third method requires detailed work in fracture mechanics and the standard only contains guidance on it. It can only be used after agreement between the concerned parties.
A.4.4 Material grouping
Materials are grouped in Table A-1 of EN 13445-2:2009 with respect to major chemical elements, specified minimum tensile test data. This grouping is used throughout the standard to decide design, manufacturing, and inspection aspects.
A.5 Design A.5.1 General
Most of the requirements for design are to be found in Part 3.
NOTE Specific design rules for vessels manufactured from spheroidal graphite cast iron and aluminium are given in EN13445-6:2009 (see A.8 in this annex) and EN13445-8:2009 (see A.9 in this annex), respectively.
A.5.2 Design for static loads
There are four different methods for design, which can be used either separately or in combination with each other
— Design by formulas (DBF)
These rules are contained in Clauses 7 to 16 and 20 to 21 of EN 13445-3:2009 and Annexes F, G, GA and J of EN 13445-3:2009.
For simple geometries such as cylinders and spheres, formulas can be given where pressure and geometrical dimensions give the required minimum thicknesses directly.
For more complicated geometries, a trial-and-error approach must be used in most cases. The designer will have to assume the analysis thickness(es), and use the formulas to compute the stresses and/or the load ratios as applicable. These stresses and/or load ratios are then compared with allowable values. Figure 5-1 of EN 13445-3:2009 shows the relations between different thickness definitions.
8
СТБ EN 13445-1-2009
In the design formulas of components having a governing weld, the weakening effect of that weld is accounted for by means of a joint coefficient z. The maximum allowed value of this coefficient depends upon the testing group of the weld as specified in 6.6.1.1 of EN 13445-5:2009.
NOTE 1 Governing welds are listed in 5.6 of EN 13445-3:2009.
For two types of components, flange connections and heat exchanger tubesheets, a multiple sets of rules are given (in Clause 11 of EN 13445-3:2009, Annex G of EN 13445-3:2009, and Annex GA of EN 13445-3:2009, in Clause 13 of EN 13445-3:2009 and Annex J of EN 13445-3:2009, respectively). The alternative rules of Annexes G, GA and J of EN 13445-3:2009 are based on more advanced methods than their corresponding main clause, and are expected to lead to more appropriate and less conservative designs. Either set can be used at the designer's option within the limitations given for each set.
NOTE 2 Annex G is recommended for the design of flange connections where the flanges are subject to strong leak-tightness requirements, significant thermal cycling, and/or significant additional loads (forces or moments). It implies that the bolt stress is controlled by the use of a defined tightening procedure.
NOTE 3 Annex GA is a further development of Annex G. It may be used particularly for flange connections in vessels containing gases or vapours, for which it is necessary to fix a maximum allowable leak rate.
NOTE 4 Annex J is recommended for the design of heat exchanger tubesheets subject to relatively low cyclic loading.
— Design by analysis using direct assessment of failure modes (DBA - Direct Route)
These rules are contained in Annex В of EN 13445-3:2009.
For each failure mode a specific assessment method is provided (e.g. : limit analysis for assessment of gross plastic deformation, shakedown analysis for progressive deformation).
— Design by analysis using stress categorization (DBA - Method based on stress categories)
These rules are contained in Annex C of EN 13445-3:2009.
i iwoi uaoco uon
■У
III II1C Old I ICI II I
. tvaicyui
The stresses in each category are then compared to allowable values for the respective category.
— Design by experiment (DBE)
These rules are contained in Annex T of EN 13445-3:2009.
Design by experiment always includes a burst test and may be supplemented by control of deformation and a fatigue test. It can either be used separately or as a verification of DBF calculations.
DBF is the most common and simple way to design vessels. All DBF rules cover pressure. Non-pressure loads can be taken into account, for some cases, through use of Clause 16.
Design by analysis is used to assess structural shapes and load configurations not covered by DBF. It may also be used as an alternative to DBF. Between the two possible DBA routes, that in Annex В of EN 13445-3:2009 is expected to be less conservative or more realistic than that in Annex C of EN 13445-3:2009, as being based on more advanced methods.
9
СТБ EN 13445-1-2009А.5.3 Design in the creep range
— Design by Formulae
The rules contained in Clause 19 of EN 13445-3:2009 allow the design of vessels or vessel parts for loading of predominantly non-cyclic nature (less than 500 equivalent full pressure cycles).
Different sets of rules are used depending on whether the vessel is subjected to a single creep load case (use
19.8.1 of EN 13445-3:2009) or multiple creep load cases (use 19.8.2 of EN 13445-3:2009).
In both cases, the joint factor is modified by the weld creep strength reduction factor according to 19.6 of EN 13445-3:2009.
NOTE A procedure for the determination of the weld creep strength reduction factor by tests is given in Annex C of EN 13445-2:2009.
— Design by Analysis - Direct Route
Design by Analysis in the creep range is covered in Annex В of EN 13445-3:2009. The design checks to be considered (in addition to those for operation below the creep range listed in B.5.1.1 of EN 13445-3:2009) are:
— Creep Rupture Design Check, see B.9.4 of EN 13445-3:2009,
— Excessive Creep Strain Design Check, see B.9.5 of EN 13445-3:2009,
— Creep Fatigue Interaction Design Check, see B.9.6 of EN 13445-3:2009.
A.5.4 Design for cyclic loads (fatigue)
Each vessel which is subjected to more than a certain number (given in Equation 5.4-1 of EN 13445-3:2009) of equivalent full pressure cycles must be checked against fatigue. The standard provides two methods, and either method can be used at the designer's option.
— A simplified fatigue analysis (Clause 17 of EN 13445-3:2009)
This simplified method uses coefficients for different geometries and different weld details to compute the maximum number of fatigue cycles allowed. It is essentially applicable to vessels predominantly subject to pressure fluctuations, with however some provisions to account (to a certain extent) for other load fluctuations.
It will normally give more conservative results than a detailed fatigue analysis
— A detailed fatigue analysis (Clause 18 of EN 13445-3:2009)
This method presumes a detailed stress analysis at all critical points (in practice mostly using finite element methods)
In both analyses, the intensity of the fatigue loading is measured, at any vessel point, by a "damage factor" from which the "critical areas" of the vessel can be found. In these areas, more NDT is required, as defined in Annex G of EN 13445-5:2009.
A.5.5 Nominal design stresses
The nominal design stress fto be introduced into the formulas giving the minimum required thickness or to be used to calculate the allowable stresses shall be computed as detailed in Clause 6 of EN 13445-3:2009 (19.5 of EN 13445-3:2009 for operation in the creep range).
10СТБ EN 13445-1-2009
NOTE 1 The concept of nominal design stress is not used within Annex В of EN 13445-3:2009. In this annex, allowable loads are directly derived from the material characteristics.
NOTE 2 For non-austenitic steels there are two alternative sets of design stresses, the normal one in 6.2 of EN 13445-3:2009 and the Alternative Route in 6.3 of EN 13445-3:2009, which permits higher stresses under certain conditions.
A.5.6 Weld details
Butt welds are preferred for all welded joints, but joggle joints, joints with permanent backing strips, and lap joints are permitted for certain circumferential joints, provided that the restrictions given in 5.7 of EN 13445-3:2009 are observed.
Allowable weld designs with material and geometry limitations are listed in Annex A of EN 13445-3:2009.
A.5.7 Access openings
The standard specifies a minimum number and size of access openings which are detailed in C.2 to C.4 of EN 13445-5:2009.
Rules for closing mechanisms and locking devices are given in C.5 of EN 13445-5:2009.
A.6 ManufacturingA.6.1 General
Most of the requirements for manufacturing are to be found in EN13445-4:2009.
NOTE Specific rules for vessels manufactured from spheroidal graphite cast iron and aluminium are given in EN13445-6:2009 (see A.8 in this annex) and EN13445-8:2009 (see A.9 in this annex), respectively.
A.6.2 Tolerances
The standard specifies manufacturing tolerances both for vessel parts themselves and for welds:
— Permitted shape tolerances for vessels under internal pressure are specified in 5.4 of EN 13445-4:2009.
Shape tolerances for vessels under external pressure must not exceed those given for internal pressure, but they must also fulfill the requirements of 8.5.1 and 8.6.1 of EN 13445-3:2009 (cylindrical and conical shells) and 8.7.2 of EN 13445-3:2009 (spherical shells). Larger shape deviations may be accepted, but lead to reduced allowable external pressures. The rules for computing these reduced pressures are given in Annex F of EN 13445-3:2009.
Annexes D and E of EN 13445-3:2009 give directions for measuring shape deviations in vessels under external pressure.
The rules cited above are absolute requirements of the standard. For other measurements, recommended maximum tolerances are given in the informative Annex A of EN 13445-4:2009.
— There are two sets of requirements on alignment at welds, for middle-line alignment (5.2 of EN 13445-4:2009) and for surface alignment (5.3 of EN 13445-4:2009). Both sets must be observed simultaneously.
11
СТБ EN 13445-1-2009А.6.3 Forming
The standard covers both cold forming and hot forming, and 9.3 of EN 13445-4:2009 specifies the temperatures (depending upon material) at which forming shall be performed.
Formed parts may have to be heat-treated after forming. For cold-formed parts this requirement depends upon the material group and also on the amount of deformation during forming. Formulas to compute this deformation are given in 9.2 of EN 13445-4:2009.
The requirements for heat treatment after hot forming depend on the material group and on the product form.
If heat treatment is performed, the standard (depending on material group and heat treatment condition) requires tests on test coupons. The samples, the type of coupons and tests are specified in 9.6 of EN 13445-4:2009.
A.6.4 Welding
The welding rules are to be found in Clauses 6 and 7 of EN 13445-4:2009. The standard specifies three prerequisites for welding:
— the manufacturer shall have a welding procedure specification (WPS), see 7.2 of EN 13445-4:2009;
— the welding procedure shall be qualified (WPAR), see 7.3 of EN 13445-4:2009;
— the welder or welding operator shall be qualified, see 7.4 of EN 13445-4:2009.
The requirements generally refer to other European Standards, with the addition of some extra requirements regarding mechanical testing of welding procedure qualification tests.
A.6.5 Production Tests on Welds
In many cases, production tests are required on governing welds (longitudinal and circumferential welds where membrane stresses govern the thickness) as defined in Clause 8 of EN 13445-4:2009. The amount of required production tests is specified in 8.2 of EN 13445-4:2009 (for some special welds in 5.7.4 of EN 13445-3:2009) and depends upon material group, testing group, welding method and material thickness and vary widely from no tests at all to one test per 100 m of weld. When a specified number of tests have passed successfully, the standard allows a reduction in the frequency of the production tests.
The actual testing and the acceptance criteria are given in 8.3 and 8.4 of EN 13445-4:2009.
A.6.6 PWHT (Post Weld Heat Treatment)
In some cases, the welding procedure will require that a PWHT be carried out after welding as defined in Clause 10 of EN 13445-4:2009. Holding times and holding temperatures are specified in the standard and depend upon material group and nominal thickness. For some material groups, PWHT is waived for low thicknesses, except in special cases, e.g., danger of stress corrosion. For materials submitted to PWHT and which are not listed in Table 10.1-1 of EN 13445-4:2009, this treatment shall be performed according to a procedure established in agreement with the material manufacturer, or in conformity with other recognized codes.
If the PWHT temperature is too close to the maximum tempering temperature or the holding time exceeds a certain number, the effect of the PWHT on the mechanical properties must be demonstrated either on test coupons heat treated with the vessel or test coupons subjected to a simulated PWHT.
СТБ EN 13445-1-2009А.7 Inspection and testing A.7.1 General
Most of the requirements for inspection and testing are to be found in EN13445-5:2009.
NOTE Specific rules for vessels manufactured from spheroidal graphite cast iron and aluminium are given in EN13445-6:2009 (see A.8 in this annex) and EN13445-8:2009 (see A.9 in this annex), respectively.
A.7.2 Technical documentation
The elements of the technical documentation for the vessel are specified in detail in Clause 5 of EN 13445-5:2009. It is also specified how the design review of these documents shall be performed.
The required amount of dimensional details is given in Annex В of EN 13445-5:2009.
NOTE Depending upon the assessment module selected for the vessel, this review is carried out by the manufacturer only or by the manufacturer and the responsible notified body.
A.7.3 Non-destructive testing of welds
Subclause 6.6.2 of EN 13445-5:2009 specifies the extent of NDT for different types of welds as a function of the testing group. The testing group determines the value of the joint coefficient used for calculation of the components having governing welds.
For the performance of NDT, 6.6.3 of EN 13445-5:2009 specifies the method to be used, depending upon the type of welded joint, but for details about NDT methods, techniques, characterization, and acceptance criteria, reference is made to other specified European Standards with some additional requirements.
Critical areas of vessels operating in cyclic service have to be subjected to more extended NDT as specified in Annex G of EN 13445-5:2009.
NOTE Critical areas in fatigue are defined in Clauses 17 and 18 of EN 13445-3:2009.
A.7.4 Final assessment
Clause 10 of EN 13445-5:2009 specifies how final assessment shall be performed. Detailed rules are given for the performance of the proof test, including the calculation of the test pressure.
NOTE Depending upon the module selected for the assessment of the vessel, this assessment is carried out by the manufacturer only or by the manufacturer and the responsible notified body.
A.7.5 Marking and records
Clauses 11 and 12 of EN 13445-5:2009 specify the minimum requirements of marking on the vessel and of the records to be kept for the vessel, respectively.
A.8 Pressure vessels constructed from spheroidal graphite cast iron A.8.1 General
Special requirements for such vessels (which must lie within the limits determined by Clause 1 and 4.2 of EN 13445-6:2009) are to be found in EN13445-6:2009, which contains additions to and exceptions from the general rules in EN13445-2:2009 to EN13445-5:2009.
СТБ EN 13445-1-2009А.8.2 Materials
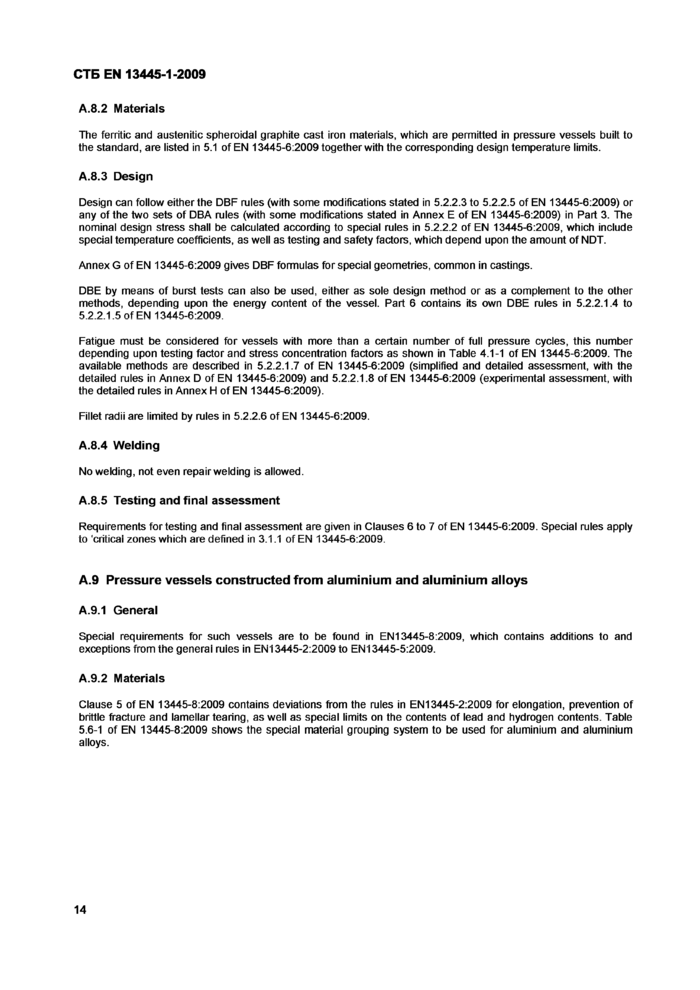
The ferritic and austenitic spheroidal graphite cast iron materials, which are permitted in pressure vessels built to the standard, are listed in 5.1 of EN 13445-6:2009 together with the corresponding design temperature limits.
A.8.3 Design
Design can follow either the DBF rules (with some modifications stated in 5.2.2.3 to 5.2.2.5 of EN 13445-6:2009) or any of the two sets of DBA rules (with some modifications stated in Annex E of EN 13445-6:2009) in Part 3. The nominal design stress shall be calculated according to special rules in 5.2.2.2 of EN 13445-6:2009, which include special temperature coefficients, as well as testing and safety factors, which depend upon the amount of NDT.
Annex G of EN 13445-6:2009 gives DBF formulas for special geometries, common in castings.
DBE by means of burst tests can also be used, either as sole design method or as a complement to the other methods, depending upon the energy content of the vessel. Part 6 contains its own DBE rules in 5.2.2.1.4 to 5.2.2.1.5 of EN 13445-6:2009.
Fatigue must be considered for vessels with more than a certain number of full pressure cycles, this number depending upon testing factor and stress concentration factors as shown in Table 4.1-1 of EN 13445-6:2009. The available methods are described in 5.2.2.1.7 of EN 13445-6:2009 (simplified and detailed assessment, with the detailed rules in Annex D of EN 13445-6:2009) and 5.2.2.1.8 of EN 13445-6:2009 (experimental assessment, with the detailed rules in Annex H of EN 13445-6:2009).
Fillet radii are limited by rules in 5.2.2.6 of EN 13445-6:2009.
A.8.4 Welding
No welding, not even repair welding is allowed.
A.8.5 Testing and final assessment
Requirements for testing and final assessment are given in Clauses 6 to 7 of EN 13445-6:2009. Special rules apply to 'critical zones which are defined in 3.1.1 of EN 13445-6:2009.
A.9 Pressure vessels constructed from aluminium and aluminium alloys A.9.1 General
Special requirements for such vessels are to be found in EN 13445-8:2009, which contains additions to and exceptions from the general ruies in EN13445-2:2009 to EN 13445-5:2009.
A.9.2 Materials
Clause 5 of EN 13445-8:2009 contains deviations from the rules in EN 13445-2:2009 for elongation, prevention of brittle fracture and lamellar tearing, as well as special limits on the contents of lead and hydrogen contents. Table 5.6-1 of EN 13445-8:2009 shows the special material grouping system to be used for aluminium and aluminium alloys.
14СТБ EN 13445-1-2009
А.9.3 Design
In general, design follows the rules in EN13445-3:2009, but 6.4 of EN 13445-8:2009 contains alternative rules for thick-walled pipes. The nominal design stress and maximum design temperatures shall be calculated as shown in Tables 6.3-1 and 6.3-2 of EN 13445-8:2009.
The rules are at present limited to vessels with less than 500 full load cycles.
Design of welds are specified in 6.6 of EN 13445-8:2009.
A.9.4 Manufacturing
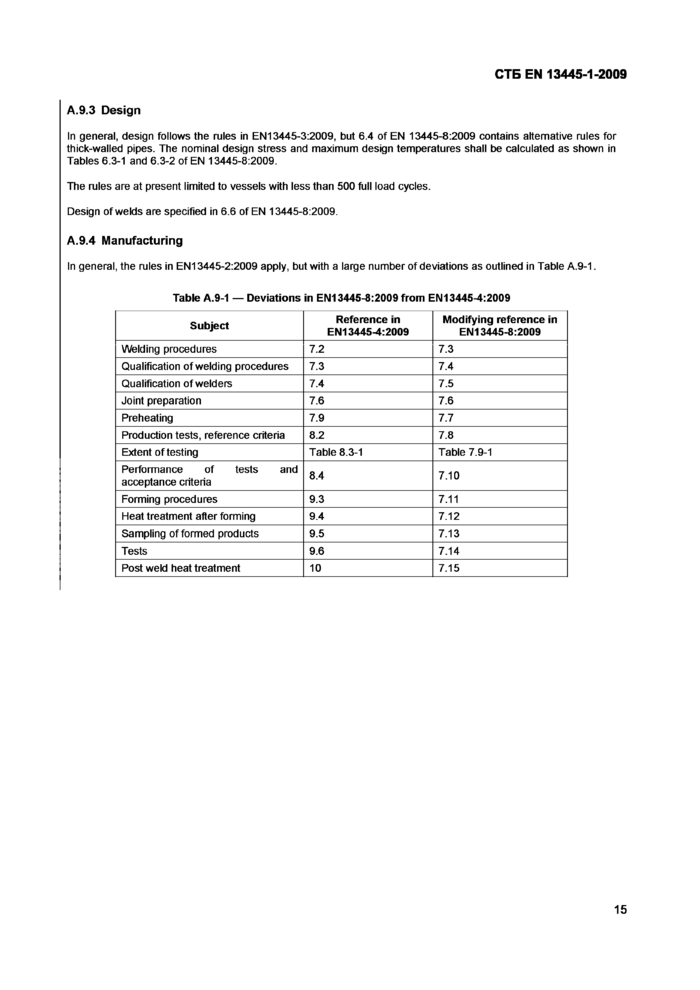
In general, the rules in EN13445-2:2009 apply, but with a large number of deviations as outlined in Table A.9-1.
|
Table A.9-1 — Deviations in EN13445-8:2009 from EN13445-4:2009 | ||||||||||||||||||||||||||||||||||||||||||
|
15СТБ EN 13445-1-2009
А.9.5 Inspection and testing
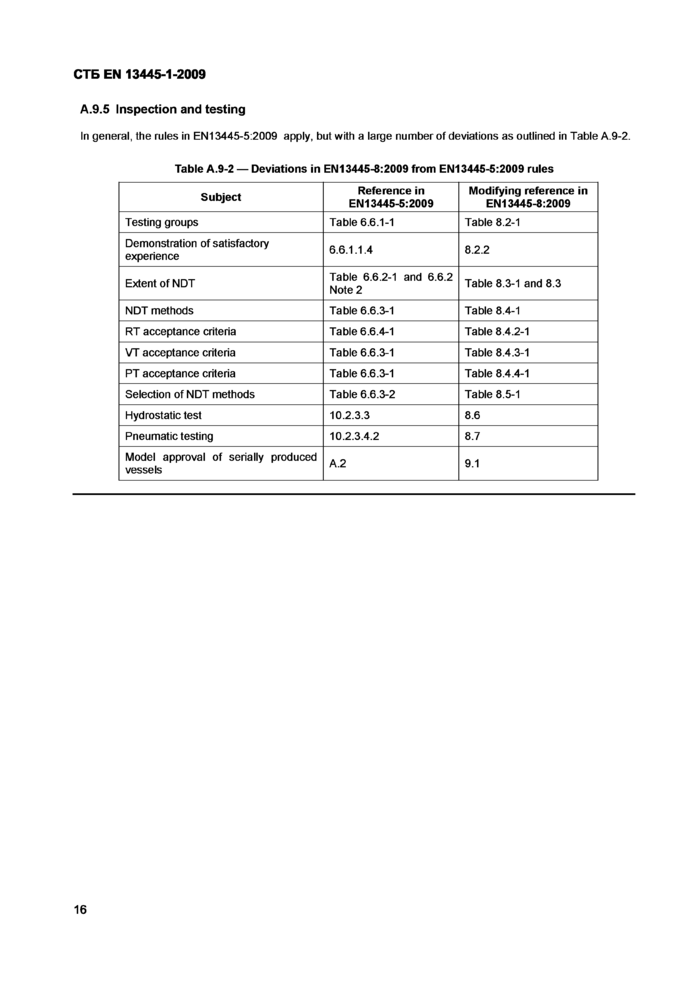
In general, the rules in EN13445-5:2009 apply, but with a large number of deviations as outlined in Table A.9-2.
|
Table A.9-2 — Deviations in EN13445-8:2009 from EN13445-5:2009 rules | ||||||||||||||||||||||||||||||||||||
|
16СТБ EN 13445-1-2009
СТБ EN 13445-1-2009
Annex В
(informative)
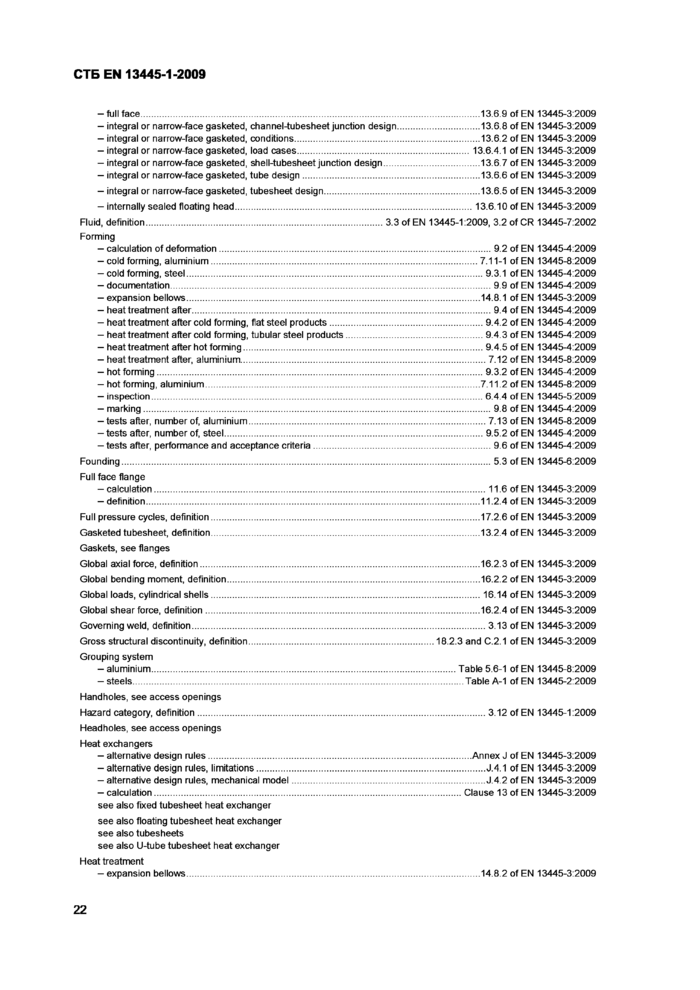
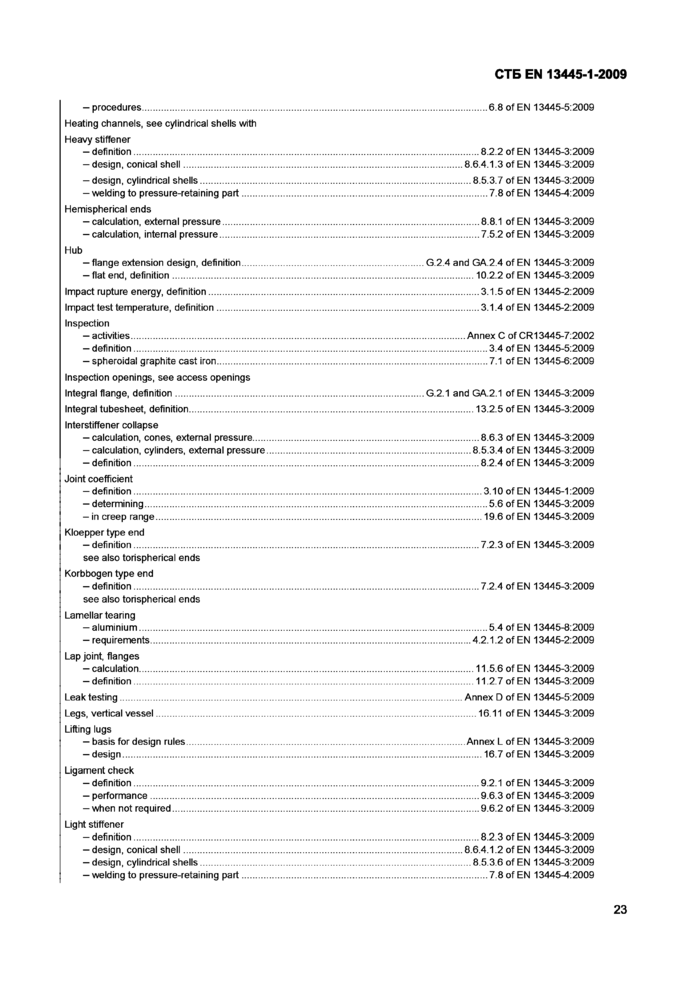
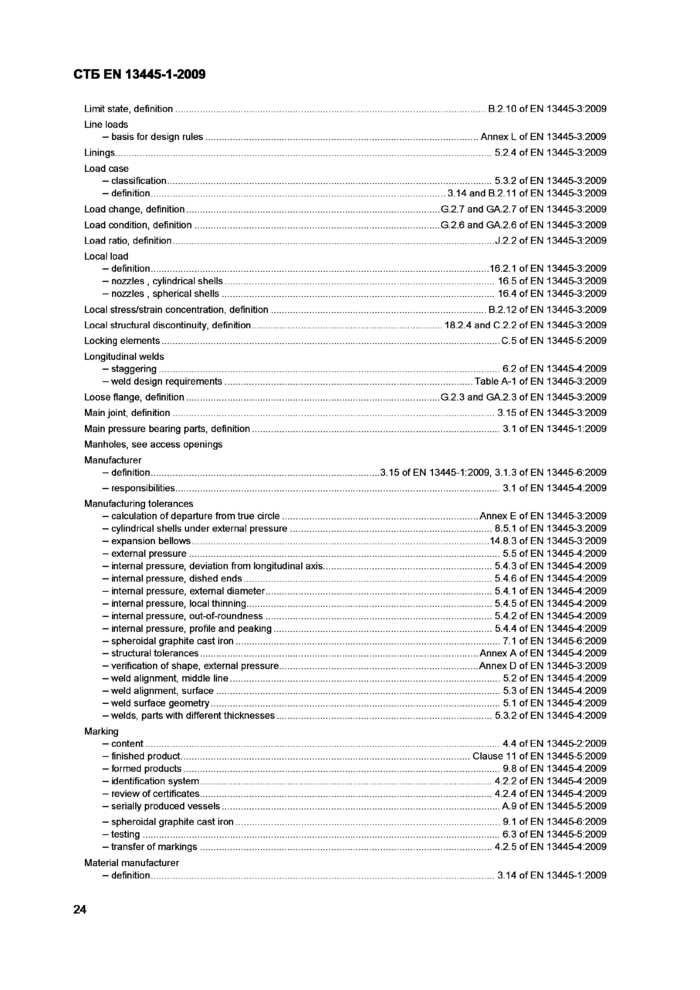
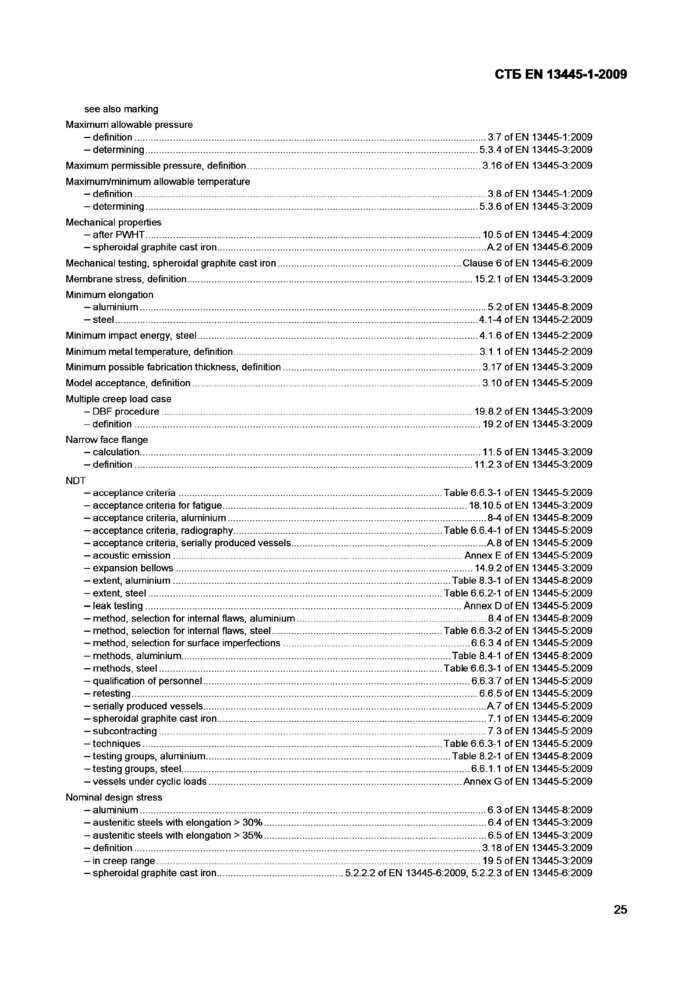
Index
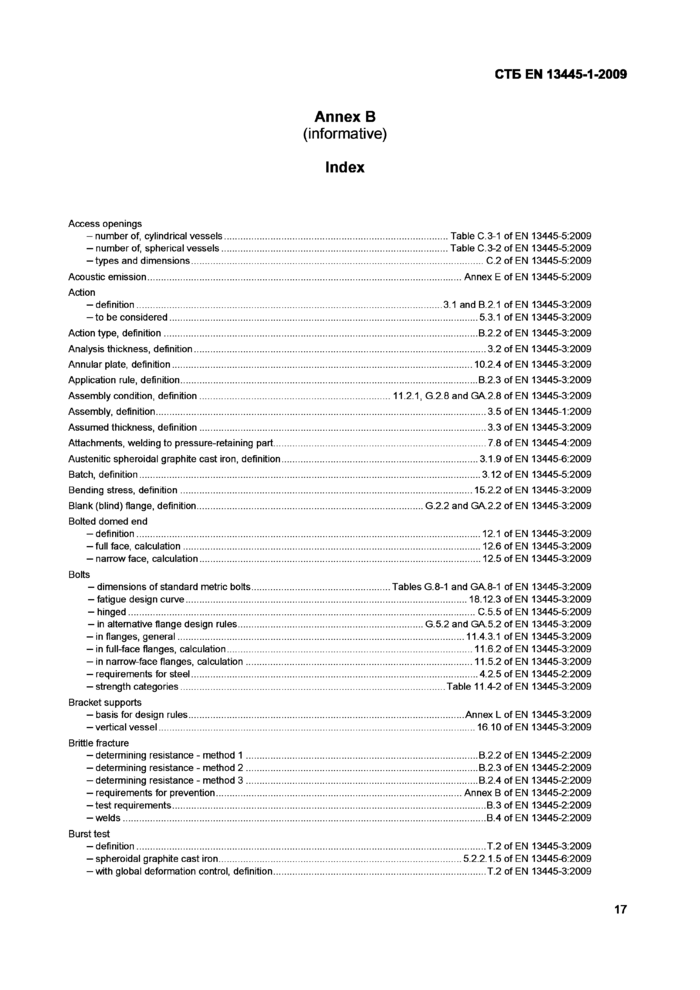
|
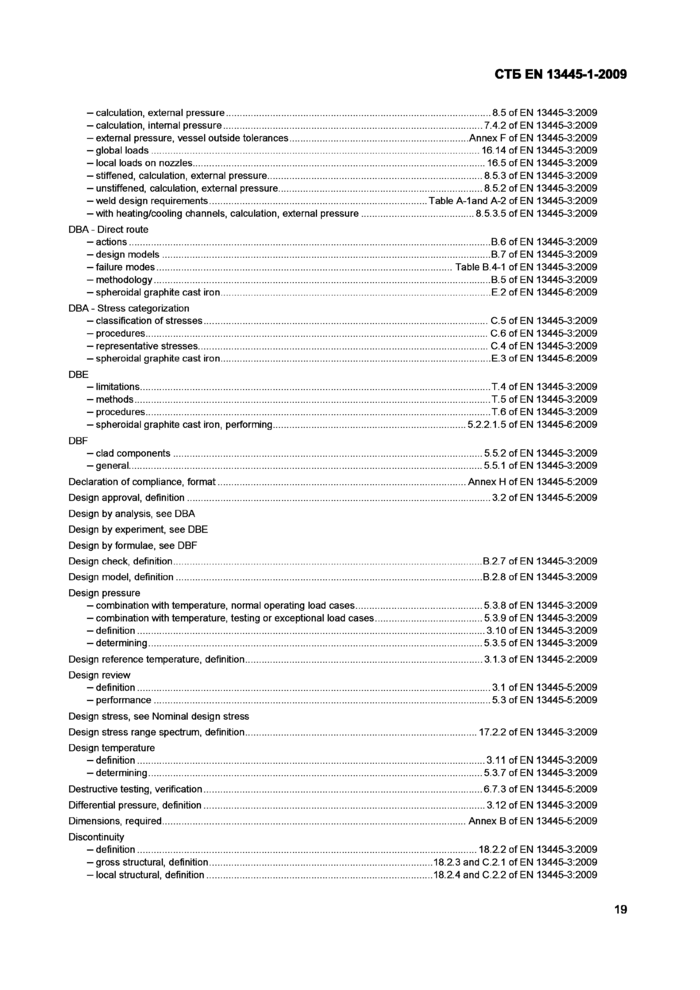
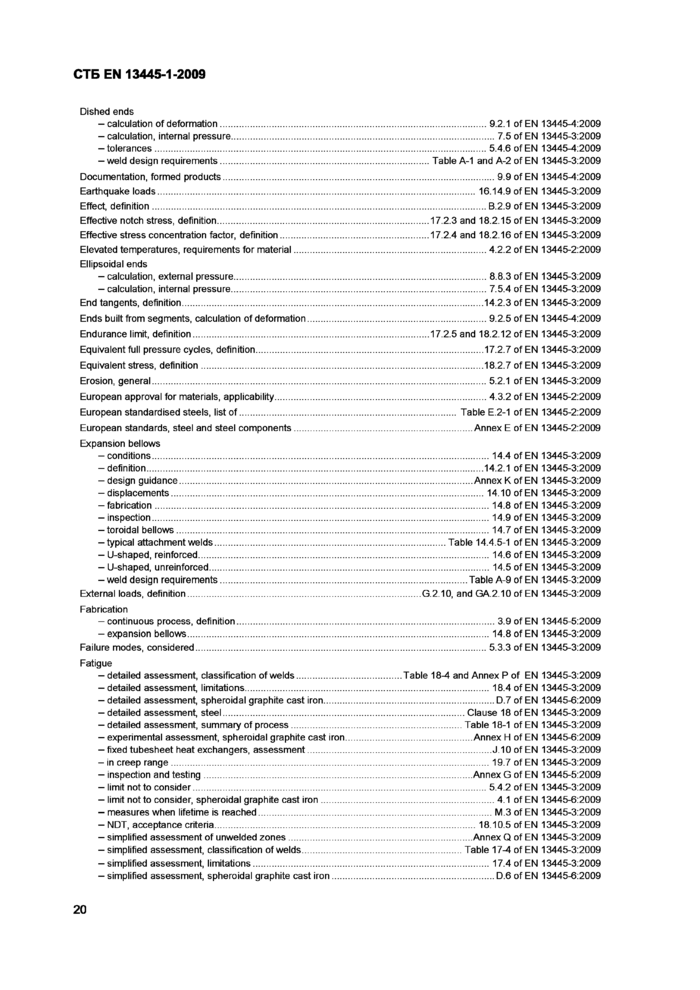
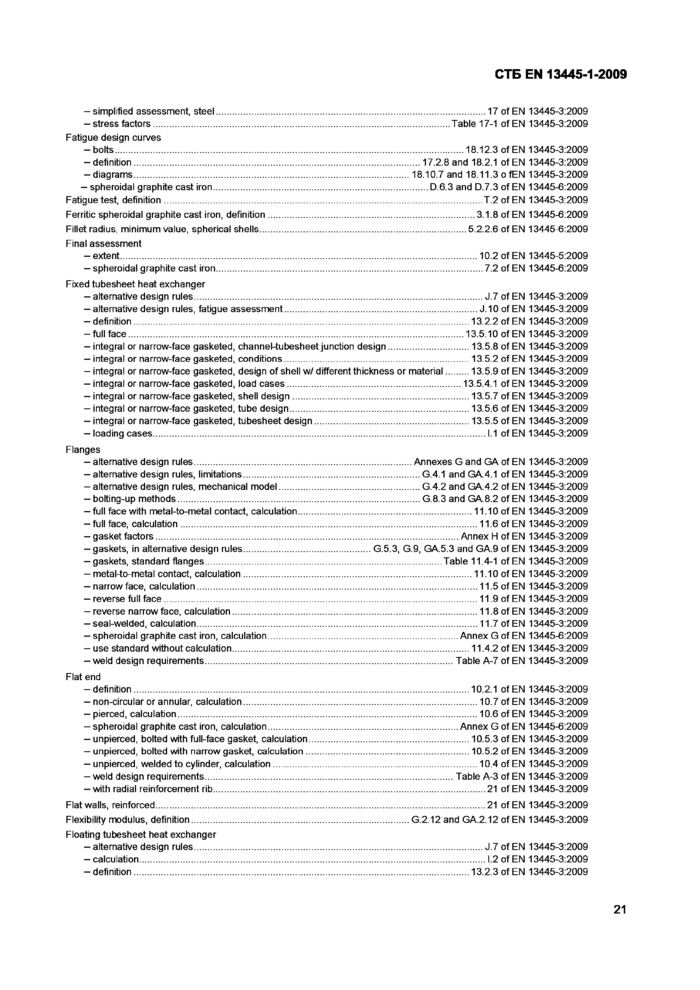
Access openings — number of, cylindrical vessels..................... — number of, spherical vessels...................... — types and dimensions................................. Acoustic emission................................................. Action — definition..................................................... — to be considered......................................... Action type, definition........................................... Analysis thickness, definition................................ Annular plate, definition........................................ Application rule, definition..................................... Assembly condition, definition.............................. Assembly, definition.............................................. Assumed thickness, definition.............................. Attachments, welding to pressure-retaining part... Austenitic spheroidal graphite cast iron, definition Batch, definition.................................................... Bending stress, definition..................................... Blank (blind) flange, definition............................... Bolted domed end — definition..................................................... — full face, calculation.................................... — narrow face, calculation.............................. Bolts — dimensions of standard metric bolts........... — fatigue design curve................................... — hinged........................................................ — in alternative flange design rules................ — in flanges, general...................................... — in full-face flanges, calculation.................... — in narrow-face flanges, calculation............. — requirements for steel................................. — strength categories..................................... Bracket supports — basis for design rules.................................. — vertical vessel............................................. Brittle fracture — determining resistance - method 1............. — determining resistance - method 2............. — determining resistance - method 3............. — requirements for prevention........................ — test requirements........................................ — welds.......................................................... Burst test — definition..................................................... — spheroidal graphite cast iron....................... — with global deformation control, definition... |
.....................Table C.3-1 of EN 13445-5:2009 .....................Table C.3-2 of EN 13445-5:2009 ..................................C.2 of EN 13445-5:2009 ..........................Annex E of EN 13445-5:2009 ...................3.1 and B.2.1 of EN 13445-3:2009 ................................5.3.1 of EN 13445-3:2009 ................................B.2.2 of EN 13445-3:2009 ...................................3.2 of EN 13445-3:2009 ..............................10.2.4 of EN 13445-3:2009 ................................B.2.3 of EN 13445-3:2009 11.2.1, G.2.8 and GA.2.8 of EN 13445-3:2009 ...................................3.5 of EN 13445-1:2009 ...................................3.3 of EN 13445-3:2009 ...................................7.8 of EN 13445-4:2009 ................................3.1.9 of EN 13445-6:2009 .................................3.12 of EN 13445-5:2009 ..............................15.2.2 of EN 13445-3:2009 ............G.2.2 and GA.2.2 of EN 13445-3:2009 .................................12.1 of EN 13445-3:2009 .................................12.6 of EN 13445-3:2009 .................................12.5 of EN 13445-3:2009 Tables G.8-1 and GA.8-1 of EN 13445-3:2009 ............................18.12.3 of EN 13445-3:2009 ...............................C.5.5 of EN 13445-5:2009 ............G.5.2 and GA.5.2 of EN 13445-3:2009 ...........................11.4.3.1 of EN 13445-3:2009 ..............................11.6.2 of EN 13445-3:2009 ..............................11.5.2 of EN 13445-3:2009 ................................4.2.5 of EN 13445-2:2009 ....................Table 11.4-2 of EN 13445-3:2009 ...........................Annex L of EN 13445-3:2009 ...............................16.10 of EN 13445-3:2009 ................................B.2.2 of EN 13445-2:2009 ................................B.2.3 of EN 13445-2:2009 ................................B.2.4 of EN 13445-2:2009 ..........................Annex В of EN 13445-2:2009 ...................................B.3of EN 13445-2:2009 ...................................B.4of EN 13445-2:2009 ...................................T.2of EN 13445-3:2009 ..........................5.2.2.1.5 of EN 13445-6:2009 ...................................T.2 of EN 13445-3:2009 17 |
СТБ EN 13445-1-2009
Введение
Настоящий стандарт содержит текст европейского стандарта EN 13445-1:2009 на языке оригинала и его перевод на русский язык (справочное приложение Д.А).
Введен в действие, как стандарт, на который есть ссылка в Еврокоде EN 1993-1-8:2005.
ГОСУДАРСТВЕННЫЙ СТАНДАРТ РЕСПУБЛИКИ БЕЛАРУСЬ
СОСУДЫ, РАБОТАЮЩИЕ ПОД ДАВЛЕНИЕМ Часть 1 Общие положения
ПАСУД31НЫ, ПРАЦУЮЧЫЯ ПАД Ц1СКАМ Частка 1 Агульныя палажэнш
Unfired pressure vessels Part 1 General
Дата введения 2010-01-01
СТБ EN 13445-1-2009
|
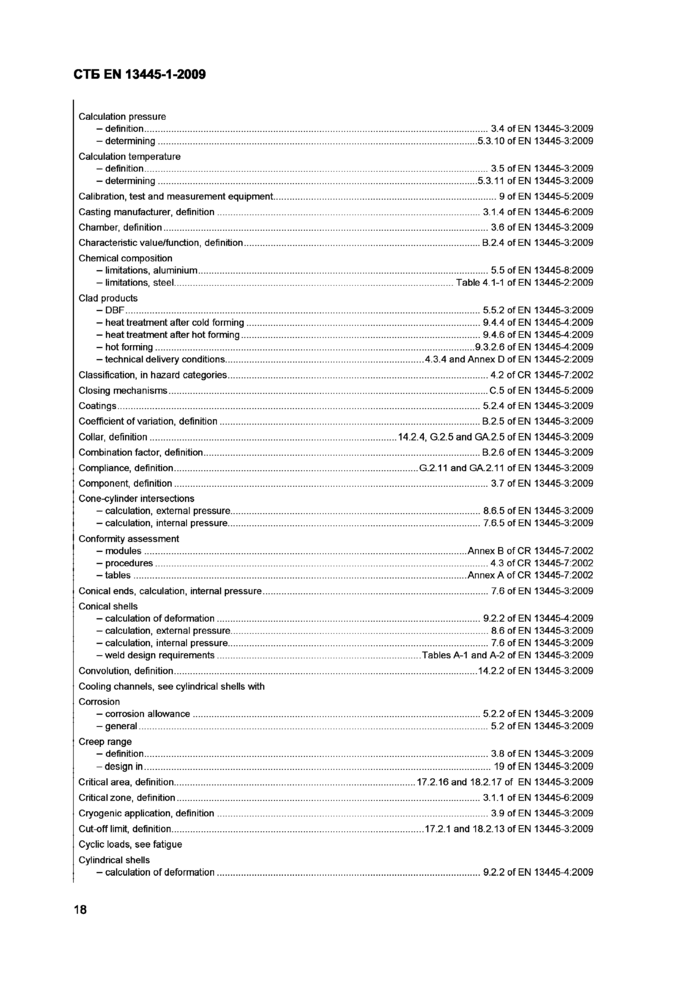
Calculation pressure - definition................................................. - determining............................................ Calculation temperature - definition................................................. - determining............................................ Calibration, test and measurement equipment. Casting manufacturer, definition...................... Chamber, definition.......................................... Characteristic value/function, definition............ Chemical composition - limitations, aluminium............................. - limitations, steel...................................... Clad products -DBF........................................................ - heat treatment after cold forming........... - heat treatment after hot forming............. - hot forming............................................. - technical delivery conditions................... Classification, in hazard categories.................. Closing mechanisms........................................ Coatings........................................................... Coefficient of variation, definition..................... Collar, definition............................................... Combination factor, definition........................... Compliance, definition...................................... Component, definition...................................... Cone-cylinder intersections - calculation, external pressure................. - calculation, internal pressure.................. Conformity assessment - modules................................................. - procedures............................................. - tables..................................................... Conical ends, calculation, internal pressure..... Conical shells - calculation of deformation...................... - calculation, external pressure................. - calculation, internal pressure.................. - weld design requirements...................... Convolution, definition...................................... Cooling channels, see cylindrical shells with Corrosion - corrosion allowance............................... - general................................................... Creep range - definition................................................. -design in................................................. Critical area, definition...................................... Critical zone, definition..................................... Cryogenic application, definition...................... Cut-off limit, definition....................................... Cyclic loads, see fatigue Cylindrical shells - calculation of deformation...................... |
..................................3.4 of EN 13445-3:2009 ..............................5.3.10 of EN 13445-3:2009 ..................................3.5 of EN 13445-3:2009 ..............................5.3.11 of EN 13445-3:2009 .....................................9 of EN 13445-5:2009 ...............................3.1.4 of EN 13445-6:2009 ..................................3.6 of EN 13445-3:2009 ...............................B.2.4 of EN 13445-3:2009 ..................................5.5 of EN 13445-8:2009 .....................Table 4.1-1 of EN 13445-2:2009 ...............................5.5.2 of EN 13445-3:2009 ...............................9.4.4 of EN 13445-4:2009 ...............................9.4.6 of EN 13445-4:2009 .............................9.3.2.6 of EN 13445-4:2009 ..........4.3.4 and Annex D of EN 13445-2:2009 ..................................4.2 of CR 13445-7:2002 ..................................C.5 of EN 13445-5:2009 ...............................5.2.4 of EN 13445-3:2009 ...............................B.2.5 of EN 13445-3:2009 14.2.4, G.2.5 and GA.2.5 of EN 13445-3:2009 ...............................B.2.6 of EN 13445-3:2009 ........G.2.11 and GA.2.11 of EN 13445-3:2009 ..................................3.7 of EN 13445-3:2009 ...............................8.6.5 of EN 13445-3:2009 ...............................7.6.5 of EN 13445-3:2009 ..........................Annex В of CR 13445-7:2002 ..................................4.3 of CR 13445-7:2002 ..........................Annex A of CR 13445-7:2002 ..................................7.6 of EN 13445-3:2009 ...............................9.2.2 of EN 13445-4:2009 ..................................8.6 of EN 13445-3:2009 ..................................7.6 of EN 13445-3:2009 .........Tables A-1 and A-2 of EN 13445-3:2009 ..............................14.2.2 of EN 13445-3:2009 ........................5.2.2 of EN 13445-3:2009 ...........................5.2 of EN 13445-3:2009 ...........................3.8 of EN 13445-3:2009 ............................19 of EN 13445-3:2009 17.2.16 and 18.2.17 of EN 13445-3:2009 ........................3.1.1 of EN 13445-6:2009 ...........................3.9 of EN 13445-3:2009 ...17.2.1 and 18.2.13 of EN 13445-3:2009 9.2.2 of EN 13445-4:2009 18 |
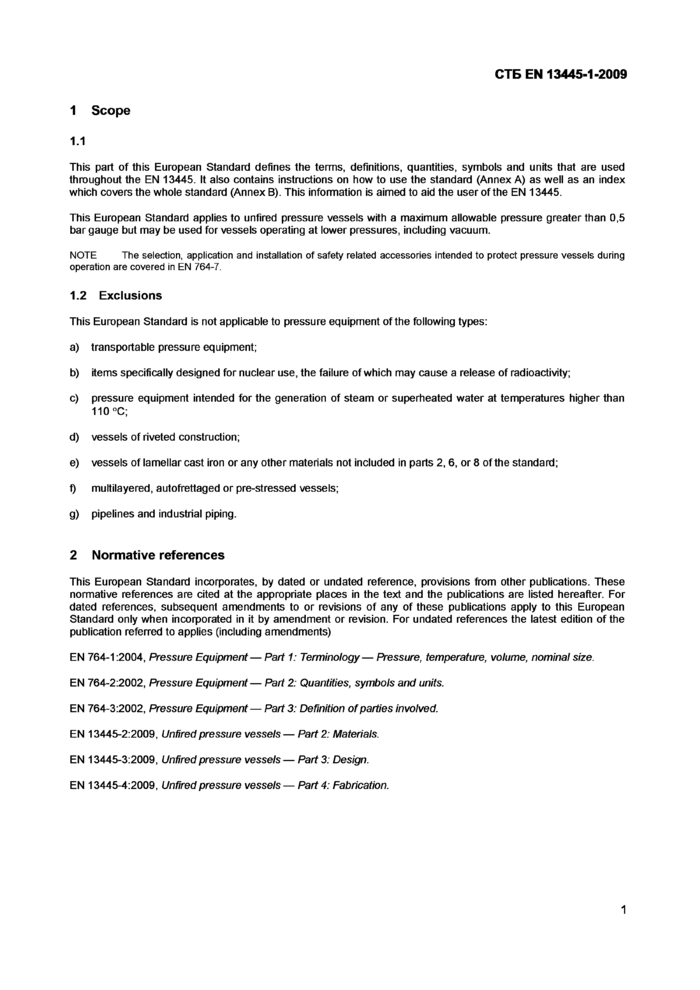
СТБ EN 13445-1-20091 Scope 1.1
This part of this European Standard defines the terms, definitions, quantities, symbols and units that are used throughout the EN 13445. It also contains instructions on how to use the standard (Annex A) as well as an index which covers the whole standard (Annex B). This information is aimed to aid the user of the EN 13445.
This European Standard applies to unfired pressure vessels with a maximum allowable pressure greater than 0,5 bar gauge but may be used for vessels operating at lower pressures, including vacuum.
NOTE The selection, application and installation of safety related accessories intended to protect pressure vessels during operation are covered in EN 764-7.
1.2 Exclusions
This European Standard is not applicable to pressure equipment of the following types:
a) transportable pressure equipment;
b) items specifically designed for nuclear use, the failure of which may cause a release of radioactivity;
c) pressure equipment intended for the generation of steam or superheated water at temperatures higher than 110 °C;
d) vessels of riveted construction;
e) vessels of lamellar cast iron or any other materials not included in parts 2,6, or 8 of the standard;
0 multilayered, autofrettaged or pre-stressed vessels;
g) pipelines and industrial piping.
2 Normative references
This European Standard incorporates, by dated or undated reference, provisions from other publications. These normative references are cited at the appropriate places in the text and the publications are listed hereafter. For dated references, subsequent amendments to or revisions of any of these publications apply to this European Standard only when incorporated in it by amendment or revision. For undated references the latest edition of the publication referred to applies (including amendments)
EN 764-1:2004, Pressure Equipment— Part 1: Terminology— Pressure, temperature, volume, nominal size.
EN 764-2:2002, Pressure Equipment— Part 2: Quantities, symbols and units.
EN 764-3:2002, Pressure Equipment— Part 3: Definition of parties involved.
EN 13445-2:2009, Unfired pressure vessels— Part 2: Materials.
EN 13445-3:2009, Unfired pressure vessels— Part 3: Design.
EN 13445-4:2009, Unfired pressure vessels — Part 4: Fabrication.
1
СТБ EN 13445-1-2009
EN 13445-5:2009, Unfired pressure vessels — Part 5: Inspection and testing.
EN 13445-6:2009, Unfired pressure vessels — Part 6: Requirements for the design and fabrication of pressure vessels and pressure parts constructed from spheroidal graphite cast iron.
EN 13445-8:2009, Unfired pressure vessels — Part 8: Additional requirements for pressure vessels of aluminium and aluminium alloys.
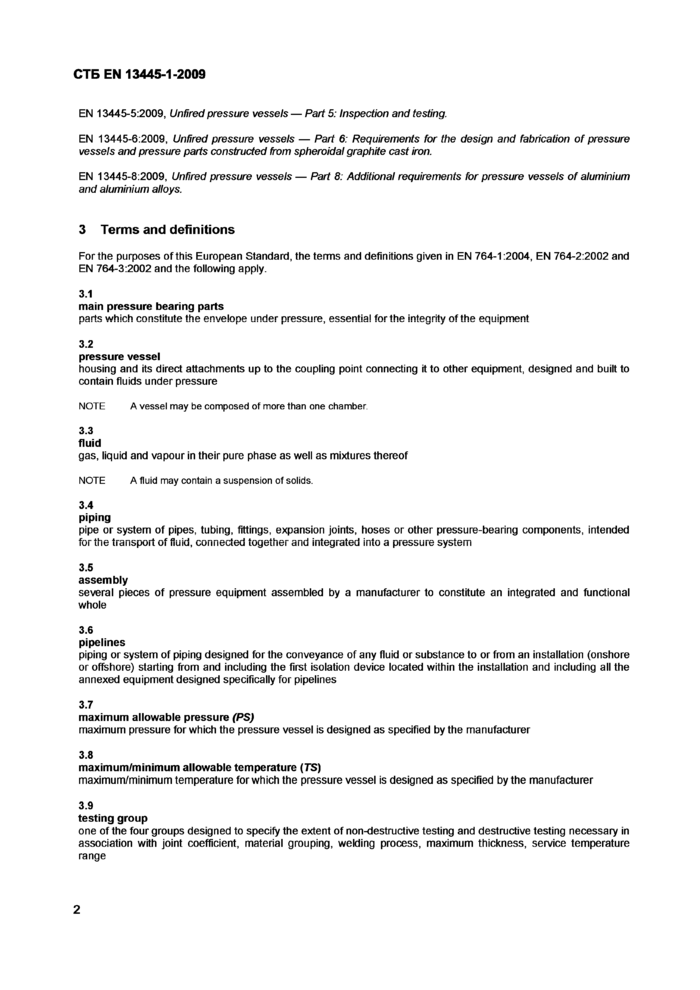
3 Terms and definitions
For the purposes of this European Standard, the terms and definitions given in EN 764-1:2004, EN 764-2:2002 and EN 764-3:2002 and the following apply.
3.1
main pressure bearing parts
parts which constitute the envelope under pressure, essentia! for the integrity of the equipment
3.2
pressure vessel
housing and its direct attachments up to the coupling point connecting it to other equipment, designed and built to contain fluids under pressure
NOTE A vessel may be composed of more than one chamber
3.3 fluid
gas, liquid and vapour in their pure phase as well as mixtures thereof NOTE A fluid may contain a suspension of solids.
3.4
piping
pipe or system of pipes, tubing, fittings, expansion joints, hoses or other pressure-bearing components, intended for the transport of fluid, connected together and integrated into a pressure system
3.5
assembly
several pieces of pressure equipment assembled by a manufacturer to constitute an integrated and functional whole
3.6
pipelines
piping or system of piping designed for the conveyance of any fluid or substance to or from an installation (onshore or offshore) starting from and including the first isolation device located within the installation and including all the annexed equipment designed specifically for pipelines
3.7
maximum allowable pressure (PS)
maximum pressure for which the pressure vessel is designed as specified by the manufacturer
3.8
maximum/minimum allowable temperature (TS)
maximum/minimum temperature for which the pressure vessel is designed as specified by the manufacturer
3.9
testing group
one of the four groups designed to specify the extent of non-destructive testing and destructive testing necessary in association with joint coefficient, material grouping, welding process, maximum thickness, service temperature range
2
СТБ EN 13445-1-2009
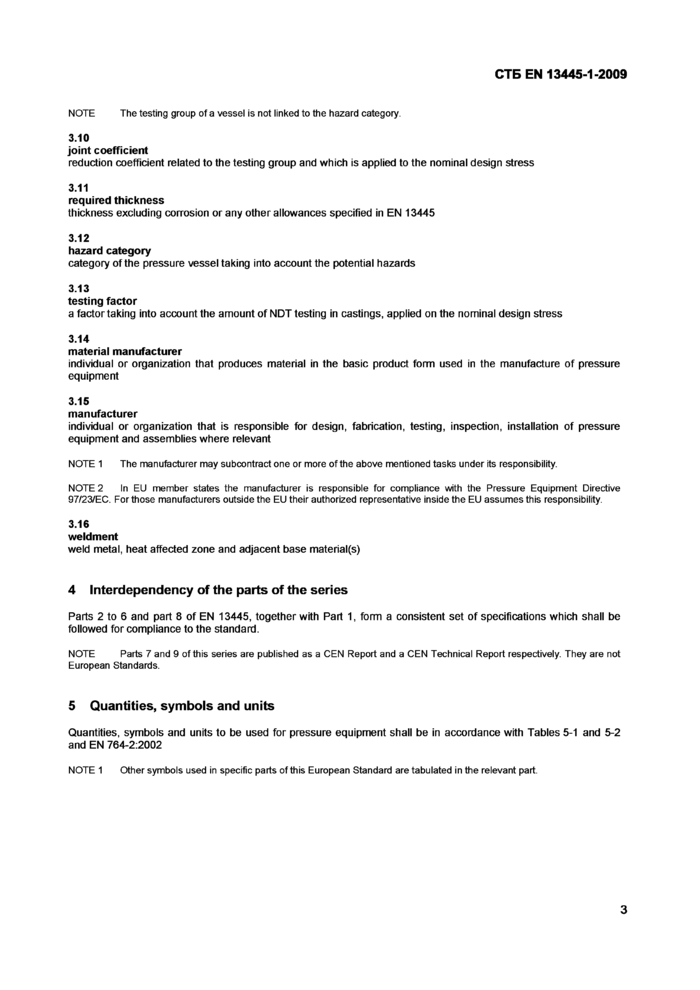
NOTE The testing group of a vessel is not linked to the hazard category.
3.10
joint coefficient
reduction coefficient related to the testing group and which is applied to the nominal design stress
3.11
required thickness
thickness excluding corrosion or any other allowances specified in EN 13445
3.12
hazard category
category of the pressure vessel taking into account the potential hazards
3.13
testing factor
a factor taking into account the amount of NDT testing in castings, applied on the nominal design stress
3.14
material manufacturer
individual or organization that produces material in the basic product form used in the manufacture of pressure equipment
3.15
manufacturer
individual or organization that is responsible for design, fabrication, testing, inspection, installation of pressure equipment and assemblies where relevant
NOTE 1 The manufacturer may subcontract one or more of the above mentioned tasks under its responsibility.
NOTE 2 In El) member states the manufacturer is responsible for compliance with the Pressure Equipment Directive
97/23/EC. For those manufacturers outside the EU their authorized representative inside the EU assumes this responsibility.
3.16
weldment
weld metal, heat affected zone and adjacent base materials)
4 Interdependency of the parts of the series
Parts 2 to 6 and part 8 of EN 13445, together with Part 1, form a consistent set of specifications which shall be followed for compliance to the standard.
NOTE Parts 7 and 9 of this series are published as a CEN Report and a CEN Technical Report respectively. They are not European Standards.
5 Quantities, symbols and units
NOTE 1
NOTE 1
Quantities, symbols and units to be used for pressure equipment shall be in accordance with Tables 5-1 and 5-2 and EN 764-2:2002
Other symbols used in specific parts of this European Standard are tabulated in the relevant part.
3
СТБ EN 13445-1-2009
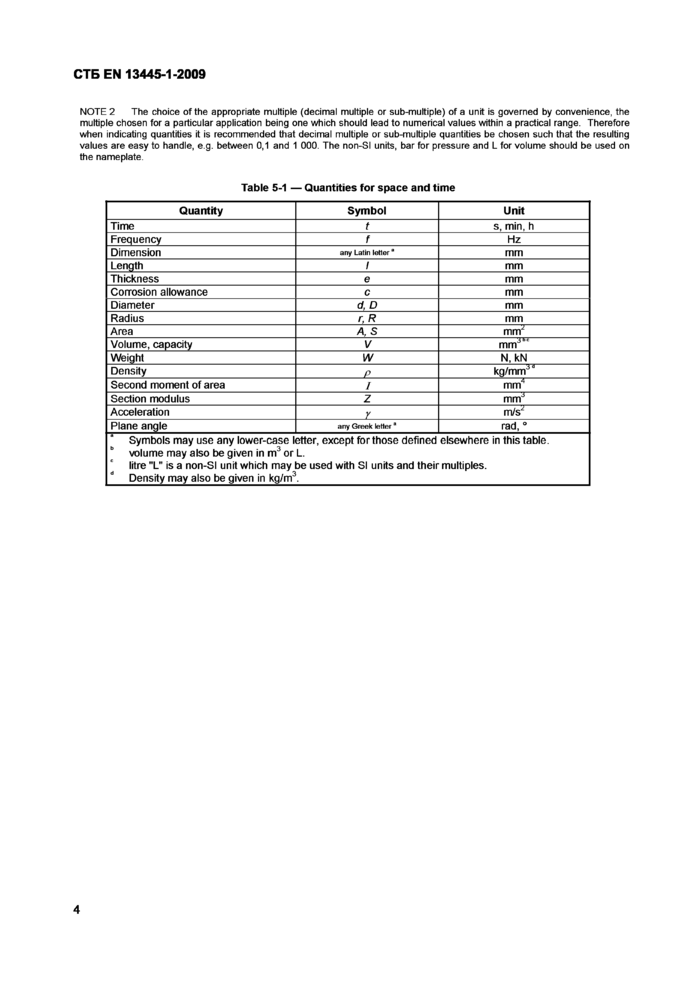
NOTE 2 The choice of the appropriate multiple (decimal multiple or sub-multiple) of a unit is governed by convenience, the multiple chosen for a particular application being one which should lead to numerical values within a practical range. Therefore when indicating quantities it is recommended that decimal multiple or sub-multiple quantities be chosen such that the resulting values are easy to handle, e g. between 0,1 and 1 000. The non-SI units, bar for pressure and L for volume should be used on the nameplate.
|
Table 5-1 — Quantities for space and time | ||||||||||||||||||||||||||||||||||||||||||||||||||||||
| ||||||||||||||||||||||||||||||||||||||||||||||||||||||
4
СТБ EN 13445-1-2009
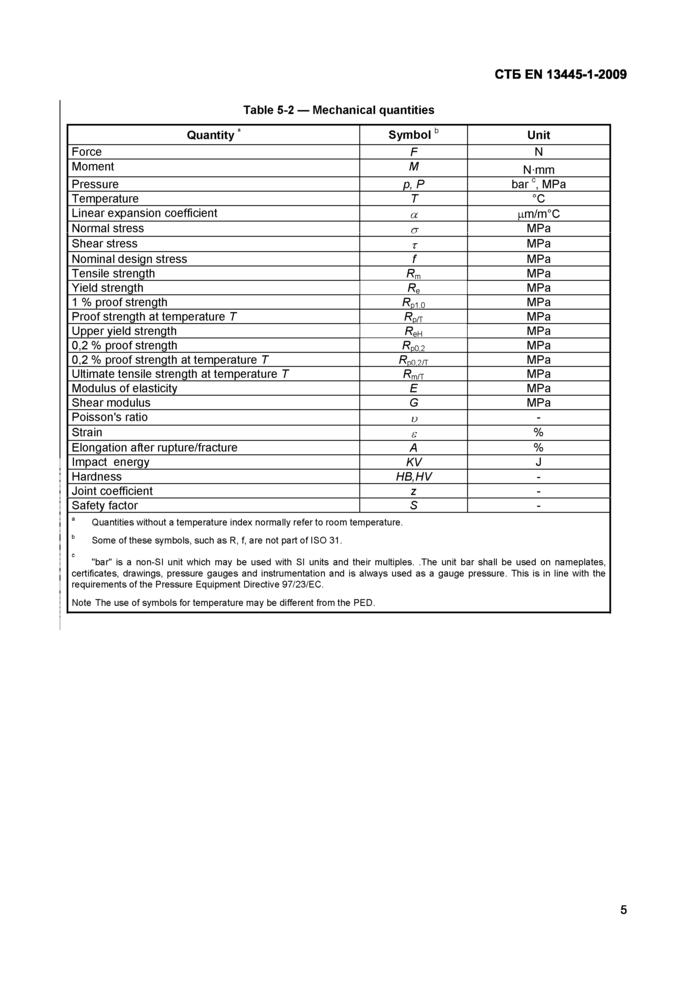
|
Table 5-2 — Mechanical quantities | ||||||||||||||||||||||||||||||||||||||||||||||||||||||||||||||||||||||||||||||||||||||||||
| ||||||||||||||||||||||||||||||||||||||||||||||||||||||||||||||||||||||||||||||||||||||||||
5
СТБ EN 13445-1-2009
Annex A
(informative)
Using the standard
A.1 Purpose
EN 13445 is a new standard (first issued in 2002) and in many places uses new design, fabrication, inspection, and testing philosophies. This annex is designed to facilitate the introduction to the use of the standard.
This annex only gives a general overview of the requirements of the standard. Reference must always be made to the standard text itself, and not all requirements are necessarily mentioned in this annex.
A.2 General
The standard is harmonized under the Pressure Equipment Directive (97/23/EC). This means that if an unfired pressure vessel meets the requirements of the standard, this pressure vessel can be presumed to conform to those essential safety requirements in Annex I of the Directive which are listed in the Annexes ZA of the individual parts of the standard.
In this connection, it should be understood that the standard is indivisible. The design and manufacture of unfired pressure vessels requires the application of all relevant Parts of the standard for the requirements of the standard to be fulfilled. Only in the case that the standard gives no information to specific parts of pressure vessels other standards may be used exceptionally. In such a case, special attention should be paid to ensure that application of such other standard(s) is made consistent with the safety philosophy and the general safety requirements of EN 13445 (i.e. same nominal design stresses, same safety margins, etc.).
NOTE Part 7 and Part 9 are not mandatory parts of the standard in this sense.
This standard applies to unfired pressure vessels with the limitations and exclusions stated in Clause 1 of EN 13445-1:2009.
A.3 Prerequisites
Prior to designing and manufacturing a pressure vessel under the standard, the manufacturer must establish a number of prerequisites:
— The conditions under which the vessel will be operating.
— Load cases to be considered are enumerated in 5.3.1 to 5.3.2 of EN 13445-3:2009.
— The category of the vessel (I to IV) as defined in the Directive. Subclause 4.2 of CR 13445-7:2002 and Annex A of CR 13445-7:2002 show how the category of a vessel is to be established.
NOTE 1 The category determines the type of inspection document required for the materials of the main pressure-bearing parts, as stated in Annex I, section. 4.3 of the Directive (Inspection Documents are defined in EN 10204:2004). The category may also influence how particular material appraisals (see A.4.2) are to be performed.
— The assessment module (as defined in the directive) to be used. Subclause 4.3 of CR 13445-7:2002 and Annex В of CR 13445-7:2002 describe the different assessment modules and which assessment modules can be used for the different categories.
6
СТБ EN 13445-1-2009
NOTE 2 The choice of module may affect the participation of a notified body and/or a recognized third party organization or user inspectorate in the inspection and testing of the vessel as enumerated in Annex C of CR 13445-7:2002. (It should be noted that the use of user inspectorates may not be permitted in all member states).
— The testing group of the vessel according to 6.6.1.1 of EN 13445-5:2009. The available testing groups depend upon the material group, thickness, and welding method. Category 4 is further limited with regards to pressure, temperature, content, number of cycles, design stress, and dimensions.
NOTE 3 The testing group affects not only the testing requirements but also design and manufacturing aspects, e g., joint coefficient, permitted weld details and required weld production tests.
NOTE 4 Although the same testing group normally applies to the whole vessel, it is (with the exception of Group 4) permissible to have different testing groups apply to different parts (e g., welds).
A.4 MaterialsA.4.1 General
Specific requirements for steels are given in Part 2.
NOTE Specific rules for spheroidal graphite cast iron and aluminium are given in EN13445-6:2009 (see A.8 in this annex) and EN13445-8:2009 (see A.9 in this annex), respectively. In some instances, references may be made from these parts to EN 13445-2:2009.
A.4.2 Permitted materials
Only materials which are qualified for pressure equipment may be used. Qualification of materials can be made in three different ways
— Materials from European harmonized Standards, see 4.3.1 of EN 13445-2:2009;
Certain materials supplied in accordance with European material Standards are accepted as qualified for use in pressure-bearing parts. These materials are enumerated in Table E.2-1 of EN 13445-2:2009.
— Materials with a European Approval for Materials (EAM), see 4.3.2 of EN 13445-2:2009;
Materials with an EAM, which states that they can be used for products under the PED, are qualified for use in relevant products according to this standard.
EAMs are published in the Official Journal, and the European Commission maintains a list of EAMs on their web site
NOTE 1 This web site is presently accessible under the address http://ec.europa.eu/enterpnse/pressure_equipment/ped/matenals/published_en.html.
— Materials with a Particular Material Appraisal (PMA), see 4.3.3 of EN 13445-2:2009.
Materials, which have been subject to a PMA are qualified. This appraisal is carried out by the manufacturer (and in certain cases checked by a Notified Body).
NOTE 2 The European Commission and Member States have in November 2006 agreed on ’’Guiding Principles for the contents of Particular Materials Appraisals. The document is published on, http://eceuropa.eu/enterphse/pressure_equipment/ped/materials/index_en.html.
7