СТБ EN 13445-4-2009
Сосуды, работающие под давлением. Часть 4. Изготовление
Купить СТБ EN 13445-4-2009 — бумажный документ с голограммой и синими печатями. подробнее
Цена на этот документ пока неизвестна. Нажмите кнопку "Купить" и сделайте заказ, и мы пришлем вам цену.
Распространяем нормативную документацию с 1999 года. Пробиваем чеки, платим налоги, принимаем к оплате все законные формы платежей без дополнительных процентов. Наши клиенты защищены Законом. ООО "ЦНТИ Нормоконтроль"
Наши цены ниже, чем в других местах, потому что мы работаем напрямую с поставщиками документов.
Способы доставки
- Срочная курьерская доставка (1-3 дня)
- Курьерская доставка (7 дней)
- Самовывоз из московского офиса
- Почта РФ
В документе определены требования по изготовлению сосудов, работающих под давлением, без огневого подвода теплоты и их частей, произведенных из сталей, а также по их соединению с частями, работающими без давления. В нем определены требования к прослеживаемости материалов, допустимым отклонениям при изготовлении, сварке, производственным испытаниям, формовке, термической обработке, ремонту и отделочным процедурам.
Оглавление
Введение
Приложение Д.А (справочное) Перевод европейского стандарта EN 13445-4:2009 на русский язык
1 Область применения
2 Нормативные ссылки
3 Требования по изготовлению и по заключению контракта с субподрядчиком
4 Материалы
5 Допуски на изготовление
6 Детализация сварных швов
7 Сварка
8 Изготовление и контроль сварных швов. Производственные испытания
9 Формовка частей, предназначенных для работы под давлением
10 Термическая обработка после сварки (PWHT)
11 Ремонт
12 Завершающие процедуры
Приложение A (справочное) Конструкционные допуски
Приложение B (справочное) Образец бланка соглашения с субподрядчиком
Приложение Y (справочное) Отличия между EN 13445:2002 и EN 13445:2009
Приложение ZA (справочное) Взаимосвязь между настоящим европейским стандартом и основными требованиями директивы ЕС 97/23/ЕС по оборудованию, работающему под давлением
Библиография
| Дата введения | 01.01.2010 |
|---|---|
| Добавлен в базу | 01.01.2019 |
| Актуализация | 01.01.2021 |
Организации:
| 27.11.2009 | Утвержден | Госстандарт Республики Беларусь | 61 |
|---|---|---|---|
| Разработан | БелГИСС | ||
| Издан | БелГИСС | 2010 г. |
Unfired pressure vessels. Part 4. Fabrication
Чтобы бесплатно скачать этот документ в формате PDF, поддержите наш сайт и нажмите кнопку:
стр. 1
стр. 2
стр. 3
стр. 4
стр. 5
стр. 6
стр. 7
стр. 8
стр. 9
стр. 10
стр. 11
стр. 12
стр. 13
стр. 14
стр. 15
стр. 16
стр. 17
стр. 18
стр. 19
стр. 20
стр. 21
стр. 22
стр. 23
стр. 24
стр. 25
стр. 26
стр. 27
стр. 28
стр. 29
стр. 30
СТБ EN 13445-4-2009
ГОСУДАРСТВЕННЫЙ СТАНДАРТ РЕСПУБЛИКИ БЕЛАРУСЬ
СОСУДЫ, РАБОТАЮЩИЕ ПОД ДАВЛЕНИЕМ
Часть 4 Изготовление
ПАСУД31НЫ, ЯК1Я ПРАЦУЮЦЬ ПАД Ц1СКАМ
Частка 4 Выраб
(EN 13445-4:2009, ЮТ)
Издание официальное
Г осстандарт Минск
(SB
СТБ EN 13445-4-2009
УДК 621.642-98(083.74)(476) МКС 23.020.30 КП 03 ЮТ
Ключевые слова: сосуды, работающие под давлением, изготовление
Предисловие
Цели, основные принципы, положения по государственному регулированию и управлению в области технического нормирования и стандартизации установлены Законом Республики Беларусь «О техническом нормировании и стандартизации».
1 ПОДГОТОВЛЕН ПО УСКОРЕННОЙ ПРОЦЕДУРЕ научно-производственным республиканским унитарным предприятием «Белорусский государственный институт стандартизации и сертификации» (БелГИСС)
ВНЕСЕН Госстандартом Республики Беларусь
2 УТВЕРЖДЕН И ВВЕДЕН В ДЕЙСТВИЕ постановлением Госстандарта Республики Беларусь от 27 ноября 2009 г. № 61
3 Настоящий стандарт идентичен европейскому стандарту EN 13445-4:2009 Unfired pressure vessels - Part 4: Fabrication (Сосуды, работающие под давлением. Часть 4. Изготовление).
Европейский стандарт разработан техническим комитетом по стандартизации CEN/TC 54 «Сосуды, работающие под давлением» Европейского комитета по стандартизации (CEN).
Перевод с английского языка (еп).
Официальные экземпляры европейского стандарта, на основе которого подготовлен настоящий государственный стандарт, и европейских стандартов, на которые даны ссылки, имеются в Национальном фонде ТИПА.
Степень соответствия - идентичная (ЮТ)
4 ВВЕДЕН ВПЕРВЫЕ
© Госстандарт, 2010
Настоящий стандарт не может быть воспроизведен, тиражирован и распространен в качестве официального издания без разрешения Госстандарта Республики Беларусь
Издан на русском языке
СТБ EN 13445-4-2009
b) 1,0 % for the ratio of e/D > 0,01.
NOTE The determination of the out of roundness need not consider the elastic deformation due to the deadweight of the pressure vessel.
Irregularities in vessel profile (e.g. dents, buckling, flats on nozzle positions) shall be also within the tolerances in a) and b). A greater out of roundness may be acceptable provided they have been proven admissible by calculation or strain gauge measurements.
5.4.3 Deviation from the longitudinal axis
The deviation from the longitudinal axis over the length of the cylindrical portion of the pressure vessel shall not exceed 0,5 % of the length of the shell.
5.4.4 Irregularities in profile
a) Local irregularities in vessel profile
Irregularities in profile (e.g. dents, buckling, flats on nozzle positions) shall be smooth and the depth shall be checked by a 20° gauge and shall not exceed the following values:
1) 2 % of the gauge length; or
2) 2,5 % of the gauge length provided that the length of the irregularities does not exceed one quarter of the length (with a maximum of 1 m) of the shell part between two circumferential joints.
Greater irregularities require proof by calculation or strain gauge measurement that the stresses are permissible.
b) Peaking on longitudinal buttwelds
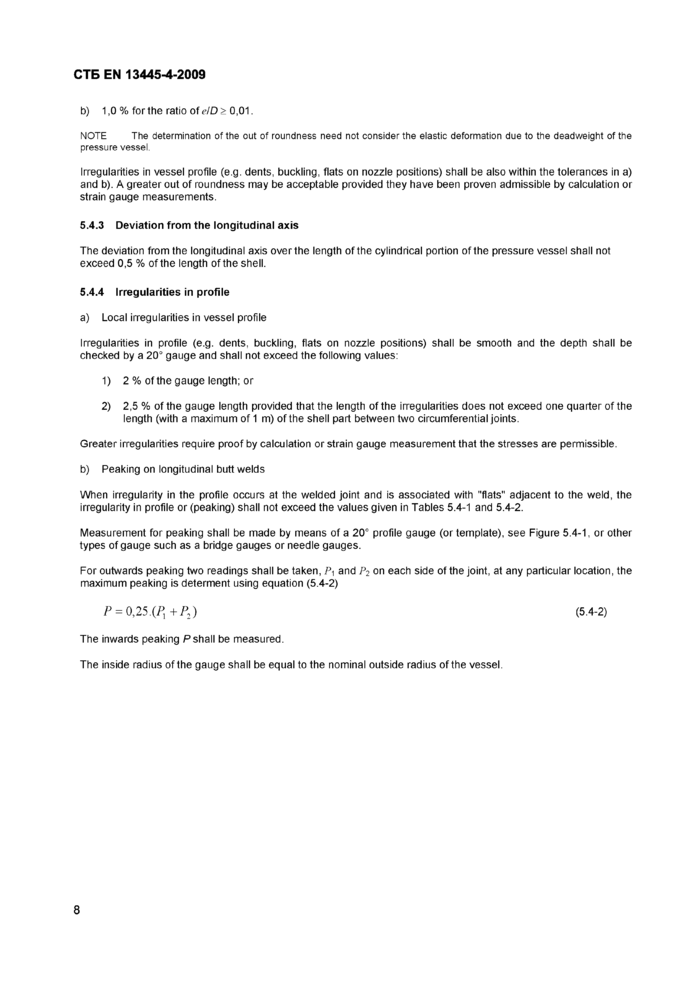
When irregularity in the profile occurs at the welded joint and is associated with "flats" adjacent to the weld, the irregularity in profile or (peaking) shall not exceed the values given in Tables 5.4-1 and 5.4-2.
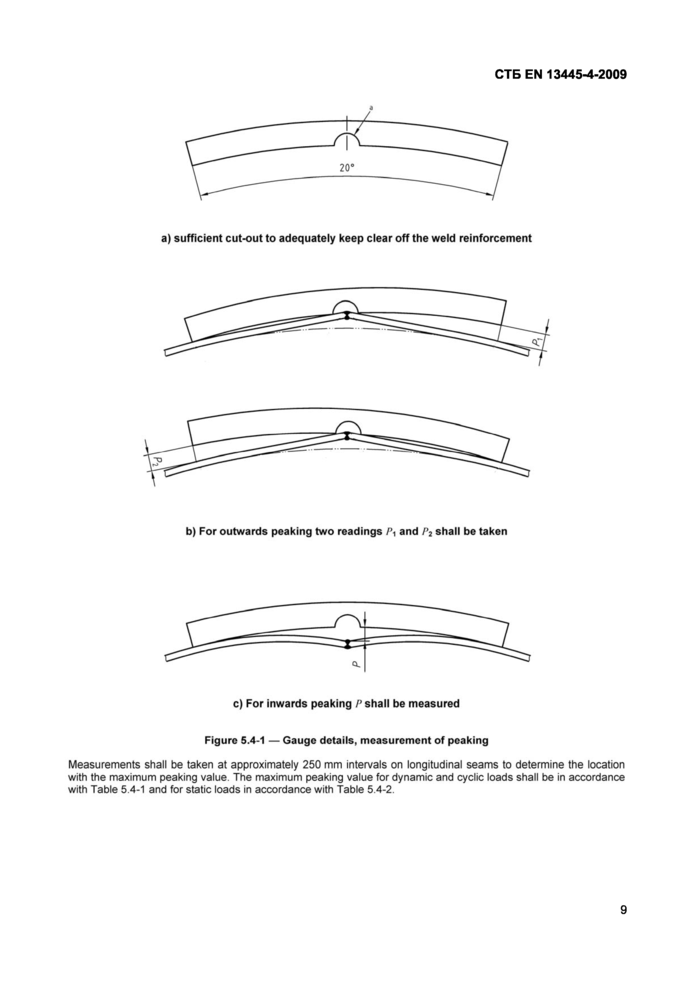
Measurement for peaking shall be made by means of a 20° profile gauge (or template), see Figure 5.4-1, or other types of gauge such as a bridge gauges or needle gauges.
For outwards peaking two readings shall be taken, P^ and P2 on each side of the joint, at any particular location, the maximum peaking is determent using equation (5.4-2)
P = 0,25.(T, +P2) (5.4-2)
The inwards peaking Pshall be measured.
The inside radius of the gauge shall be equal to the nominal outside radius of the vessel.
8
СТБ EN 13445-4-2009
|
a |
a) sufficient cut-out to adequately keep clear off the weld reinforcement
b) For outwards peaking two readings Pi and P2 shall be taken
c) For inwards peaking P shall be measured
Figure 5.4-1 — Gauge details, measurement of peaking
Measurements shall be taken at approximately 250 mm intervals on longitudinal seams to determine the location with the maximum peaking value. The maximum peaking value for dynamic and cyclic loads shall be in accordance with Table 5.4-1 and for static loads in accordance with Table 5.4-2.
9
СТБ EN 13445-4-2009
|
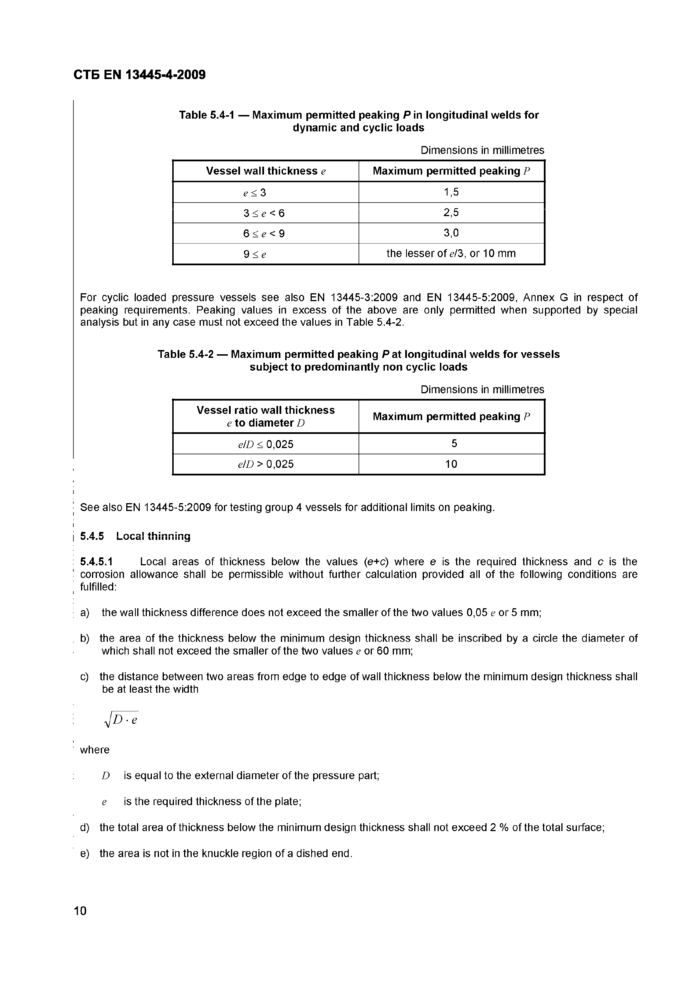
Table 5.4-1 — Maximum permitted peaking P in longitudinal welds for dynamic and cyclic loads Dimensions in millimetres | ||||||||||
|
For cyclic loaded pressure vessels see also EN 13445-3:2009 and EN 13445-5:2009, Annex G in respect of peaking requirements. Peaking values in excess of the above are only permitted when supported by special analysis but in any case must not exceed the values in Table 5.4-2.
|
Table 5.4-2 — Maximum permitted peaking P at longitudinal welds for vessels subject to predominantly non cyclic loads Dimensions in millimetres | ||||||
|
■ See also EN 13445-5:2009 fortesting group 4 vessels for additional limits on peaking.
С А С I 4hinnirt/«
| yj.'+.yj uuuai u 111111111vj
: 5.4.5.1 Local areas of thickness below the values (e+c) where e is the required thickness and c is the
1 corrosion allowance shall be permissible without further calculation provided all of the following conditions are ' fulfilled:
■ a) the wall thickness difference does not exceed the smaller of the two values 0,05 e or 5 mm;
b) the area of the thickness below the minimum design thickness shall be inscribed by a circle the diameter of which shall not exceed the smaller of the two values e or 60 mm;
c) the distance between two areas from edge to edge of wall thickness below the minimum design thickness shall be at least the width
where
D is equal to the external diameter of the pressure part; e is the required thickness of the plate;
d) the total area of thickness below the minimum design thickness shall not exceed 2 % of the total surface;
e) the area is not in the knuckle region of a dished end.
СТБ EN 13445-4-2009
5.4.5.2 Furthermore, local areas of wall thickness smaller than the minimum design wall thickness shall be permissible provided:
a) the diameter of a circumscribed circle of the area with a wall thickness below the minimum design wall thickness has no larger dimension than that of a calculated permissible unreinforced opening according to EN 13445-3:2009 with a maximum of 200 mm;
b) the residual wall thickness is greater than the thickness of a flat end of the same diameter and calculated with a C-factorof 0,35;
c) the areas of reduced wall thickness are recorded.
5.4.6 Dished ends
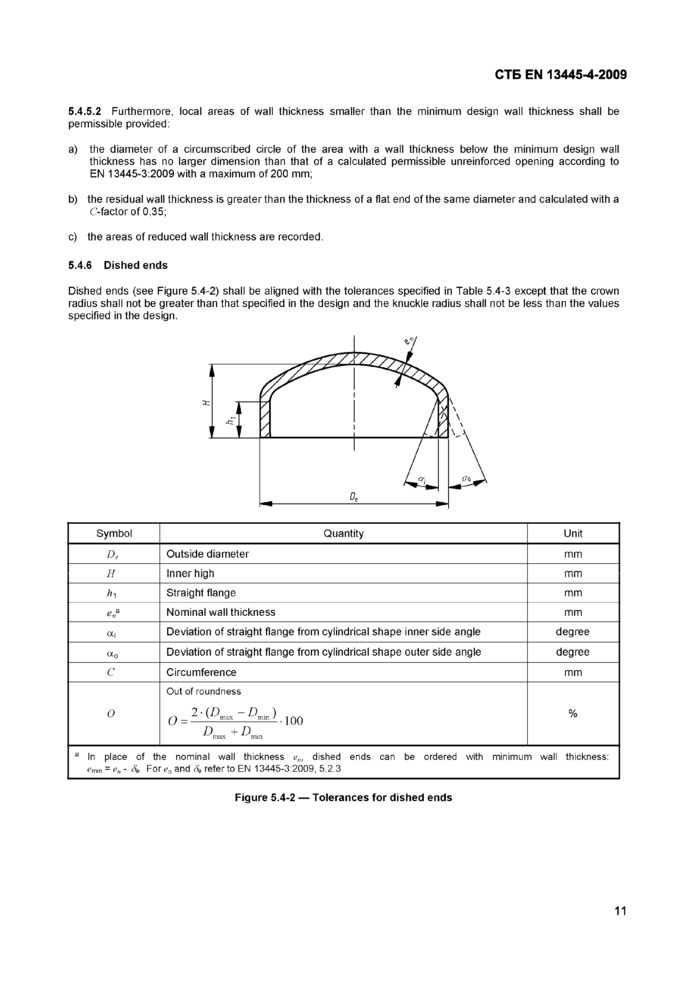
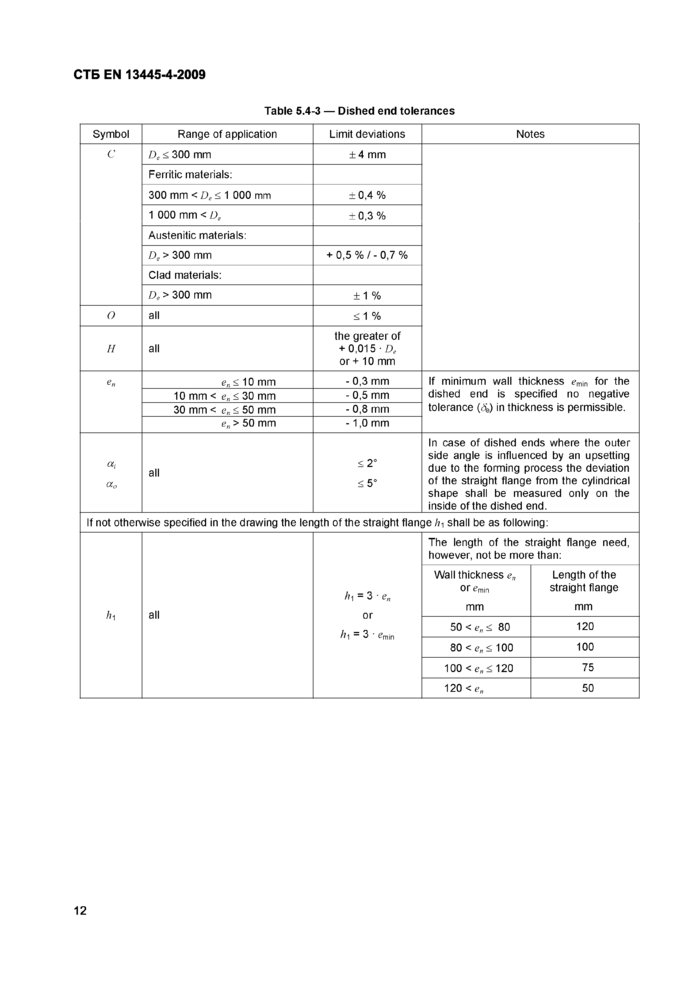
Dished ends (see Figure 5.4-2) shall be aligned with the tolerances specified in Table 5.4-3 except that the crown radius shall not be greater than that specified in the design and the knuckle radius shall not be less than the values specified in the design.
| |||||||||||||||||||||||||||||||||
|
Figure 5.4-2 — Tolerances for dished ends | |||||||||||||||||||||||||||||||||
11
СТБ EN 13445-4-2009
|
Table 5.4-3 — Dished end tolerances | |||||||||||||||||||||||||||||||||||||||||||||||||||||||||||||||||||
| |||||||||||||||||||||||||||||||||||||||||||||||||||||||||||||||||||
|
If not otherwise specified in the drawing the length of the straight flange /?-, shall be as following: |
|
The length of the straight flange need, however, not be more than: | |
|
Wall thickness en ОГ £mjn |
Length of the straight flange |
|
mm |
mm |
|
50 < e„ < 80 |
120 |
|
80 < en< 100 |
100 |
|
100 < e„ < 120 |
75 |
|
120 < en |
50 |
12
СТБ EN 13445-4-20095.5 Tolerances for vessels subjected to external pressure
Tolerances shall be in accordance with EN 13445-3:2009, but in no case shall they exceed the tolerances specified in 5.4.
5.6 Structural tolerances
Structural tolerances, other than those specified in 5.4 and 5.5 should not exceed the values recommended in Annex A.
6 Weld details
6.1 General
The manufacturer in selecting an appropriate weld detail should give consideration to:
+1"» /■'i rYi/-\+ h r\f mo n ■ ifoof ■ ■ m •
a) uic 11 itj li iuu ui 11 iai luiauiui kj,
b) the service conditions (e.g. corrosion);
c) the ability to carry out the necessary non-destructive testing required in accordance with EN 13445-5:2009;
d) the design requirements given in 5.7 and in Annex A of EN 13445-3:2009 for welds.
Other weld details may be used.
NOTE 1 Annex A of EN 13345-3:2009 gives figures of the joints in finished condition, design requirements mainly on geometry, a list of applicable testing groups, recommendations for prevention of lamellar tearing and corrosion.
NOTE 2 Basic weld details are given in EN 1708-1 [5]. These details show sound and commonly accepted practice. It is not intended that these are considered mandatory or should restrict development of welding technology any way and as a result other suitable weld details may be used.
6.2 Vessels or parts made of more than one course
Where a vessel or vessel part is made of two or more courses the longitudinal weld joints of adjacent courses shall be staggered by 4 e with 10 mm minimum, or 30 mm minimum when the vessel or vessel part is either working in the creep range or designed by Design by Analysis - Direct Route (Annex В of EN 13445-3:2009) or designed using 6.3 of EN 13445-3:2009.
6.3 Lapped joints, joggle joints, permanent backing strips
Design and weld details shall be in accordance with EN 13445-3:2009.
7 Welding7.1 General
Welding of the component parts of a pressure vessel shall only be undertaken if the following conditions are satisfied:
a) a welding procedure specification is held by the manufacturer;
13СТБ EN 13445-4-2009
b) the welding procedures selected by the manufacturer are qualified forthe field of application;
c) the welders and welding operators are qualified for the work allocated to them and their approval is valid.
7.2 Welding procedure specification (WPS)
The manufacturer shall compile welding procedure specifications, in accordance with EN ISO 15609-1:2004 for all welds.
7.3 Qualification of welding procedure specifications (WPAR)
Welding procedure specifications to be used in production shall be qualified by reference to an appropriate WPAR.
For the pressure retaining welds of a pressure vessel this shall be achieved by performing welding procedure approval tests in accordance with EN ISO 15614-1:2004 or by preproduction tests in accordance with EN ISO 15613:2004.
In addition to the requirements of EN ISO 15614-1:2004 the following tests shall apply:
a) For test plates on butt joints equal to or over 20 mm thickness a longitudinal weld tensile test having a minimum diameter equal to or over 6 mm shall be performed in accordance with EN 876:1995 and 7?C/T, Rm and A5 shall satisfy the specified minimum requirements of the base material or for weld consumables requirements in EN 13445-2:2002, clause 4.3.5 or other relevant values specifically taken into account in the design (e.g. austenitic filler metal in combination with 9 % Nickel steel).
Where the design temperature is higher than 300 °C then the test shall be done at the design temperature.
NOTE 1 It is important that special consideration is given where the mechanical properties of the weld are below the base materials by design, e.g. 9 % Ni steels welded with austenitic filler metal."
b) a micro examination shall be performed for material groups 8.2 and 10 in accordance with EN 13445-2:2009, Table A-1.
— requirements on welds, material group 8.2: the micro examination shall show adequate microstructure
NOTE 2 Occasional isolated micro fissures with a length of < 1,5 mm may be acceptable, but should be reported.
— requirements on welds, material group 10: the micro examination shall show adequate microstructure
— the ferrite content in the heat affected zone (HAZ) shall be between min. 30 % and max. 70 %. In the high temperature HAZ, a distance of about two times the grain size from the fusion line, the ferrite content shall be equal to or less than 85 %. Where the welding consumable used are of an austenitic-ferritic matching type the ferrite content in the weld metal shall also be between 30 % and 70 %. The ferrite content shall be measured by metallographic methods. If the welding consumables are of non-matching type (i.e. austenitic) the requirement for ferrite content in the weld metal does not apply.
14СТБ EN 13445-4-2009
NOTE 3 The limit deviation on metallographic measurements frequently are of the order of ± 5 %.
c) Impact test: The testing and the acceptance criteria shall conform to EN ISO 15614-1:2004; in addition, tl impact test requirements in accordance with EN 13445-2:2009, Annex В shall apply.
For austenitic steels see also Clause 8.2 a) 2) of this part of the standard.
For welds other than pressure retaining welds directly attached to the pressure vessels e.g. tray rings, support fei etc. welding procedure specifications may be acceptable by holding welding procedure approval records carried c in accordance with EN ISO 15611:2003 and EN ISO 15612:2004. "
If required, the welding procedure approval records shall be approved by a competent third party, who sh perform examination and tests (or have them carried out) as specified in EN ISO 15614-1:2004 and this clause.
NOTE 4 For all test coupons it is permissible for a manufacturer to subcontract preparation of test pieces and their testi but not the welding of the test pieces.
7 Л Di lalifiratinn nf wplH^rc anrl w^lrlinn nnpratnrc
Welders and welding operators shall be approved to EN 287-1:2004 or EN 1418:1997 respectively.
NOTE 1 The training, supervision and control of welders and welding operators is the responsibility of the manufacturer.
An up-to-date list of welders and welding operators together with records of their approval test shall be maintain by the manufacturer.
The prolongation (every 6 months) and re-approval (every 2 years) shall be carried out in accordance with EN 28 1:2004.
The evidence in support of the prolongation and re-approval shall be maintained for at least 2 years.
NOTE 2 Any welders not in the employ of the manufacturer may be used provided they are under the full technical control the manufacturer and work to the manufacturer's requirements.
7.5 Filler metals and auxiliary materials
The technical delivery conditions for welding consumables shall be in accordance with EN 13445-2:2009. The fill metals and auxiliary materials shall be documented, and shall be suitable for use with the parent metals, tl welding processes and the fabricating conditions.
All welding consumables shall be stored and handled with care and used in accordance with the conditio specified by the welding consumable manufacturer.
NOTE This is particularly important where baking and drying are specified.
Electrodes, filler wires and rods and fluxes that show signs of damage or deterioration, such as cracked or flak coating, rusting or dirty electrode wire, shall not be used.
7.6 Joint preparation
Material shall be cut to size and shape by any mechanical or thermal cutting process or by combination of both. NOTE 1 This may be carried out before or after forming operations.
15СТБ EN 13445-4-2009
Where thermal cutting is employed precautions shall be taken to ensure that the edges are not adversely influenced by hardening.
NOTE 2 For some materials this will involve preheating prior to cutting.
The cut edges of ferritic steel which are cut by the thermal process, shall be dressed back by grinding or machining if required by the WPS.
The surface to be welded shall be thoroughly cleaned of oxide, scale, oil grease or other foreign substance and shall be free of defects such as inclusions, cracks and laminations to avoid any detrimental effect on weld quality.
The edges to be welded shall be kept in position, either by mechanical means, temporary attachments or by tack welds or by a combination. The tack welds shall be removed or fused again in the weld bead (see Note 3). In both cases, the manufacturer shall take all precautions so that the tack welding or temporary attachment or a combination of these does not generate metallurgical or homogeneity defects.
NOTE 3 It is permissible to use tack welds and incorporate them into the final weld provided they have been made to an
I WCU VVCIUII
Where single sided welds are being used, the manufacturer shall ensure that the alignment and the gap of the edges to be welded will be adequate to assure the required penetration at the weld root.
During the whole welding operation, the edges to be welded shall be held so that the alignment tolerances defined in 5.2 are satisfied.
7.7 Execution of welded joints
The welder shall have available the applicable WPS or detailed work instructions based on the approved WPS and defining all essential variables under direct control by the welder.
Depending on the weld process, after each weld run, the slag shall be removed and the weld cleaned and the surface defects removed to obtain the proper quality of weld metal.
Unless the welding process used provides effective and sound penetration, the second side of a welded joint shall be removed back to sound metal using a mechanical or thermal process or by grinding.
Arc strikes on pressure vessel parts outside the weld preparation shall be avoided. Where arc strikes occurs accidentally the affected area (including the heat affected area) shall be repaired in accordance with 11.1.
A record shall be maintained of which welder or welding operator has carried out each weld.
NOTE This may be by marking each weld with a welder identification mark or alternatively by means of records which assure traceability of the welder to his work throughout the construction of the pressure vessel.
7.8 Attachments, supports and stiffeners
Attachments, whether temporary or not, supports and stiffeners shall be welded to a part subject to pressure by qualified welders using a qualified procedure.
Temporary attachments shall be removed using a technique which does not affect the properties of the metal of the pressure part to which they are welded. Care shall to be taken that the area of the removed attachment is free of surface cracks. Repair shall be carried out in a accordance with 11.2.
16СТБ EN 13445-4-2009
Cold formed dished ends of ferritic steels without subsequent heat treatment shall not be welded or heated up locally to temperatures between 550 °C and 750 °C in the knuckle area.
7.9 Preheat
The manufacturer shall include in the WPS the preheating temperatures and, where relevant, the inter-pass temperatures required for the welding. The preheating temperature shall be determined by taking into consideration the composition, and thickness of the metal being welded, the welding process being used and the arc parameters.
NOTE Recommendations for preheating for ferritic steels are given in EN 1011-2 [4], recommendations for preheat control are given in EN ISO 13916 [6].
The preheating temperature specified in the WPS shall be adhered to when tack welding and during the entire welding operation. Adherence to the preheating temperature shall be continuously monitored with suitable measuring instruments or temperature indicating crayons.
No welding shall be carried out when the temperature of the parent metal near the joint is less than +5 °C.
8 Manufacture and testing of welds — Production test8.1 General
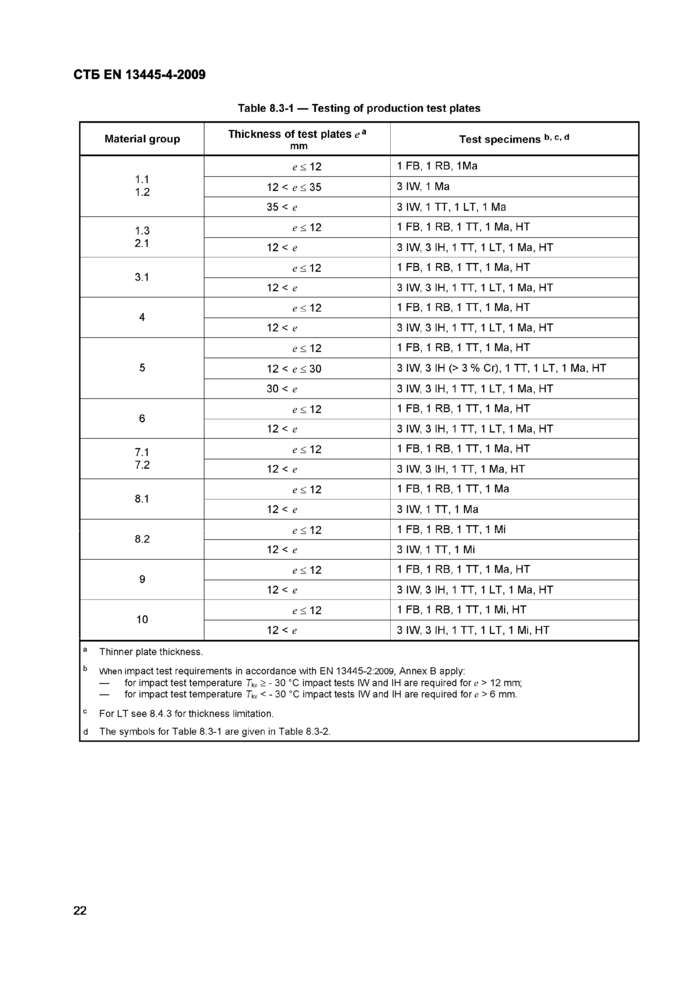
In orderto control the continuing quality ofthe manufacture and the compliance of the mechanical properties ofthe welds with the specification, production test plates shall be welded and tested in accordance with 8.2 and 8.3.
Production test plates apply only to governing shell-longitudinal and -circumferential welds (see EN 13445-3:2009).
Specific requirements apply to vessels and vessel parts made of thermo-mechanically rolled steels (group 2.1) and quenched and tempered steels (group 3.1). See 8.2 f).
NOTE When a vessel includes one or more longitudinal welds the test plates should wherever practicable be attached to the shell plate on one end ofthe weld so that the edges to be welded in the test plate are a continuation and duplication ofthe corresponding edges of the longitudinal welds. The weld metal should be deposited in the test plates continuously with the welding of the corresponding longitudinal weld so that the welding process, procedure and technique are the same. When it is necessary to weld the test plates separately, the procedure used should duplicate that used in the construction ofthe vessel.
Where difficulties are encountered with electro slag welds in transferring from welds with different curvatures (e.g. from a cylinder to a flat coupon plate) the test plate may be welded separately either immediately before or immediately after the welds ofthe vessel, using the same welding parameters.
When the test plates are required for circumferential welds they shall be welded separately from the vessel providing the technique used in their preparation duplicates as far as possible the procedure used in the welding of the appropriate welds ofthe vessel.
8.2 Reference criteria
The criteria for the determination the number of production test plates is given below. This is dependent upon the material, the length of welded joints, the thickness, post weld heat treatment (PWHT) and the joint coefficient for each qualified weld procedure. Special provisions are given fortesting group 4. The actual testing of production test plates is dependent on the material and the thickness. Additional specific impact testing requirements are also addressed below.
17
СТБ EN 13445-4-2009
Введение
Настоящий стандарт содержит текст европейского стандарта EN 13445-4:2009 на языке оригинала и его перевод на русский язык (справочное приложение Д.А).
Введен в действие как стандарт, на который есть ссылка в Еврокоде EN 1993-1-8:2005.
ГОСУДАРСТВЕННЫЙ СТАНДАРТ РЕСПУБЛИКИ БЕЛАРУСЬ
СОСУДЫ, РАБОТАЮЩИЕ ПОД ДАВЛЕНИЕМ Часть 4 Изготовление
ПАСУД31НЫ, ЯК1Я ПРАЦУЮЦЬ ПАД Ц1СКАМ Частка 4 Вы раб
Unfired pressure vessels Part 4 Fabrication
Дата введения 2010-01-01
СТБ EN 13445-4-2009
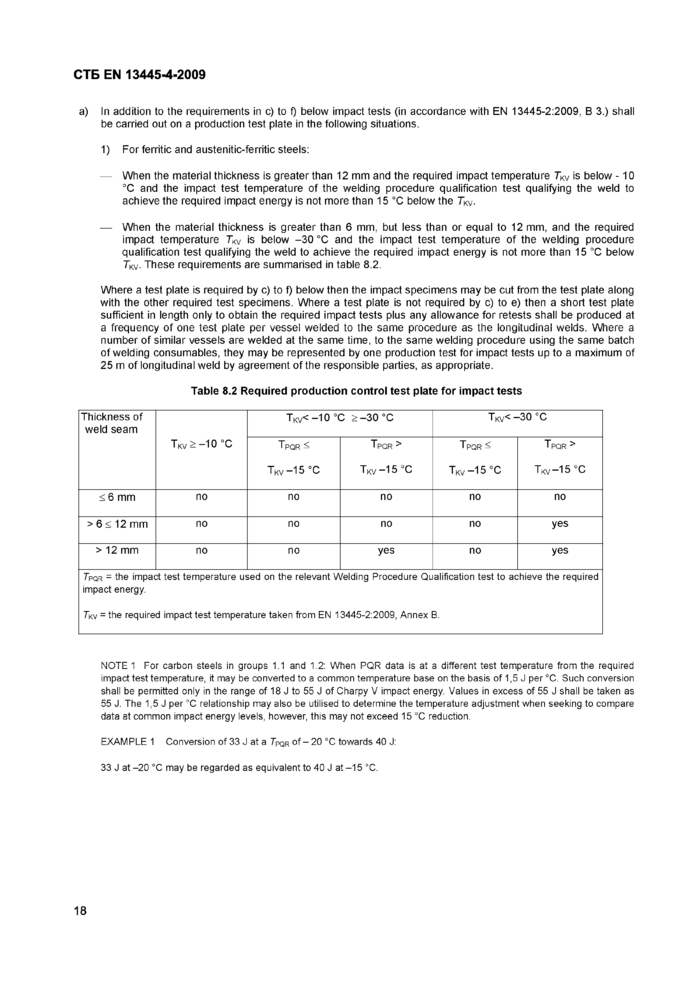
a) In addition to the requirements in c) to f) below impact tests (in accordance with EN 13445-2:2009, В 3.) shall be carried out on a production test plate in the following situations.
1) For ferritic and austenitic-ferritic steels:
— When the material thickness is greater than 12 mm and the required impact temperature T«v is below -10 °C and the impact test temperature of the welding procedure qualification test qualifying the weld to achieve the required impact energy is not more than 15 °C below the Tkv.
— When the material thickness is greater than 6 mm, but less than or equal to 12 mm, and the required impact temperature TKv is below -30 °C and the impact test temperature of the welding procedure qualification test qualifying the weld to achieve the required impact energy is not more than 15 °C below TKV. These requirements are summarised in table 8.2.
Tkv = the required impact test temperature taken from EN 13445-2:2009, Annex B.
Where a test plate is required by c) to f) below then the impact specimens may be cut from the test plate along with the other required test specimens. Where a test plate is not required by c) to e) then a short test plate sufficient in length only to obtain the required impact tests plus any allowance for retests shall be produced at a frequency of one test plate per vessel welded to the same procedure as the longitudinal welds. Where a number of similar vessels are welded at the same time, to the same welding procedure using the same batch of welding consumables, they may be represented by one production test for impact tests up to a maximum of 25 m of longitudinal weld by agreement of the responsible parties, as appropriate.
|
Table 8.2 Required production control test plate for impact tests | ||||||||||||||||||||||||||||
| ||||||||||||||||||||||||||||
|
Tpqr = the impact test temperature used on the relevant Welding Procedure Qualification test to achieve the required impact energy. | ||||||||||||||||||||||||||||
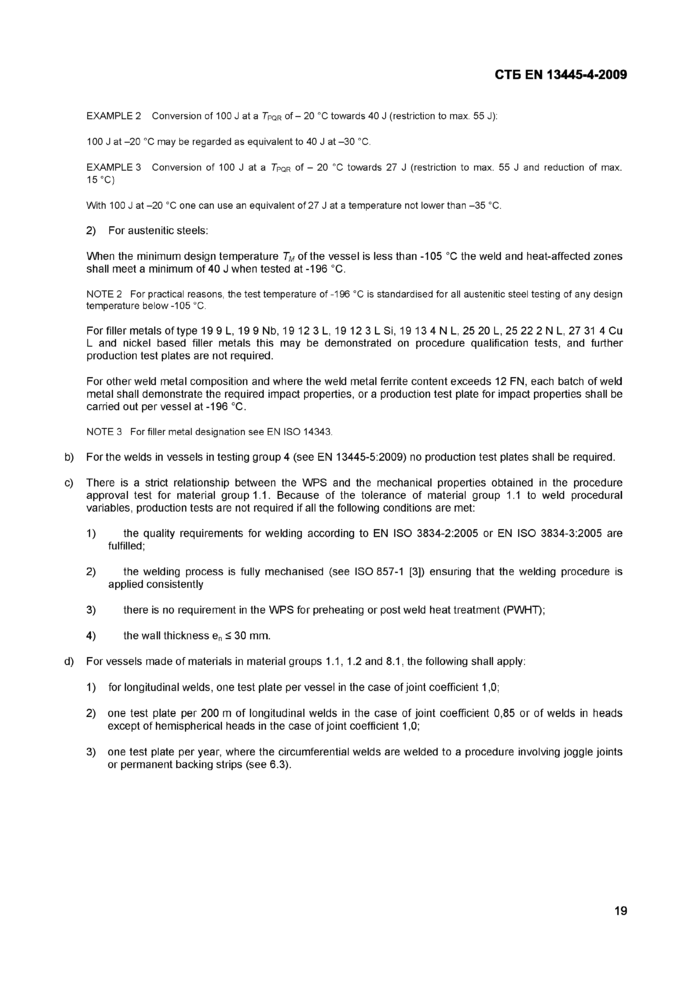
impact test temperature, it may be converted to a common temperature base on the basis of 1,5 J per °C. Such conversion shall be permitted only in the range of 18 J to 55 J of Charpy V impact energy. Values in excess of 55 J shall be taken as 55 J. The 1,5 J per °C relationship may also be utilised to determine the temperature adjustment when seeking to compare data at common impact energy levels, however, this may not exceed 15 °C reduction.
EXAMPLE 1 Conversion of 33 J at a rPQR of-20 °C towards 40 J:
33 J at -20 °C may be regarded as equivalent to 40 J at -15 °C.
18
СТБ EN 13445-4-20091 Scope
This document specifies requirements for the manufacture of unfired pressure vessels and their parts, made of steels, including their connections to non-pressure parts. It specifies requirements for material traceability, manufacturing tolerances, welding requirements, production tests, forming requirements, heat treatment, repairs and finishing operations.
2 Normative references
This Europe Standard incorporates by dated or undated reference, provisions from other publications. These normative references are cited at the appropriate places in the text and the publications are listed hereafter. For dated references, subsequent amendments to or revisions of any of these publications apply to this Europe Standard only when incorporated in it by amendment or revision. For undated references the latest edition of the publication referred to applies (including amendments).
EN 287-1:2004, EN 287-1:2004/A2:2006, Approval testing of welders — Fusion welding — Part 1: Steels.
EN 875:1995, Destructive tests on welds in metallic materials — Impact tests — Test specimen location, notch orientation and examination.
EN 876:1995, Destructive tests on welds in metallic materials — Longitudinal tensile test on weld metal in fusion welded joints.
EN 895:1995, Destructive tests on welds in metallic materials — Transverse tensile test.
EN 910:1996, Destructive tests on welds in metallic materials — Bend tests.
EN 1043-1:1995, Destructive tests on welds in metallic materials — Hardness testing — Part 1: Hardness test on arc welded joints.
EN 1321:1996, Destructive tests on welds in metallic materials — Macroscopic and microscopic examination of welds.
EN 1418:1997, Welding personnel — Approval testing of welding operators for fusion welding and resistance weld setters for fully mechanized and automatic welding of metallic materials.
EN 10028-2:2003, Flat products made of steels for pressure purposes — Part 2: Non-alloy and alloy steels with specified elevated temperature properties.
EN 10028-3:2003, Flat products made of steels for pressure purposes — Part 3: Weldable fine grain steels, normalized.
EN 10028-4:2003, Flat products made of steels for pressure purposes — Part 4: Nickel alloy steels with specified low temperature properties.
EN 10216-1:2002, EN 10216-1:2002/A1:2004, Seamless steel tubes for pressure purposes — Technical delivery conditions — Part 1: Non-alloy steel tubes with specified room temperature properties.
EN 10216-2:2002+A2:2007, Seamless steel tubes for pressure purposes — Technical delivery conditions — Part 2: Non-alloy and alloy steel tubes with specified elevated temperature properties.
1
СТБ EN 13445-4-2009
EN 10216-3:2002, EN 10216-3:2002/A1:2004, Seamless steel tubes for pressure purposes — Technical delivery conditions — Part 3: Alloy fine grain steel tubes.
EN 10216-4:2002, EN 10216-4:2002/A1:2004, Seamless steel tubes for pressure purposes — Technical delivery conditions — Part 4: Non-alloy and alloy steel tubes with specified low temperature properties.
EN 10217-1:2002, EN 10217-1:2002/A1:2005, Welded steel tubes for pressure purposes — Technical delivery conditions — Part 1: Non-alloy steel tubes with specified room temperature properties.
EN 10217-2:2002, EN 10217-2:2002/A1:2005, Welded steel tubes for pressure purposes — Technical delivery conditions — Part 2: Electric welded non-alloy and alloy steel tubes with specified elevated temperature properties.
EN 10217-3:2002, EN 10217-3:2002/A1:2005, Welded steel tubes for pressure purposes — Technical delivery conditions — Part 3: Alloy fine grain steel tubes.
EN 10217-4:2002, EN 10217-4:2002/A1:2005, Welded steel tubes for pressure purposes — Technical delivery conditions — Part 4: Electric welded non-alloy and alloy steel tubes with specified low temperature properties.
EN 10217-5:2002, EN 10217-5:2002/A1:2005, Welded steel tubes for pressure purposes — Technical delivery conditions — Part 5: Submerged arc welded non-alloy and alloy steel tubes with specified elevated temperature properties.
EN 10217-6:2002, EN 10217-6:2002/A1:2005, Welded steel tubes for pressure purposes — Technical delivery conditions — Part 6: Submerged arc welded non-alloy and alloy steel tubes with specified low temperature properties.
EN 10222-2:1999 Steel forgings for pressure purposes — Part 2: Ferritic and martensitic steels with specified elevated temperature properties.
EN 10222-3:1998 Steel forgings for pressure purposes — Part3: Nickel steels with specified low temperatures properties.
EN 10222-4:1998, EN 10222-4:1998/A1:2002, Steel forgings for pressure purposes — Part 4: Weldable fine grain steels with high proof strength.
EN 13445-1:2009, Unfired pressure vessels — Part 1: General.
EN 13445-2:2009, Unfired pressure vessels — Part 2: Materials.
EN 13445-3: 2009 Unfired pressure vessels — Part 3: Design.
EN 13445-5:2009, Unfired pressure vessels — Part 5: Inspection and testing.
EN ISO 3834-2:2005, Quality requirements for fusion welding of metallic materials — Part 2: Comprehensive quality requirements.
EN ISO 3834-3:2005, Quality requirements for fusion welding of metallic materials - Part 3: Standard quality requirements.
EN ISO 15609-1:2004, Specification and qualification of welding procedures for metallic materials — Welding procedure specification — Part 1: Arc welding (ISO 15609-1:2004).
EN ISO 15611:2003, Specification and qualification of welding procedures for metallic materials — Qualification based on previous welding experience (ISO 15611:2003).
2
СТБ EN 13445-4-2009
EN ISO 15612:2004, Specification and qualification of welding procedures for metallic materials — Qualification by adoption of a standard welding procedure (ISO 15612:2004).
EN ISO 15613:2004, Specification and qualification of welding procedures for metallic materials — Qualification based on pre-production welding test (ISO 15613:2004).
EN ISO 15614-1:2004, Specification and qualification of welding procedures for metallic materials — Welding procedure test — Part 1: Arc and gas welding of steels and arc welding of nickel and nickel alloys (ISO 15614-1:2004).
3 Requirements for manufacturing and subcontracting3.1 Manufacturing
The general responsibilities of the pressure vessel manufacturer are stated in EN 13445-1:2009. Additionally to those requirements, the manufacturer shall ensure that:
a) the organisation for the control of manufacturing operations which includes special processes such as welding, forming and heat treatment shall be clearly defined by the manufacturer;
b) the manufacturing procedures such as welding, forming and heat treatment are adequate for the purpose and the pressure vessel meets the requirements of this standard. Where specific requirements are associated with materials these shall be taken into account, e.g. EAMs;
c) the manufacturing equipment is adequate for fabrication;
a) the staff is adequate for the assigned tasks;
NOTE As far as welding co-ordination is concerned, the qualifications, tasks and responsibilities can be defined by the manufacturer in accordance with EN ISO 14731:2007 [1] in the job assignment.
e) the quality requirements for welding defined in EN ISO 3834-3:2005 are met as a minimum.
3.2 Subcontracting
The manufacturer may subcontract work, but shall ensure that the subcontractor carries out the work in accordance with the requirements of this European Standard. The manufacturer is responsible forthe adequate definition of the subcontracted task and the need for any associated records.
On all occasions that the subcontractor work includes
a) welding;
b) forming including associated heat treatment;
c) post weld heat treatment;
d) non-destructive testing of welds (see EN 13445-5:2009),
the manufacturer shall obtain a subcontractor form (see Annex B).
Where welding operations are subcontracted, the manufacturer shall also either obtain copies of the welding procedure and welding operator qualification records or take other action to ensure that they comply with this standard.
3СТБ EN 13445-4-2009
In discharging his responsibility to ensure that the subcontractor carries out the work in accordance with this standard the manufacturer shall ensure that surveillance of the subcontracted work is performed.
Where a manufacturer is producing equipment that requires the intervention of a responsible authority, the manufacturer should inform the responsible authority of his intention to subcontract so that the responsible authority has the opportunity to take part in the subcontractor surveillance.
NOTE 1 See also EN 764-3:2002, 2.11 [2] and CR 13445-7.
NOTE 2 When the manufacturer is producing equipment based on quality assurance, the controls a manufacturer applies over subcontractors should be described in his approved quality system.
4 Materials4.1 General
Materials for pressure vessels and the grouping of materials for pressure vessels shall be in accordance with EN 13445-2:2009.
The grouping applies regardless of product form, i.e. plate, forging, piping.
4.2 Material traceability
4.2.1 General
The vessel manufacturer shall have and maintain an identification system for materials used in fabrication, so thal all material subject to stress due to pressure and those welded thereto in the completed work can be traced to its origin. This includes the use of welding consumables.
4.2.2 Identification system
4.2.2.1 The vessel manufacturer's identification system shall assure that all materials to be used in the vesse have been subjected to and satisfactorily passed the following:
a) examination of material before fabrication for the purpose of detecting, as far as possible, imperfections which would affect the safety of the work;
b) check of material to determine that it has the required thickness;
c) check of the material to assure that the materials are permitted by this European Standard, fully traceable to the correct material certification and as specified in the design documentation;
d) check of the welding consumables to assure the correct markings and that correct conditions are maintained to prevent deterioration.
4.2.2.2 Material traceability to the original identification markings shall be by one or more of the following methods:
a) accurate transfer of the original identification markings to a location where the markings will be visible on the completed vessel;
b) identification by a coded marking traceable to the original required marking;
4СТБ EN 13445-4-2009
c) recording the identification markings using material lists or as built sketches which assure identification of each piece of material during fabrication and subsequent identification in the completed vessel;
d) the batch numbers of welding consumables shall be recorded.
4.2.3 Visibility
Materials which cannot be stamped or which will not be visible after the vessel is completed or for small multiple parts or non pressure parts the manufacturer may operate a documented system which ensures material trace-ability for all materials in the completed vessel.
4.2.4 Review of material certification and material identification
All material certification shall be reviewed upon receipt. The review shall cover the completeness and adequacy of the reports against the following:
a) mechanical and chemical properties required to be reported by the material specification;
b) assuring that the reported results meet the requirements of the specification;
c) all markings required by the material specification are satisfied and that there is traceability between the actual markings and those recorded on the material certification.
All materials certification shall be made readily available throughout manufacture.
4.2.5 Transfer of markings
In case the original identification markings are unavoidably cut out or the material is divided into two or more pieces the markings shall be accurately transferred by the manufacturer's nominated personnel prior to cutting.
The actual material marking shall be by methods which are not harmful to the material in subsequent use/operation.
The transfer of markings shall take place before partitioning of the product and after verification of the marks present with the corresponding certification.
5 Manufacturing tolerances5.1 Surface geometry of welds
The surface geometry of welded butt and fillet joints shall meet the requirements of EN 13445-5:2009 unless the drawing specifies more stringent requirements.
5.2 Middle line alignment
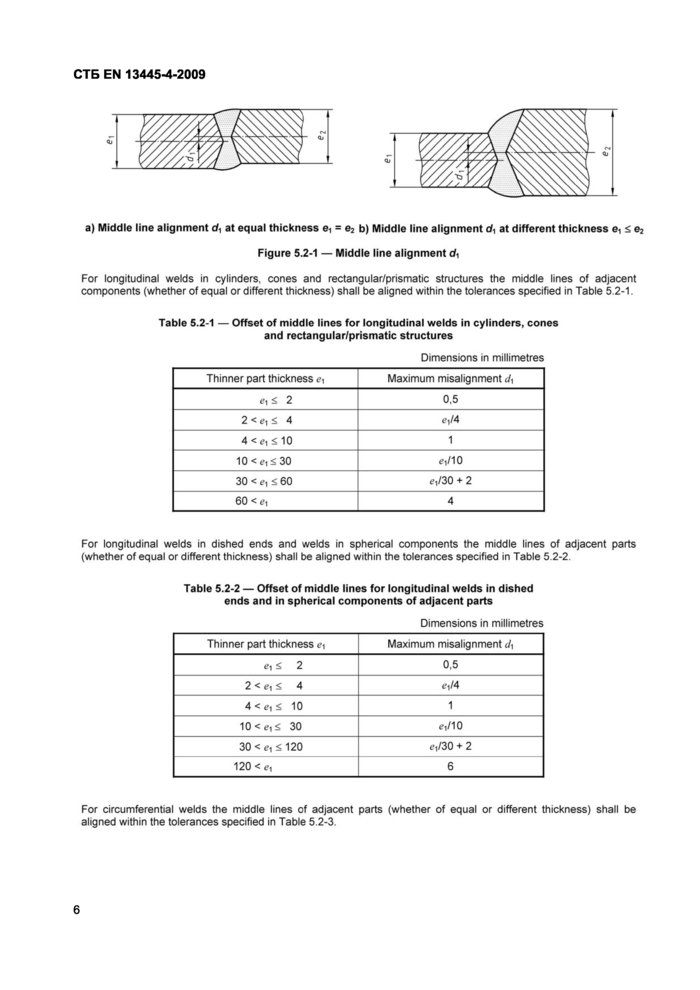
The misalignment tolerances of middle lines shall be as specified in Tables 5.2-1,5.2-2, 5.2-3 and Figure 5.2-1.
5СТБ EN 13445-4-2009
a) Middle line alignment d, at equal thickness ei = e2 b) Middle line alignment d, at different thickness ei < e2
Figure 5.2-1 — Middle line alignment d\
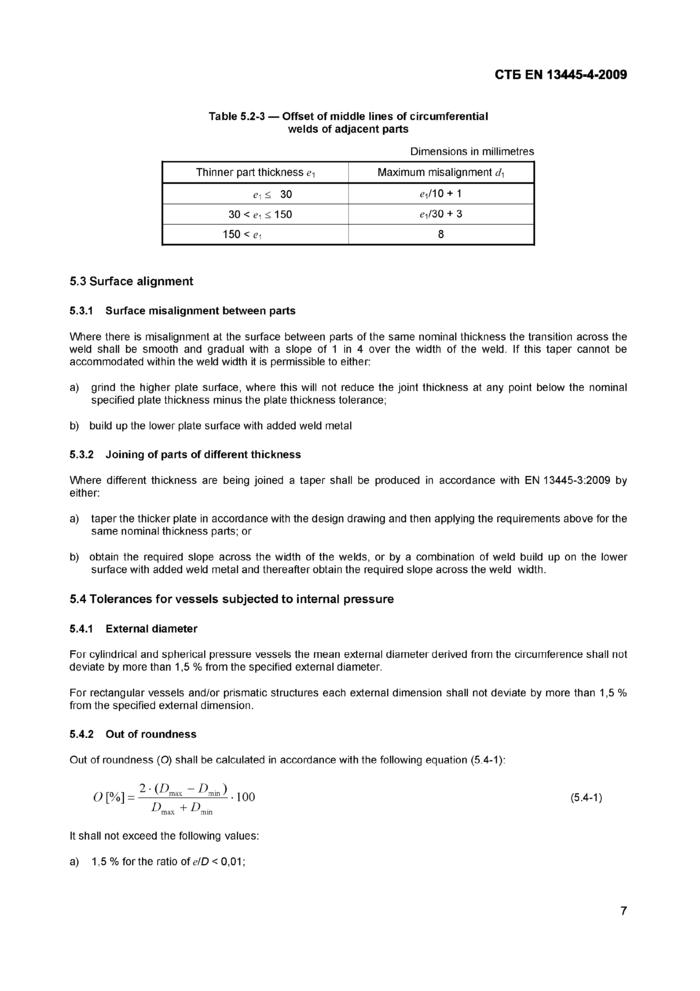
For longitudinal welds in cylinders, cones and rectangular/prismatic structures the middle lines of adjacent components (whether of equal or different thickness) shall be aligned within the tolerances specified in Table 5.2-1.
Dimensions in millimetres
|
Table 5.2-1 — Offset of middle lines for longitudinal welds in cylinders, cones and rectangular/prismatic structures | ||||||||||||||
|
For longitudinal welds in dished ends and welds in spherical components the middle lines of adjacent parts (whether of equal or different thickness) shall be aligned within the tolerances specified in Table 5.2-2.
|
Table 5.2-2 — Offset of middle lines for longitudinal welds in dished ends and in spherical components of adjacent parts Dimensions in millimetres | ||||||||||||||
|
For circumferential welds the middle lines of adjacent parts (whether of equal or different thickness) shall be aligned within the tolerances specified in Table 5.2-3.
6
СТБ EN 13445-4-2009
Dimensions in millimetres
|
Table 5.2-3 — Offset of middle lines of circumferential welds of adjacent parts | ||||||||
|
5.3 Surface alignment
5.3.1 Surface misalignment between parts
Where there is misalignment at the surface between parts of the same nominal thickness the transition across the weld shall be smooth and gradual with a slope of 1 in 4 over the width of the weld. If this taper cannot be accommodated within the weld width it is permissible to either:
a) grind the higher plate surface, where this will not reduce the joint thickness at any point below the nominal specified plate thickness minus the plate thickness tolerance;
b) build up the lower plate surface with added weld metal
5.3.2 Joining of parts of different thickness
Where different thickness are being joined a taper shall be produced in accordance with EN 13445-3:2009 by either:
a) taper the thicker plate in accordance with the design drawing and then applying the requirements above for the same nominal thickness parts; or
b) obtain the required slope across the width of the welds, or by a combination of weld build up on the lower surface with added weld metal and thereafter obtain the required slope across the weld width.
5.4 Tolerances for vessels subjected to internal pressure
5.4.1 External diameter
For cylindrical and spherical pressure vessels the mean external diameter derived from the circumference shall not deviate by more than 1,5 % from the specified external diameter.
For rectangular vessels and/or prismatic structures each external dimension shall not deviate by more than 1,5 % from the specified external dimension.
5.4.2 Out of roundness
Out of roundness (O) shall be calculated In accordance with the following equation (5.4-1):
6>[%]= 2,(X>ma* ~ ,)"m ) ■ 100 (5.4-1)
^max ^ ^ ri in
It shall not exceed the following values: a) 1,5 % for the ratio of e/D < 0,01;