Нд 2-020101-109-r-e для НД 2-020101-109-R-E
Рекомендации МАКО
Купить НД 2-020101-109-R-E — бумажный документ с голограммой и синими печатями. подробнее
Цена на этот документ пока неизвестна. Нажмите кнопку "Купить" и сделайте заказ, и мы пришлем вам цену.
Распространяем нормативную документацию с 1999 года. Пробиваем чеки, платим налоги, принимаем к оплате все законные формы платежей без дополнительных процентов. Наши клиенты защищены Законом. ООО "ЦНТИ Нормоконтроль"
Наши цены ниже, чем в других местах, потому что мы работаем напрямую с поставщиками документов.
Способы доставки
- Срочная курьерская доставка (1-3 дня)
- Курьерская доставка (7 дней)
- Самовывоз из московского офиса
- Почта РФ
Приложение к правилам и руководствам Российского морского регистра судоходства содержит обязательные для применения процедурные требования и унифицированные интерпретации Международной ассоциации классификационных обществ (МАКО), а также рекомендации МАКО, ссылки на которые имеются в правилах и других нормативных документах Регистра.
Оглавление
Процедурные требования МАКО
Унифицированные интерпретации МАКО
Рекомендации МАКО
| Дата введения | 01.01.2018 |
|---|---|
| Добавлен в базу | 01.01.2019 |
| Завершение срока действия | 03.06.2019 |
| Актуализация | 01.01.2021 |
| Дополняет: | НД 2-020101-109-R-E |
Этот документ находится в:
- Раздел Экология
Организации:
| Разработан | Российский морской регистр судоходства | |
| Утвержден | Российский морской регистр судоходства |
IACS recommendations
Чтобы бесплатно скачать этот документ в формате PDF, поддержите наш сайт и нажмите кнопку:
стр. 1
стр. 2
стр. 3
стр. 4
стр. 5

стр. 6
стр. 7
стр. 8
стр. 9
стр. 10
стр. 11
стр. 12
стр. 13
стр. 14
стр. 15
стр. 16

стр. 17
стр. 18
стр. 19
стр. 20
стр. 21
стр. 22
стр. 23
стр. 24
стр. 25
стр. 26
стр. 27
стр. 28
стр. 29
стр. 30
РОССИЙСКИЙ МОРСКОЙ РЕГИСТР СУДОХОДСТВА ROSSIAN MARITIME REGISTER OF SHIPPING
ПРИЛОЖЕНИЕ К ПРАВИЛАМ И РУКОВОДСТВАМ РОССИЙСКОГО МОРСКОГО РЕГИСТРА СУДОХОДСТВА
ПРОЦЕДУРНЫЕ ТРЕБОВАНИЯ, УНИФИЦИРОВАННЫЕ ИНТЕРПРЕТАЦИИ И РЕКОМЕНДАЦИИ МЕЖДУНАРОДНОЙ АССОЦИАЦИИ КЛАССИФИКАЦИОННЫХ ОБЩЕСТВ
SUPPLEMENT ТО RULES AND GUIDELINES OF RUSSIAN MARITIME REGISTER OF SHIPPING
I ACS PROCEDURAL REQUIREMENTS, UNIFIED INTERPRETATIONS AND RECOMMENDATIONS
НД № 2-020101-109-R-E
2018
Настоящее Приложение к правилам и руководствам Российского морского регистра судоходства содержит обязательные для применения процедурные требования и унифицированные интерпретации Международной ассоциации классификационных обществ (МАКО), а также рекомендации МАКО, ссылки на которые имеются в правилах и других нормативных документах Регистра.
Все материалы публикуются на английском языке.
Данный документ публикуется в электронном виде отдельным изданием и является обязательным Приложением к правилам Регистра.
The present Supplement to rules and guidelines of Russian Maritime Register of Shipping contains IACS Procedural Requirements and IACS Unified Interpretations compulsory for implementation, and IACS recommendations, which are referred to in the rules and other normative documents of the Register.
All materials are published in English.
The present document is published in electronic format as a separate edition and is a compulsory Supplement to the Register rules.
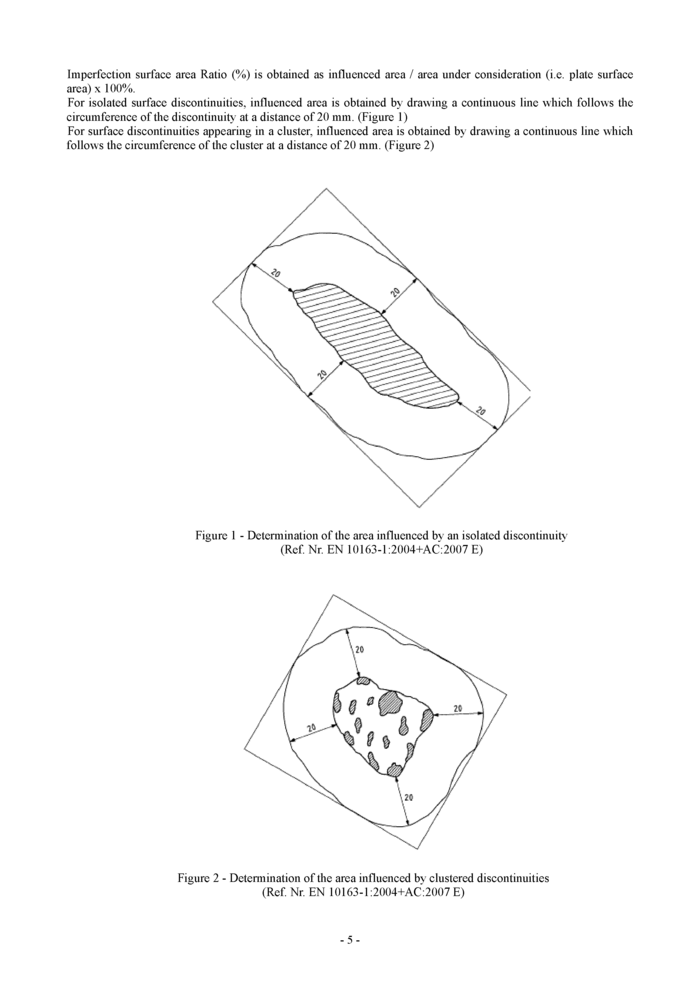
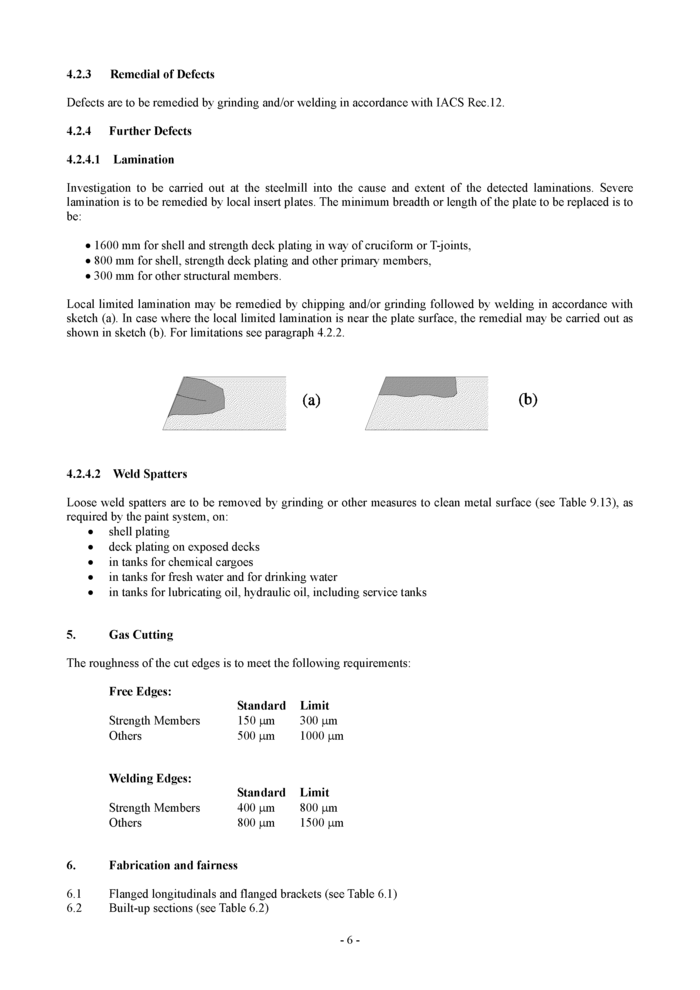
Imperfection surface area Ratio (%) is obtained as influenced area / area under consideration (i.e. plate surface area) x 100%.
For isolated surface discontinuities, influenced area is obtained by drawing a continuous line which follows the circumference of the discontinuity at a distance of 20 mm. (Figure 1)
For surface discontinuities appearing in a cluster, influenced area is obtained by drawing a continuous line which follows the circumference of the cluster at a distance of 20 mm. (Figure 2)
|
Figure 1 - Determination of the area influenced by an isolated discontinuity (Ref. Nr. EN 10163-1:2004+AC:2007 E) |
|
Figure 2 - Determination of the area influenced by clustered discontinuities (Ref. Nr. EN 10163-1:2004+AC:2007 E) |
4.2.3 Remedial of Defects
Defects are to be remedied by grinding and/or welding in accordance with IACS Rec.12.
4.2.4 Further Defects4.2.4.1 Lamination
Investigation to be carried out at the steelmill into the cause and extent of the detected laminations. Severe lamination is to be remedied by local insert plates. The minimum breadth or length of the plate to be replaced is to be:
• 1600 mm for shell and strength deck plating in way of cruciform or T-joints,
• 800 mm for shell, strength deck plating and other primary members,
• 300 mm for other structural members.
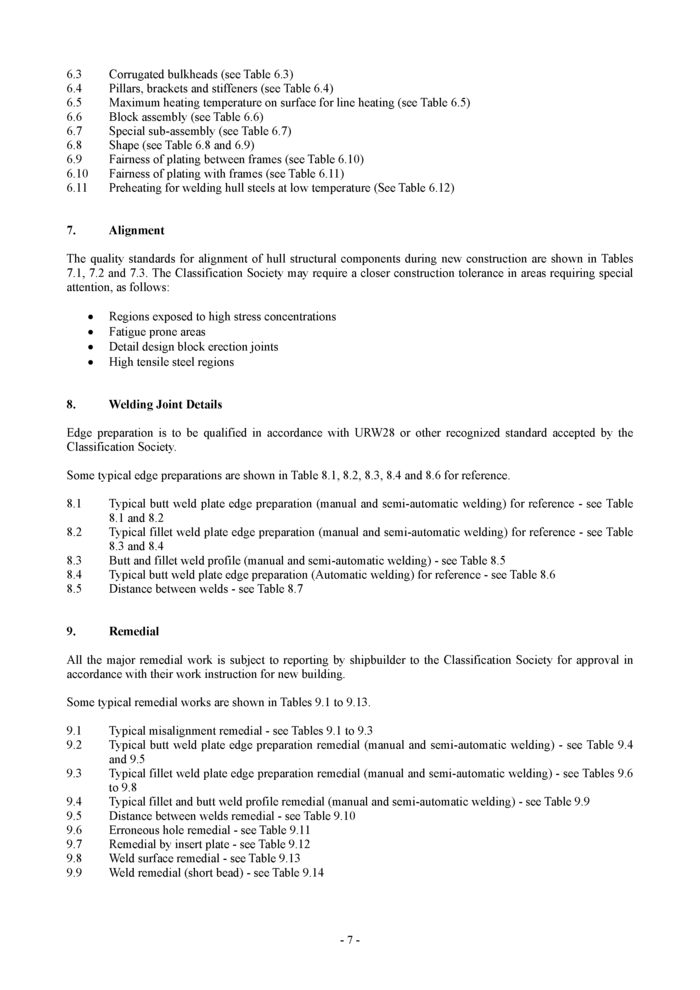
Local limited lamination may be remedied by chipping and/or grinding followed by welding in accordance with sketch (a). In case where the local limited lamination is near the plate surface, the remedial may be carried out as shown in sketch (b). For limitations see paragraph 4.2.2.
(b)
4.2.4.2 Weld Spatters
Loose weld spatters are to be removed by grinding or other measures to clean metal surface (see Table 9.13), as required by the paint system, on:
• shell plating
• deck plating on exposed decks
• in tanks for chemical cargoes
• in tanks for fresh water and for drinking water
• in tanks for lubricating oil, hydraulic oil, including service tanks
5. Gas Cutting
The roughness of the cut edges is to meet the following requirements:
Free Edges:
Standard Limit
Strength Members 150 pm 300 pm
Others 500 pm 1000 pm
Welding Edges:
Strength Members Others
Standard Limit
400 pm 800 pm
800 pm 1500 pm
6. Fabrication and fairness
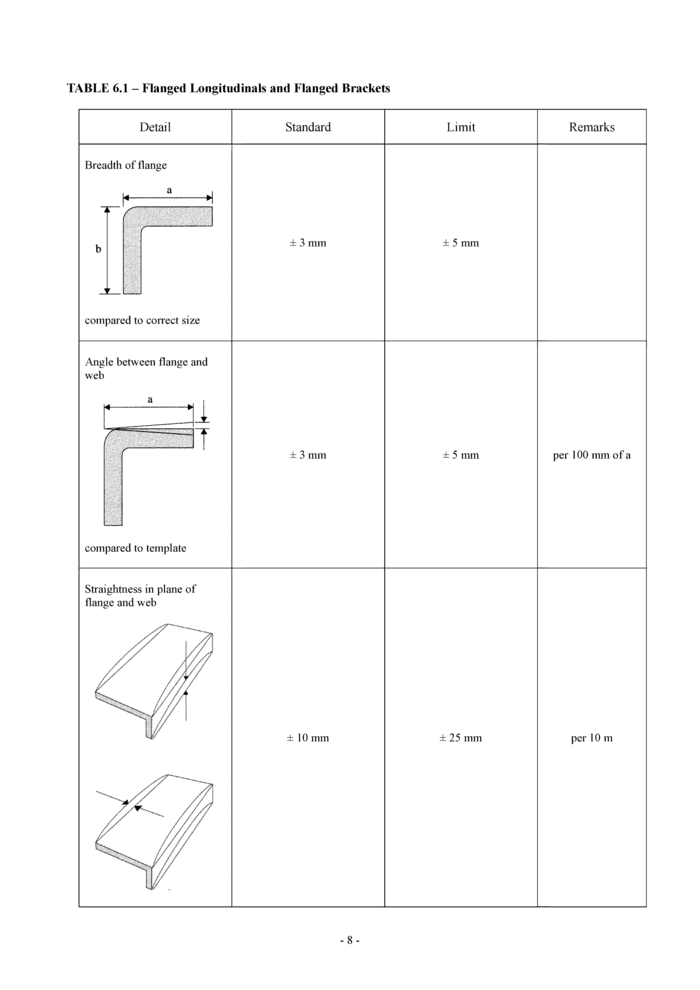
6.1 Flanged longitudinals and flanged brackets (see Table 6.1)
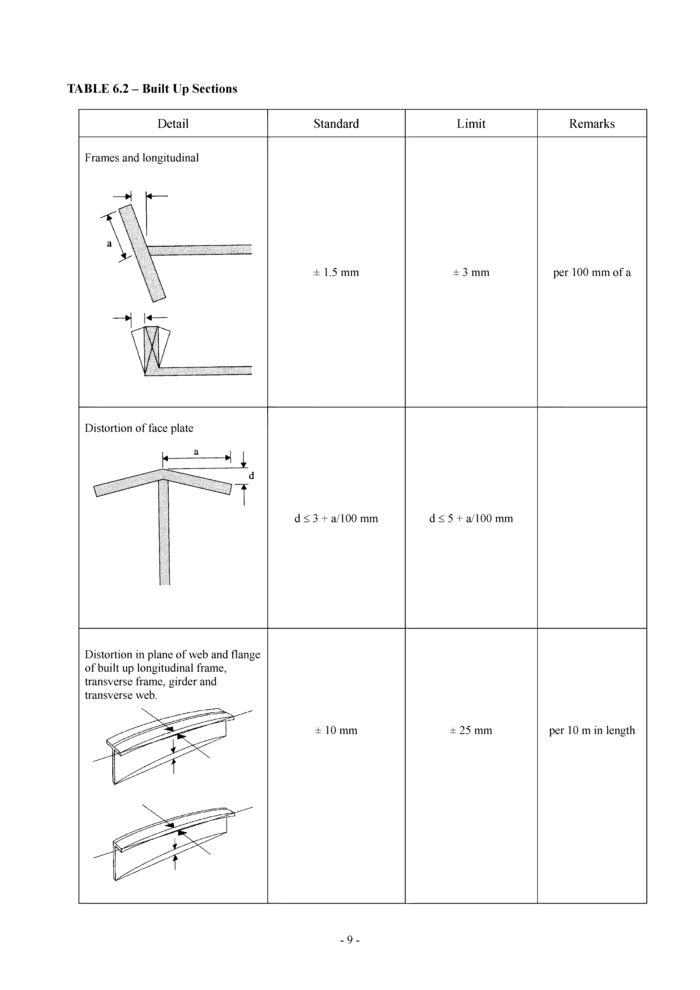
6.2 Built-up sections (see Table 6.2)
-6-
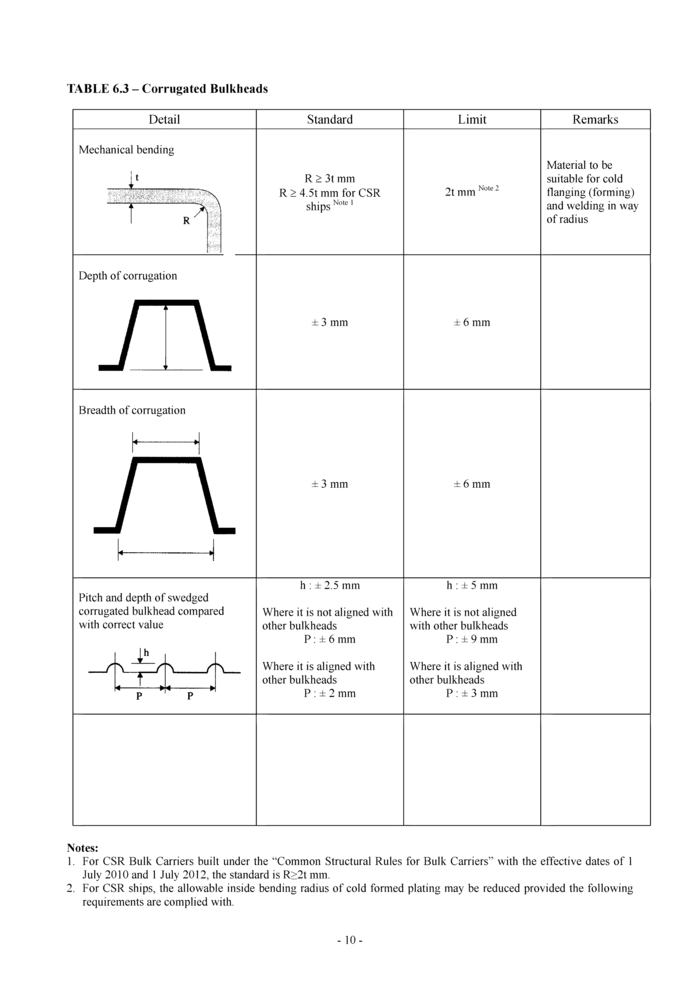
6.3 Corrugated bulkheads (see Table 6.3)
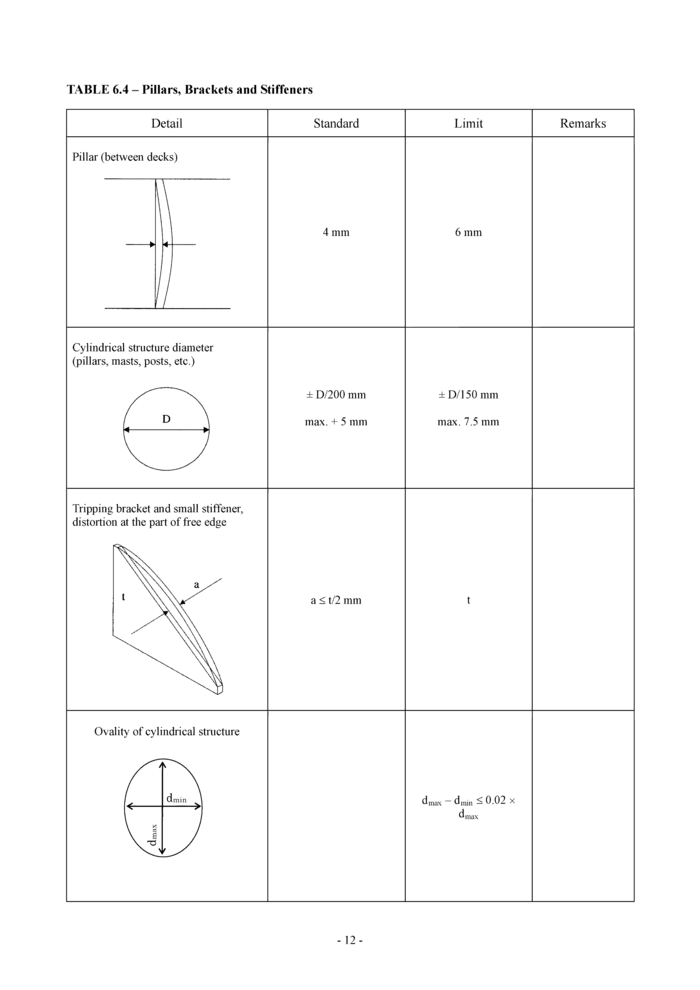
6.4 Pillars, brackets and stiffeners (see Table 6.4)
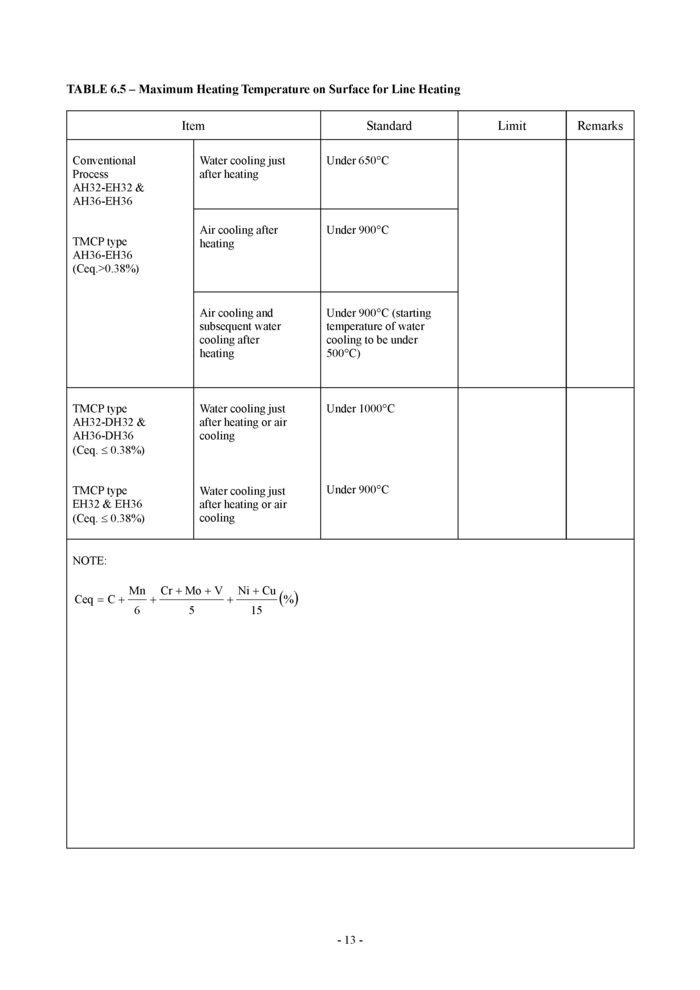
6.5 Maximum heating temperature on surface for line heating (see Table 6.5)
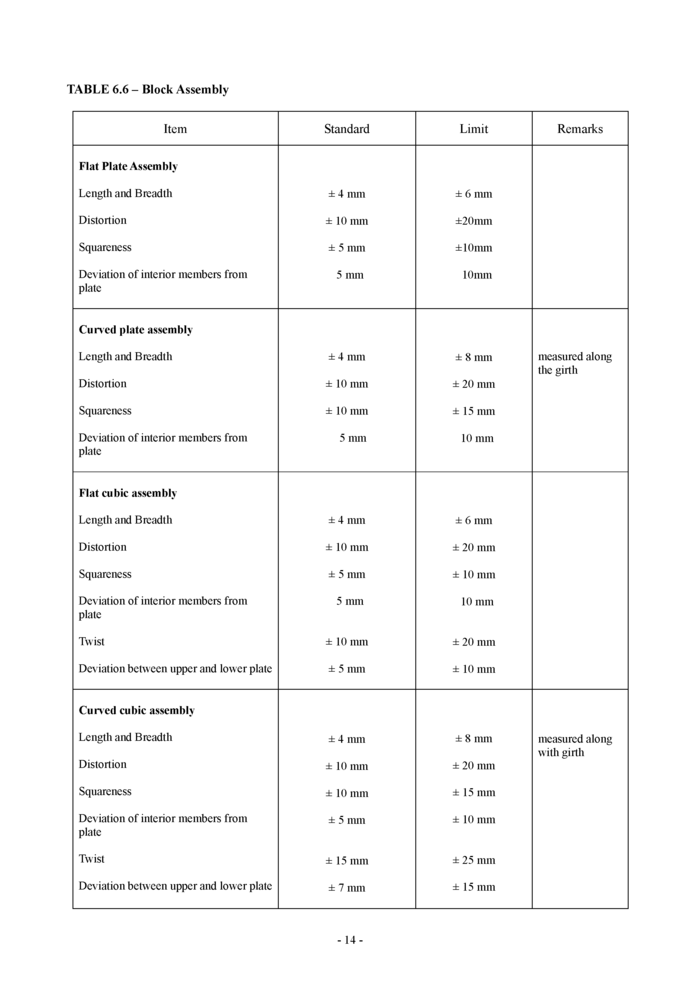
6.6 Block assembly (see Table 6.6)
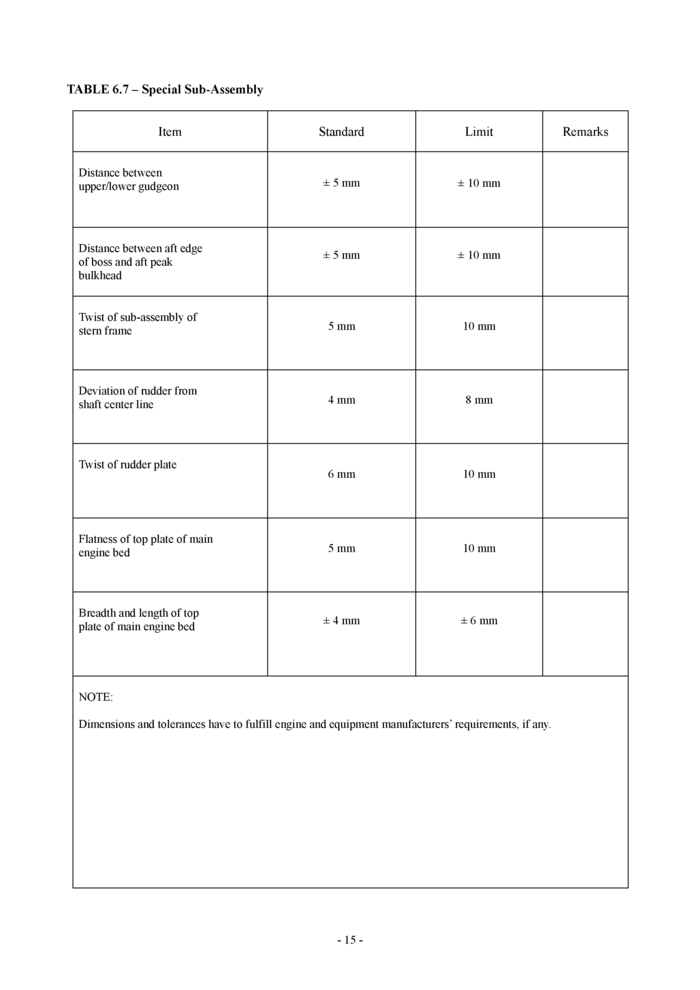
6.7 Special sub-assembly (see Table 6.7)
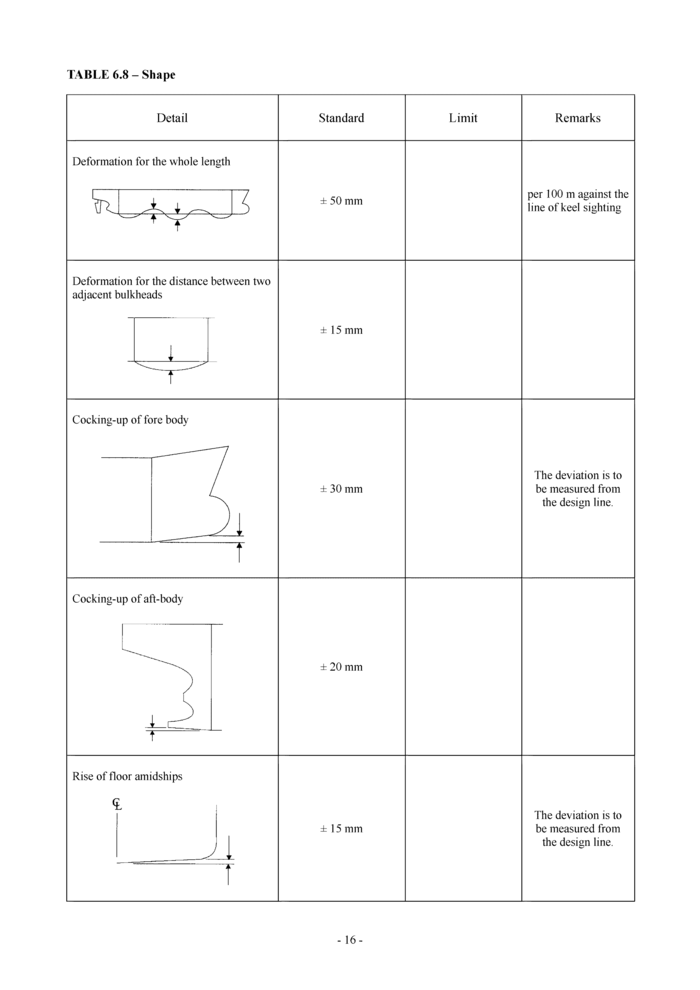
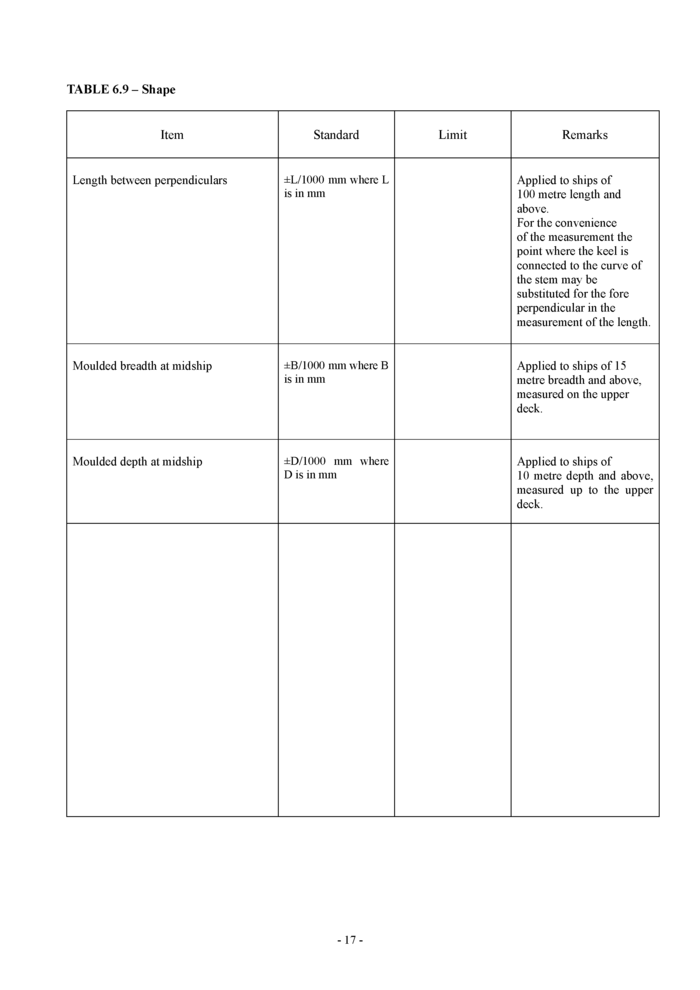
6.8 Shape (see Table 6.8 and 6.9)
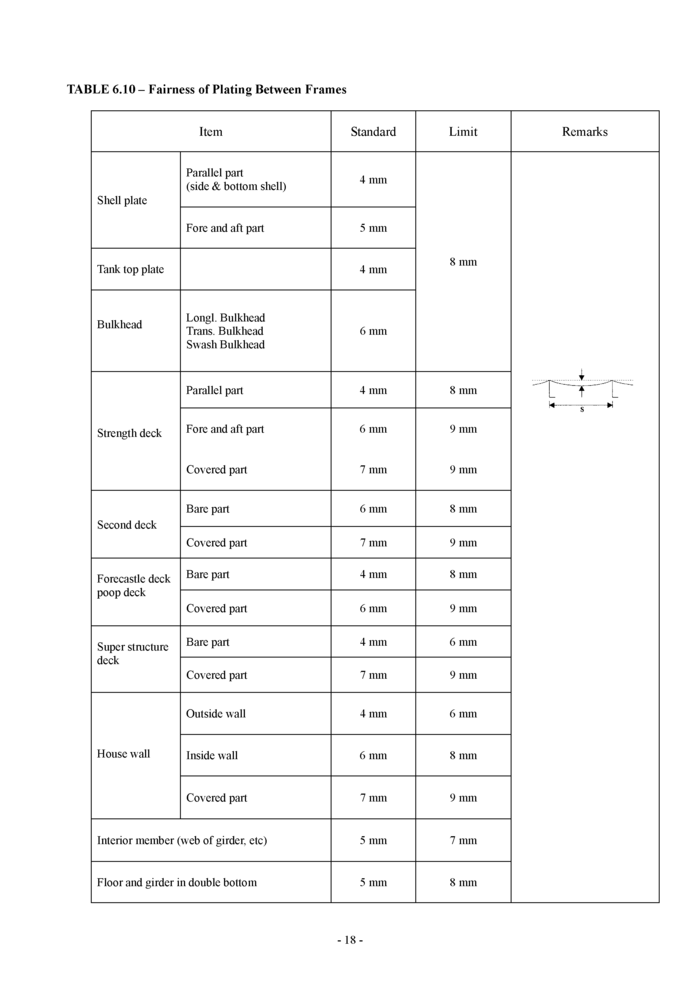
6.9 Fairness of plating between frames (see Table 6.10)
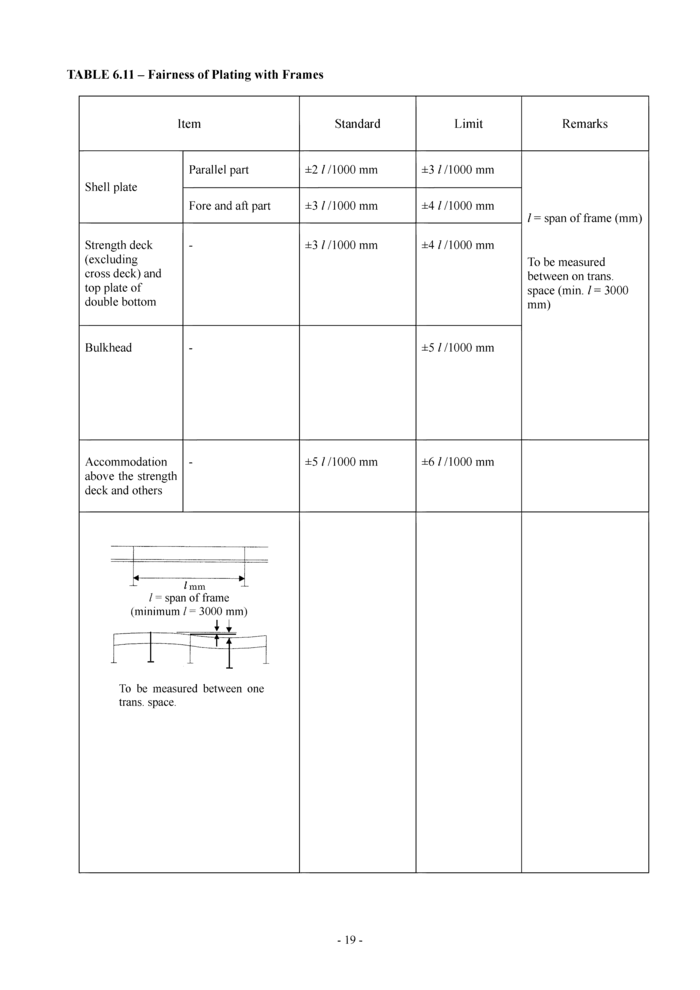
6.10 Fairness of plating with frames (see Table 6.11)
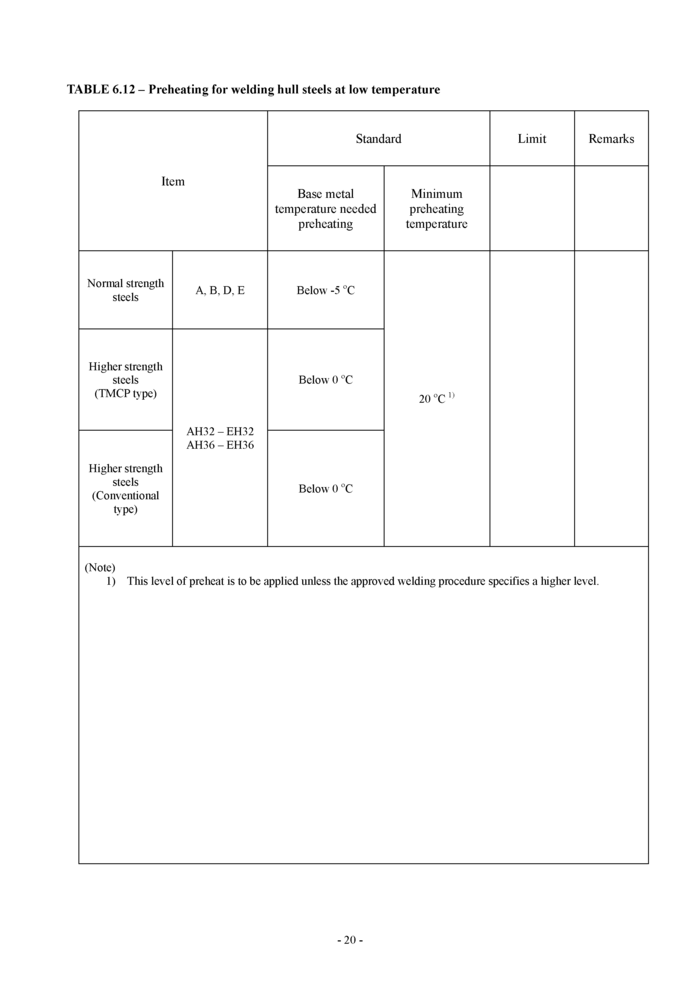
6.11 Preheating for welding hull steels at low temperature (See Table 6.12)
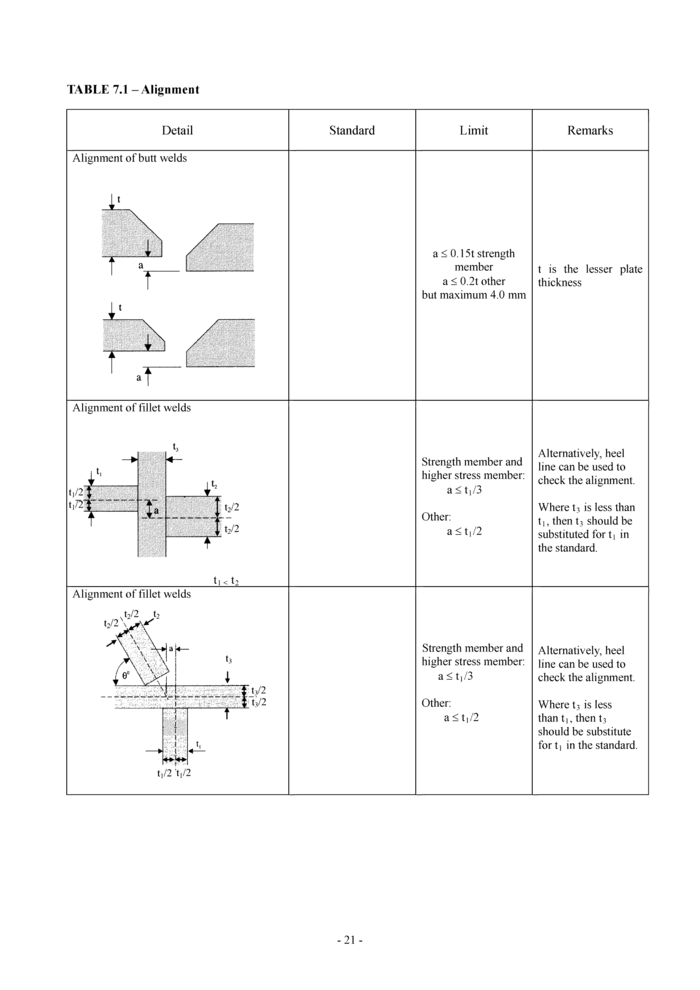
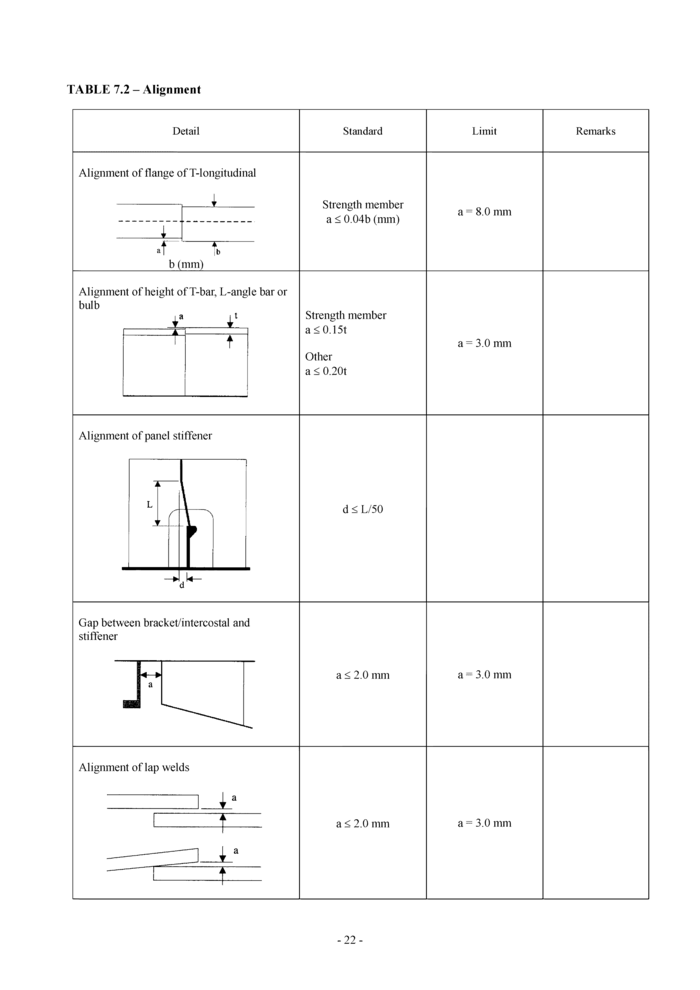
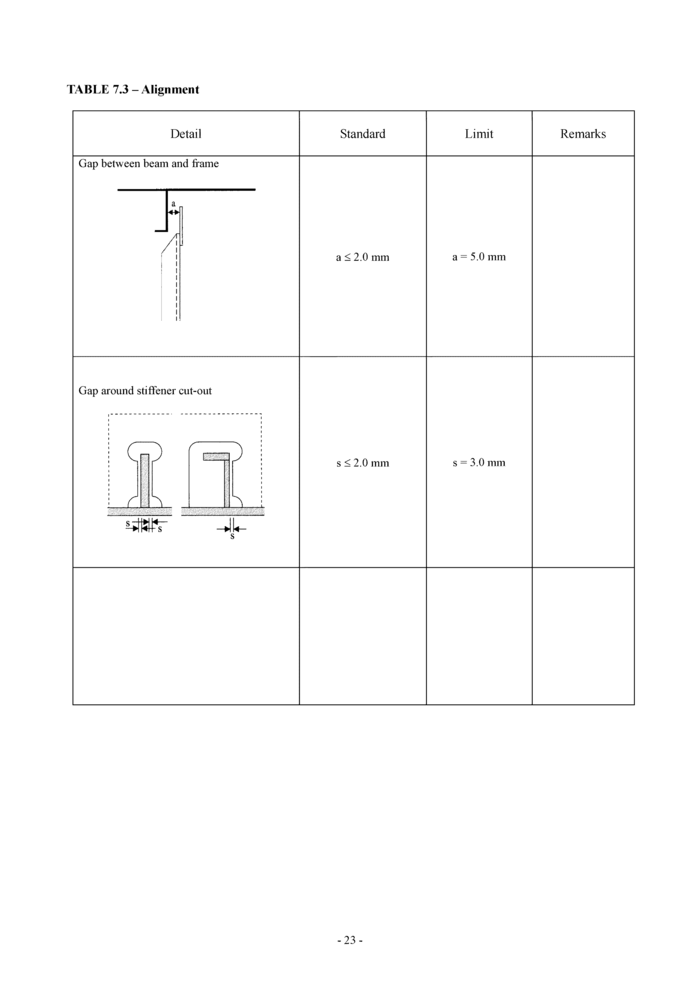
7. Alignment
The quality standards for alignment of hull structural components during new construction are shown in Tables 7.1, 7.2 and 7.3. The Classification Society may require a closer construction tolerance in areas requiring special attention, as follows:
• Regions exposed to high stress concentrations
• Fatigue prone areas
• Detail design block erection joints
• High tensile steel regions
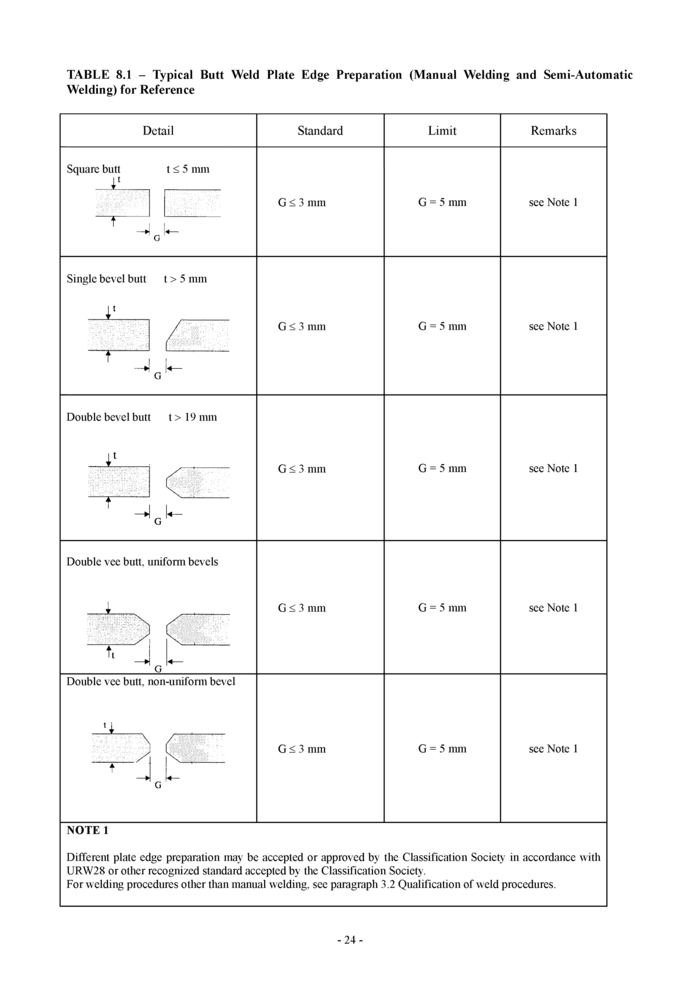
8. Welding Joint Details
Edge preparation is to be qualified in accordance with URW28 or other recognized standard accepted by the Classification Society.
Some typical edge preparations are shown in Table 8.1, 8.2, 8.3, 8.4 and 8.6 for reference.
8.1 Typical butt weld plate edge preparation (manual and semi-automatic welding) for reference - see Table
8.1 and 8.2
8.2 Typical fillet weld plate edge preparation (manual and semi-automatic welding) for reference - see Table
8.3 and 8.4
8.3 Butt and fillet weld profile (manual and semi-automatic welding) - see Table 8.5
8.4 Typical butt weld plate edge preparation (Automatic welding) for reference - see Table 8.6
8.5 Distance between welds - see Table 8.7
9. Remedial
All the major remedial work is subject to reporting by shipbuilder to the Classification Society for approval in accordance with their work instruction for new building.
Some typical remedial works are shown in Tables 9.1 to 9.13.
9.1 Typical misalignment remedial - see Tables 9.1 to 9.3
9.2 Typical butt weld plate edge preparation remedial (manual and semi-automatic welding) - see Table 9.4 and 9.5
9.3 Typical fillet weld plate edge preparation remedial (manual and semi-automatic welding) - see Tables 9.6 to 9.8
9.4 Typical fillet and butt weld profile remedial (manual and semi-automatic welding) - see Table 9.9
9.5 Distance between welds remedial - see Table 9.10
9.6 Erroneous hole remedial - see Table 9.11
9.7 Remedial by insert plate - see Table 9.12
9.8 Weld surface remedial - see Table 9.13
9.9 Weld remedial (short bead) - see Table 9.14
Detail
Standard
Limit
Remarks
Breadth of flange
|
> |
compared to correct size
Angle between flange and web
i
compared to template
Straightness in plane of flange and web
± 3 mm
± 5 mm
± 3 mm
± 5 mm
± 25 mm
per 100 mm of a
per 10 in
Detail
Standard
Limit
Remarks
Frames and longitudinal
|
Distortion of face plate |
d < 3 + a/100 mm
± 3 mm
per 100 mm of a
d < 5 + a/100 mm
Distortion in plane of web and flange of built up longitudinal frame, transverse frame, girder and transverse web.
± 10 mm
± 25 mm
per 10 m in length
|
TABLE 6.3 - Corrugated Bulkheads | ||||||||||||||||||||||||||||||||||||||||||
| ||||||||||||||||||||||||||||||||||||||||||
Notes:
1. For CSR Bulk Carriers built under the “Common Structural Rules for Bulk Carriers” with the effective dates of 1 July 2010 and 1 July 2012, the standard is R>2t mm.
2. For CSR ships, the allowable inside bending radius of cold formed plating may be reduced provided the following requirements are complied with.
- 10-
When the inside bending radius is reduced below 4.5 times the as-built plate thickness, supporting data is to be provided. The bending radius is in no case to be less than 2 times the as-built plate thickness. As a minimum, the following additional requirements are to be complied with: a) For all bent plates:
• 100% visual inspection of the bent area is to be carried out.
• Random checks by magnetic particle testing are to be carried out.
b) In addition to a), for corrugated bulkheads subject to lateral liquid pressure:
• The steel is to be of Grade D/DH or higher.
The material is impact tested in the strain-aged condition and satisfies the requirements stated herein. The deformation is to be equal to the maximum deformation to be applied during production, calculated by the formula tas.buat 1(2rbdg + tas-ъиад, where tas.buiU is the as-built thickness of the plate material and rbdg is the bending radius. One sample is to be plastically strained at the calculated deformation or 5%, whichever is greater and then artificially aged at 250°C for one hour then subject to Charpy V-notch testing. The average impact energy after strain ageing is to meet the impact requirements specified for the grade of steel used.
-11 -
| |||||||||||||||||||||||||||||||||||
|
- 12- | |||||||||||||||||||||||||||||||||||
|
Item |
Standard |
Limit |
Remarks | |
|
Conventional |
Water cooling just |
Under 650°C | ||
|
Process |
after heating | |||
|
AH32-EH32 & | ||||
|
AH36-EH36 | ||||
|
Air cooling after |
Under 900°C | |||
|
TMCP type |
heating | |||
|
AH36-EH36 | ||||
|
(Ceq>0.38%) | ||||
|
Air cooling and |
Under 900°C (starting | |||
|
subsequent water |
temperature of water | |||
|
cooling after |
cooling to be under | |||
|
heating |
500°C) | |||
|
TMCP type |
Water cooling just |
Under 1000°C | ||
|
AH32-DH32 & |
after heating or air | |||
|
AH36-DH36 |
cooling | |||
|
(Ceq. < 0.38%) | ||||
|
TMCP type |
Water cooling just |
Under 900°C | ||
|
EH32 & EH36 |
after heating or air | |||
|
(Ceq. < 0.38%) |
cooling | |||
|
NOTE: | ||||
|
Mn Cr + Mo + V Ni + Си , ч | ||||
|
Ceq = C +-+- |
-+-(% | |||
|
6 5 |
15 | |||
-13 -
|
TABLE 6.6 - Block Assembly | ||||||||||||||||||||||||||||||||||||||||||||||||||||||||||||||||||||||||||||||||||||||||||||||||||||
|
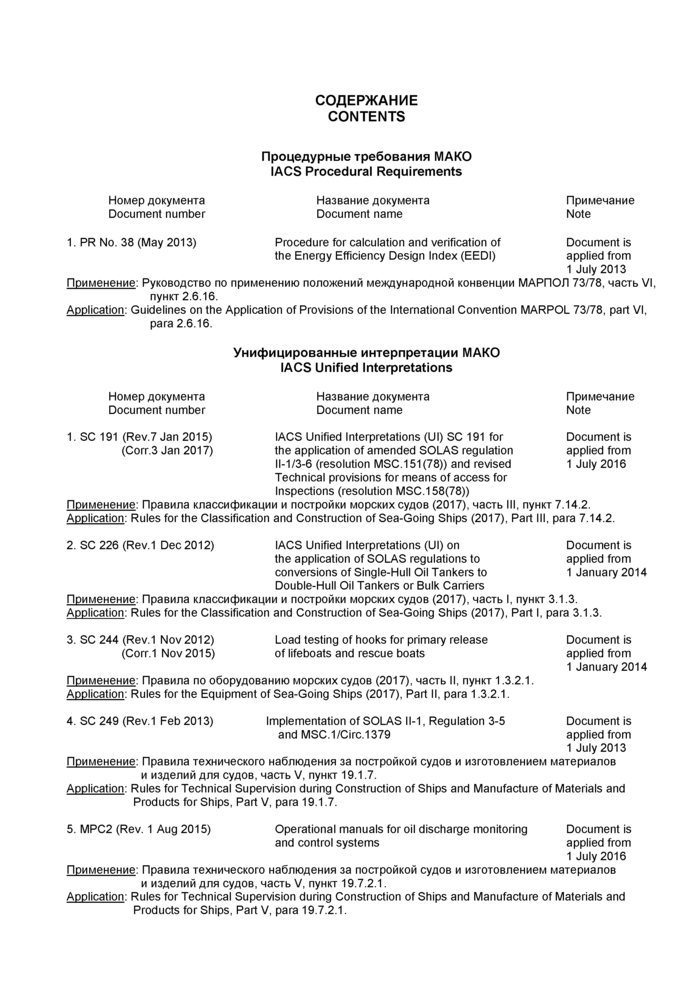
Номер документа Document number
СОДЕРЖАНИЕCONTENTS
Процедурные требования МАКО IACS Procedural Requirements
Название документа Document name
Примечание
Note
1. PR No. 38 (May 2013) Procedure for calculation and verification of Document is
the Energy Efficiency Design Index (EEDI) applied from
1 July 2013
Применение: Руководство по применению положений международной конвенции МАРПОЛ 73/78, часть VI, пункт 2.6.16.
Application: Guidelines on the Application of Provisions of the International Convention MARPOL 73/78, part VI, para 2.6.16.
Унифицированные интерпретации МАКО IACS Unified Interpretations
Номер документа Название документа Примечание
Document number Document name Note
1. SC 191 (Rev.7 Jan 2015) IACS Unified Interpretations (Ul) SC 191 for Document is
(Corr.3 Jan 2017) the application of amended SOLAS regulation applied from
11-1/3-6 (resolution MSC.151(78)) and revised 1 July 2016
Technical provisions for means of access for Inspections (resolution MSC.158(78))
Применение: Правила классификации и постройки морских судов (2017), часть III, пункт 7.14.2. Application: Rules for the Classification and Construction of Sea-Going Ships (2017), Part III, para 7.14.2.
2. SC 226 (Rev.1 Dec 2012) IACS Unified Interpretations (Ul) on Document is
the application of SOLAS regulations to applied from
conversions of Single-Hull Oil Tankers to 1 January 2014
Double-Hull Oil Tankers or Bulk Carriers Применение: Правила классификации и постройки морских судов (2017), часть I, пункт 3.1.3.
Application: Rules for the Classification and Construction of Sea-Going Ships (2017), Part I, para 3.1.3.
3. SC 244 (Rev.1 Nov 2012) Load testing of hooks for primary release Document is
(Corr.1 Nov 2015) of lifeboats and rescue boats applied from
1 January 2014
Применение: Правила по оборудованию морских судов (2017), часть II, пункт 1.3.2.1.
Application: Rules for the Equipment of Sea-Going Ships (2017), Part II, para 1.3.2.1.
4. SC 249 (Rev.1 Feb 2013) Implementation of SOLAS 11-1, Regulation 3-5 Document is
and MSC.1/Circ.1379 applied from
1 July 2013
Применение: Правила технического наблюдения за постройкой судов и изготовлением материалов и изделий для судов, часть V, пункт 19.1.7.
Application: Rules for Technical Supervision during Construction of Ships and Manufacture of Materials and Products for Ships, PartV, para 19.1.7.
5. MPC2 (Rev. 1 Aug 2015) Operational manuals for oil discharge monitoring Document is
and control systems applied from
1 July 2016
Применение: Правила технического наблюдения за постройкой судов и изготовлением материалов и изделий для судов, часть V, пункт 19.7.2.1.
Application: Rules for Technical Supervision during Construction of Ships and Manufacture of Materials and Products for Ships, PartV, para 19.7.2.1.
|
TABLE 6.7 - Special Sub-Assembly | ||||||||||||||||||||||||||||||||||||||||
| ||||||||||||||||||||||||||||||||||||||||
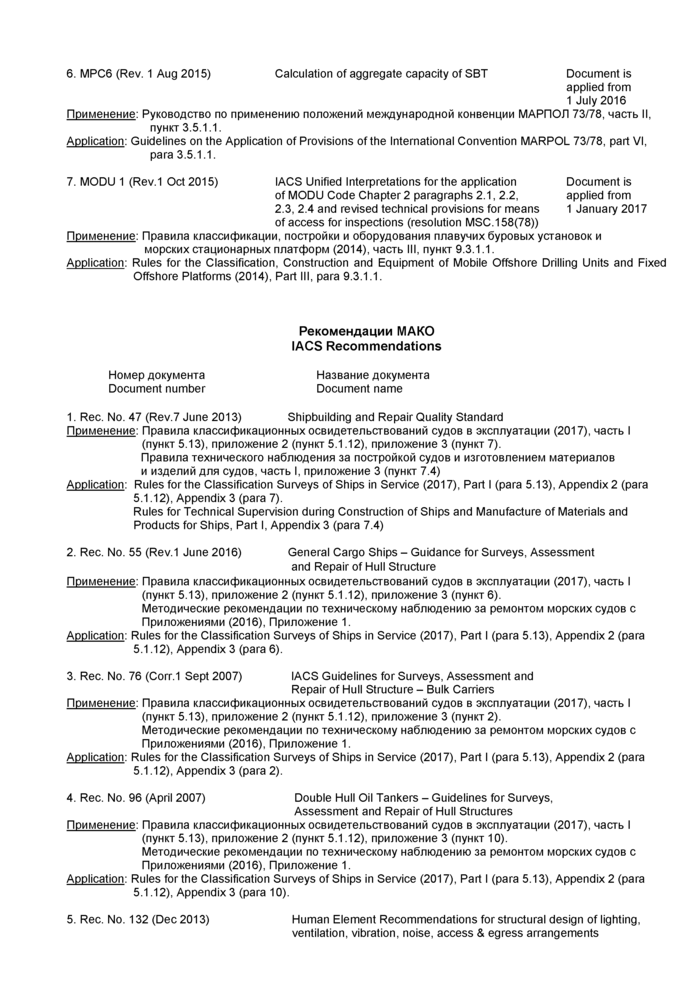
6. MPC6 (Rev. 1 Aug 2015) Calculation of aggregate capacity of SBT Document is
applied from 1 July 2016
Применение: Руководство по применению положений международной конвенции МАРПОЛ 73/78, часть II, пункт 3.5.1.1.
Application: Guidelines on the Application of Provisions of the International Convention MARPOL 73/78, part VI, para 3.5.1.1.
7. MODU 1 (Rev.1 Oct 2015) IACS Unified Interpretations for the application Document is
of MODU Code Chapter 2 paragraphs 2.1,2.2, applied from
2.3, 2.4 and revised technical provisions for means 1 January 2017 of access for inspections (resolution MSC. 158(78))
Применение: Правила классификации, постройки и оборудования плавучих буровых установок и морских стационарных платформ (2014), часть III, пункт 9.3.1.1.
Application: Rules for the Classification, Construction and Equipment of Mobile Offshore Drilling Units and Fixed Offshore Platforms (2014), Part III, para 9.3.1.1.
Рекомендации MAKO IACS Recommendations
Номер документа Название документа
Document number Document name
1. Rec. No. 47 (Rev.7 June 2013) Shipbuilding and Repair Quality Standard
Применение: Правила классификационных освидетельствований судов в эксплуатации (2017), часть I (пункт 5.13), приложение 2 (пункт 5.1.12), приложение 3 (пункт 7).
Правила технического наблюдения за постройкой судов и изготовлением материалов и изделий для судов, часть I, приложение 3 (пункт 7.4)
Application: Rules for the Classification Surveys of Ships in Service (2017), Part I (para 5.13), Appendix 2 (para
5.1.12) , Appendix 3 (para 7).
Rules for Technical Supervision during Construction of Ships and Manufacture of Materials and Products for Ships, Part I, Appendix 3 (para 7.4)
2. Rec. No. 55 (Rev.1 June 2016) General Cargo Ships - Guidance for Surveys, Assessment
and Repair of Hull Structure Применение: Правила классификационных освидетельствований судов в эксплуатации (2017), часть I (пункт 5.13), приложение 2 (пункт 5.1.12), приложение 3 (пункт 6).
Методические рекомендации по техническому наблюдению за ремонтом морских судов с Приложениями (2016), Приложение 1.
Application: Rules for the Classification Surveys of Ships in Service (2017), Part I (para 5.13), Appendix 2 (para
5.1.12) , Appendix 3 (para 6).
3. Rec. No. 76 (Corr.1 Sept 2007) IACS Guidelines for Surveys, Assessment and
Repair of Hull Structure - Bulk Carriers Применение: Правила классификационных освидетельствований судов в эксплуатации (2017), часть I (пункт 5.13), приложение 2 (пункт 5.1.12), приложение 3 (пункт 2).
Методические рекомендации по техническому наблюдению за ремонтом морских судов с Приложениями (2016), Приложение 1.
Application: Rules for the Classification Surveys of Ships in Service (2017), Part I (para 5.13), Appendix 2 (para
5.1.12) , Appendix 3 (para 2).
4. Rec. No. 96 (April 2007) Double Hull Oil Tankers - Guidelines for Surveys,
Assessment and Repair of Hull Structures Применение: Правила классификационных освидетельствований судов в эксплуатации (2017), часть I (пункт 5.13), приложение 2 (пункт 5.1.12), приложение 3 (пункт 10).
Методические рекомендации по техническому наблюдению за ремонтом морских судов с Приложениями (2016), Приложение 1.
Application: Rules for the Classification Surveys of Ships in Service (2017), Part I (para 5.13), Appendix 2 (para
5.1.12) , Appendix 3 (para 10).
5. Rec. No. 132 (Dec 2013) Human Element Recommendations for structural design of lighting,
ventilation, vibration, noise, access & egress arrangements
Применение: Руководство по освидетельствованию условий труда и отдыха моряков на соответствие
требованиям Конвенции 2006 года о труде в морском судоходстве (2016), пункты 2.1.22, 4.7.3. Руководство по освидетельствованию жилых помещений экипажа (2015), пункты 2.1.16,
4.1.2.8.
Application: Guidelines on On-board Maritime Labour Convention, 2006 (MLC) Inspection (2016), paras 2.1.22, 4.7.3.
Guidelines on On-board Inspection for Crew Accomodation (2015), paras 2.1.16, 4.1.2.8.
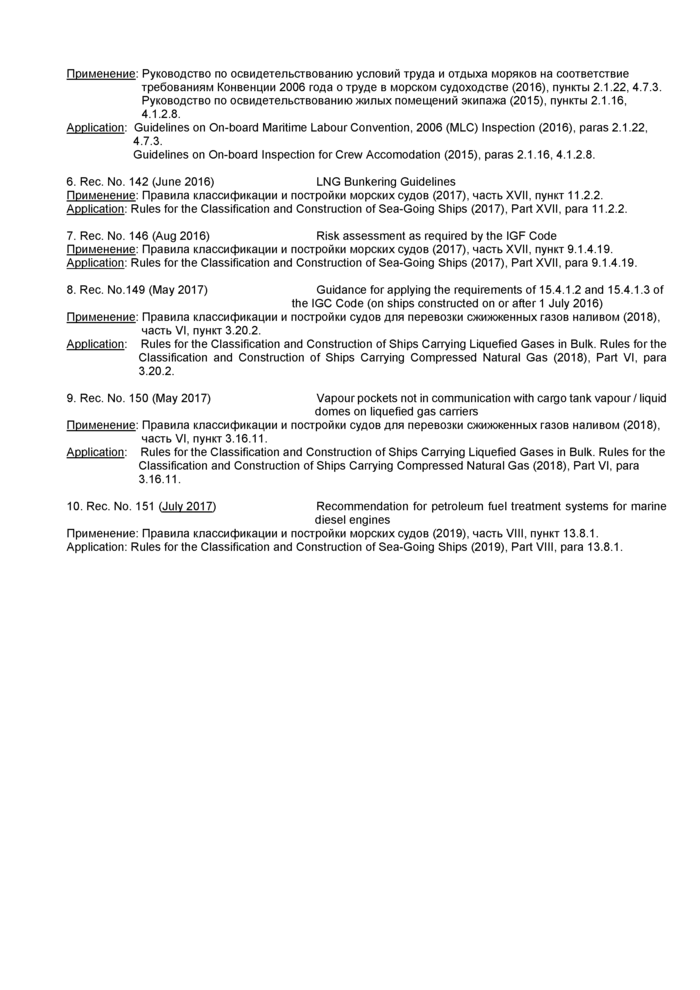
6. Rec. No. 142 (June 2016) LNG Bunkering Guidelines
Применение: Правила классификации и постройки морских судов (2017), часть XVII, пункт 11.2.2.
Application: Rules for the Classification and Construction of Sea-Going Ships (2017), Part XVII, para 11.2.2.
7. Rec. No. 146 (Aug 2016) Risk assessment as required by the IGF Code
Применение: Правила классификации и постройки морских судов (2017), часть XVII, пункт 9.1.4.19.
Application: Rules for the Classification and Construction of Sea-Going Ships (2017), Part XVII, para 9.1.4.19.
8. Rec. No.149 (May 2017) Guidance for applying the requirements of 15.4.1.2 and 15.4.1.3 of
the IGC Code (on ships constructed on or after 1 July 2016)
Применение: Правила классификации и постройки судов для перевозки сжижженных газов наливом (2018), часть VI, пункт 3.20.2.
Application: Rules for the Classification and Construction of Ships Carrying Liquefied Gases in Bulk. Rules for the
Classification and Construction of Ships Carrying Compressed Natural Gas (2018), Part VI, para 3.20.2.
9. Rec. No. 150 (May 2017) Vapour pockets not in communication with cargo tank vapour / liquid
domes on liquefied gas carriers
Применение: Правила классификации и постройки судов для перевозки сжижженных газов наливом (2018), часть VI, пункт 3.16.11.
Application: Rules for the Classification and Construction of Ships Carrying Liquefied Gases in Bulk. Rules for the
Classification and Construction of Ships Carrying Compressed Natural Gas (2018), Part VI, para 3.16.11.
10. Rec. No. 151 (July 2017) Recommendation for petroleum fuel treatment systems for marine
diesel engines
Применение: Правила классификации и постройки морских судов (2019), часть VIII, пункт 13.8.1.
Application: Rules for the Classification and Construction of Sea-Going Ships (2019), Part VIII, para 13.8.1.
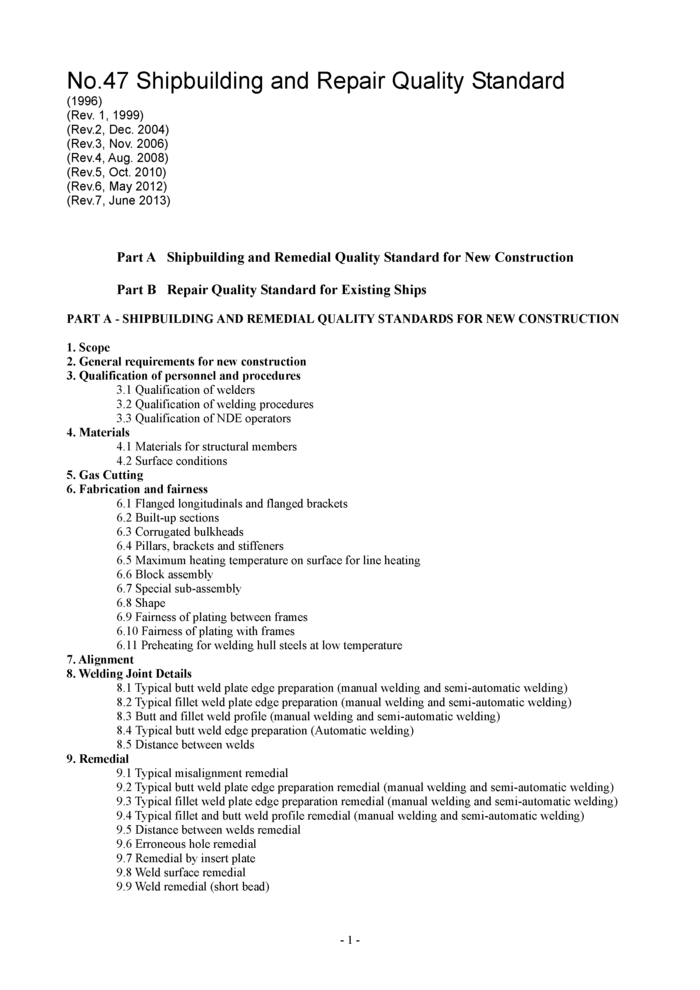
РЕКОМЕНДАЦИИ МАКО IACS
RECOMMENDATIONS
No.47 Shipbuilding and Repair Quality Standard
(1996)
(Rev. 1, 1999)
(Rev.2, Dec. 2004)
(Rev.3, Nov. 2006)
(Rev.4, Aug. 2008)
(Rev.5, Oct. 2010)
(Rev.6, May 2012)
(Rev.7, June 2013)
Part A Shipbuilding and Remedial Quality Standard for New Construction Part В Repair Quality Standard for Existing Ships PART A - SHIPBUILDING AND REMEDIAL QUALITY STANDARDS FOR NEW CONSTRUCTION
1. Scope
2. General requirements for new construction
3. Qualification of personnel and procedures
3.1 Qualification of welders
3.2 Qualification of welding procedures
3.3 Qualification of NDE operators
4. Materials
4.1 Materials for structural members
4.2 Surface conditions
5. Gas Cutting
6. Fabrication and fairness
6.1 Flanged longitudinals and flanged brackets
6.2 Built-up sections
6.3 Corrugated bulkheads
6.4 Pillars, brackets and stiffeners
6.5 Maximum heating temperature on surface for line heating
6.6 Block assembly
6.7 Special sub-assembly
6.8 Shape
6.9 Fairness of plating between frames
6.10 Fairness of plating with frames
6.11 Preheating for welding hull steels at low temperature
7. Alignment
8. Welding Joint Details
8.1 Typical butt weld plate edge preparation (manual welding and semi-automatic welding)
8.2 Typical fillet weld plate edge preparation (manual welding and semi-automatic welding)
8.3 Butt and fillet weld profile (manual welding and semi-automatic welding)
8.4 Typical butt weld edge preparation (Automatic welding)
8.5 Distance between welds
9. Remedial
9.1 Typical misalignment remedial
9.2 Typical butt weld plate edge preparation remedial (manual welding and semi-automatic welding)
9.3 Typical fillet weld plate edge preparation remedial (manual welding and semi-automatic welding)
9.4 Typical fillet and butt weld profile remedial (manual welding and semi-automatic welding)
9.5 Distance between welds remedial
9.6 Erroneous hole remedial
9.7 Remedial by insert plate
9.8 Weld surface remedial
9.9 Weld remedial (short bead)
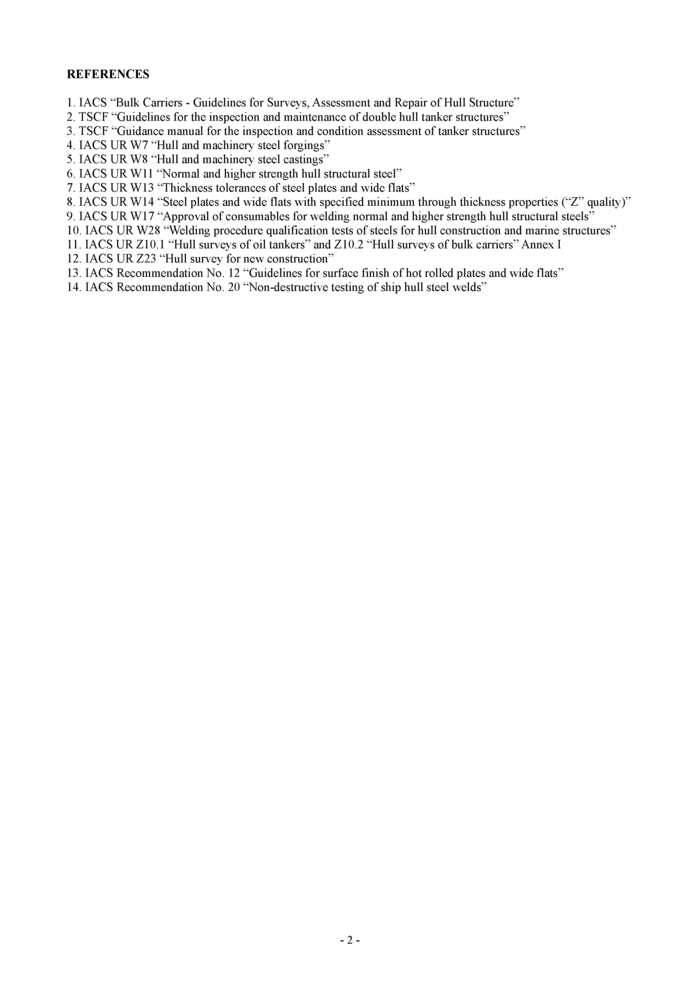
REFERENCES
1. IACS “Bulk Carriers - Guidelines for Surveys, Assessment and Repair of Hull Structure”
2. TSCF “Guidelines for the inspection and maintenance of double hull tanker structures”
3. TSCF “Guidance manual for the inspection and condition assessment of tanker structures”
4. IACS UR W7 “Hull and machinery steel forgings”
5. IACS UR W8 “Hull and machinery steel castings”
6. IACS UR Wll “Normal and higher strength hull structural steel”
7. IACS UR W13 “Thickness tolerances of steel plates and wide flats”
8. IACS UR W14 “Steel plates and wide flats with specified minimum through thickness properties (“Z” quality)”
9. IACS UR W17 “Approval of consumables for welding normal and higher strength hull structural steels”
10. IACS UR W28 “Welding procedure qualification tests of steels for hull construction and marine structures”
11. IACS URZ10.1 “Hull surveys of oil tankers” and Z10.2 “Hull surveys of bulk carriers” Annex I
12. IACS UR Z23 “Hull survey for new construction”
13. IACS Recommendation No. 12 “Guidelines for surface finish of hot rolled plates and wide flats”
14. IACS Recommendation No. 20 “Non-destructive testing of ship hull steel welds”
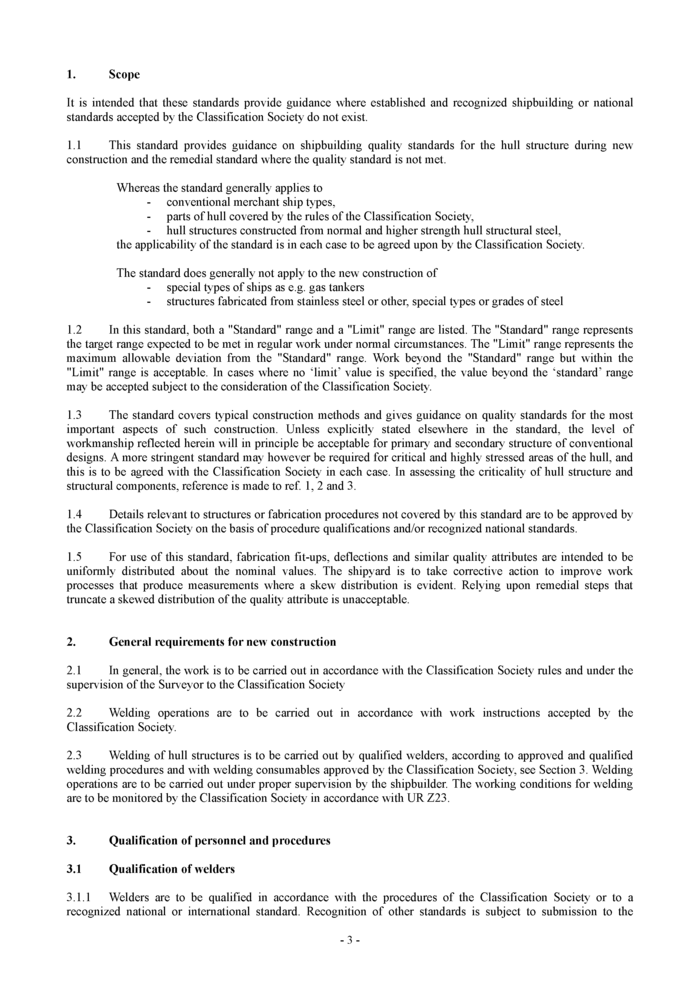
Scope
1.
1.
It is intended that these standards provide guidance where established and recognized shipbuilding or national standards accepted by the Classification Society do not exist.
1.1 This standard provides guidance on shipbuilding quality standards for the hull structure during new construction and the remedial standard where the quality standard is not met.
Whereas the standard generally applies to
conventional merchant ship types,
parts of hull covered by the rules of the Classification Society, hull structures constructed from normal and higher strength hull structural steel, the applicability of the standard is in each case to be agreed upon by the Classification Society.
The standard does generally not apply to the new construction of special types of ships as e.g. gas tankers
structures fabricated from stainless steel or other, special types or grades of steel
1.2 In this standard, both a "Standard" range and a "Limit" range are listed. The "Standard" range represents the target range expected to be met in regular work under normal circumstances. The "Limit" range represents the maximum allowable deviation from the "Standard" range. Work beyond the "Standard" range but within the "Limit" range is acceptable. In cases where no ‘limit’ value is specified, the value beyond the ‘standard’ range may be accepted subject to the consideration of the Classification Society.
1.3 The standard covers typical construction methods and gives guidance on quality standards for the most important aspects of such construction. Unless explicitly stated elsewhere in the standard, the level of workmanship reflected herein will in principle be acceptable for primary and secondary structure of conventional designs. A more stringent standard may however be required for critical and highly stressed areas of the hull, and this is to be agreed with the Classification Society in each case. In assessing the criticality of hull structure and structural components, reference is made to ref. 1, 2 and 3.
1.4 Details relevant to structures or fabrication procedures not covered by this standard are to be approved by the Classification Society on the basis of procedure qualifications and/or recognized national standards.
1.5 For use of this standard, fabrication fit-ups, deflections and similar quality attributes are intended to be uniformly distributed about the nominal values. The shipyard is to take corrective action to improve work processes that produce measurements where a skew distribution is evident. Relying upon remedial steps that truncate a skewed distribution of the quality attribute is unacceptable.
2. General requirements for new construction
2.1 In general, the work is to be carried out in accordance with the Classification Society rules and under the supervision of the Surveyor to the Classification Society
2.2 Welding operations are to be carried out in accordance with work instructions accepted by the Classification Society.
2.3 Welding of hull structures is to be carried out by qualified welders, according to approved and qualified welding procedures and with welding consumables approved by the Classification Society, see Section 3. Welding operations are to be carried out under proper supervision by the shipbuilder. The working conditions for welding are to be monitored by the Classification Society in accordance with UR Z23.
3. Qualification of personnel and procedures3.1 Qualification of welders
3.1.1 Welders are to be qualified in accordance with the procedures of the Classification Society or to a recognized national or international standard. Recognition of other standards is subject to submission to the
-3 -
Classification Society for evaluation. Subcontractors are to keep records of welders qualification and, when required, furnish valid approval test certificates.
3.1.2 Welding operators using fully mechanized or fully automatic processes need generally not pass approval testing provided that the production welds made by the operators are of the required quality. However, operators are to receive adequate training in setting or programming and operating the equipment. Records of training and operation experience shall be maintained on individual operator’s files and records, and be made available to the Classification Society for inspection when requested.
3.2 Qualification of welding procedures
Welding procedures are to be qualified in accordance with URW28 or other recognized standard accepted by the Classification Society.
3.3 Qualification of NDE operators
Personnel performing non-destructive examination for the purpose of assessing quality of welds in connection with new construction covered by this standard, are to be qualified in accordance with Classification Society rules or to a recognized international or national qualification scheme. Records of operators and their current certificates are to be kept and made available to the Surveyor for inspection.
4. Materials4.1 Materials for Structural Members
All materials, including weld consumables, to be used for the structural members are to be approved by the Classification Society as per the approved construction drawings and meet the respective IACS Unified Requirements. Additional recommendations are contained in the following paragraphs.
All materials used should be manufactured at a works approved by the Classification Society for the type and grade supplied.
4.2 Surface Conditions4.2.1 Definitions
Pitting, rolled-in scale, indentations, roll marks, scratches and grooves Cracks, shells, sand patches, sharp edged seams and minor imperfections exceeding the limits of table 1
The depth is to be measured from the surface of the product
Pitting, rolled-in scale, indentations, roll marks, scratches and grooves Cracks, shells, sand patches, sharp edged seams and minor imperfections exceeding the limits of table 1
The depth is to be measured from the surface of the product
Minor Imperfections:
Defects:
Depth of Imperfections or defects
4.2.2 Acceptance without remedies
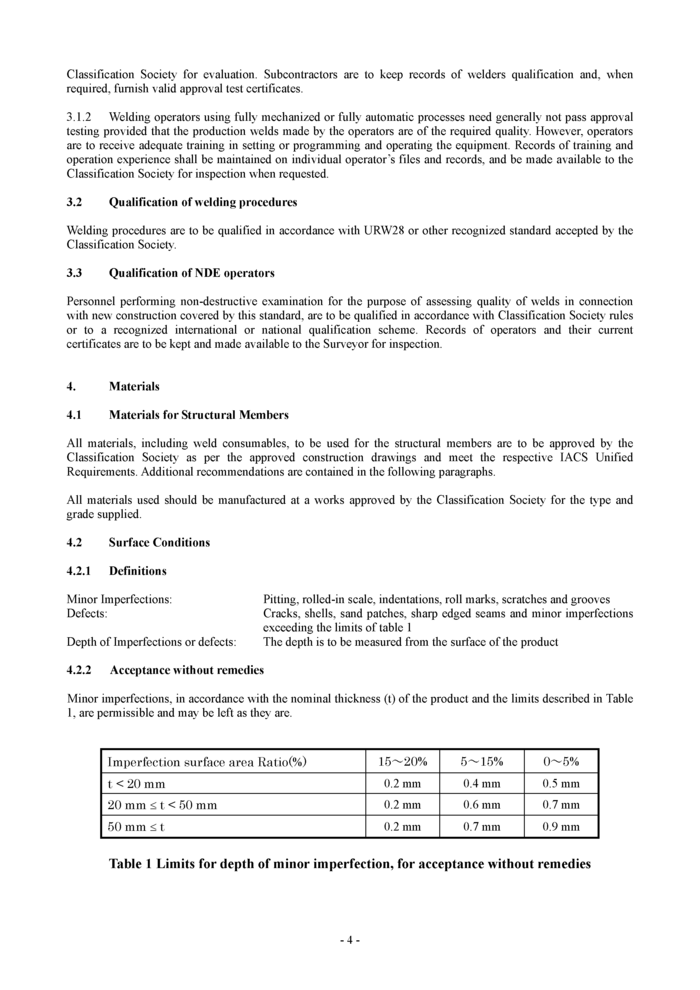
Minor imperfections, in accordance with the nominal thickness (t) of the product and the limits described in Table 1, are permissible and may be left as they are.
| ||||||||||||||||
|
Table 1 Limits for depth of minor imperfection, for acceptance without remedies |